Vulnerability Assessment
Guardium Vulnerability Assessment helps identify and address database vulnerabilities. The assessment process evaluates and suggests actions to improve the health of your database environment. Guardium provides predefined tests that you can add to security assessments, and you can define custom tests. In this exercise, you perform the following tasks:
- Grant permissions to create and run security assessments
- Create and run a security assessment
- Use the report to harden database and validate assessment
- Create an exception to test the assessment
Running a Vulnerability Assessment
To create and run security assessments, a Guardium user must have the vulnerability-assess role. In an environment with multiple managed units and a central manager, the user role must be granted on the central manager.
In this task, you verify that the admin user has the vulnerability assessment role and access to the vulnerability assessment tools.
Granting permissions to create and run security assessments
To create and run security assessments, a Guardium user must have the vulnerability-assess role. In an environment with multiple managed units and a central manager, the user role must be granted on the central manager.
In this lab, we verify that the admin user has the vulnerability assessment role and access to the vulnerability assessment tools.
- Log in to the MA170 Guardium graphical console as user
labaccessmgrwith passwordP@ssw0rd.
Roles are managed from the central manager, in this case MA170.
- Click Access > Access Management

-
To view the roles for user
labadmin, click Roles. -
To enable vulnerability assessment for user
labadmin, scroll down, ensure the vulnerability-assess role is selected, and click Save.

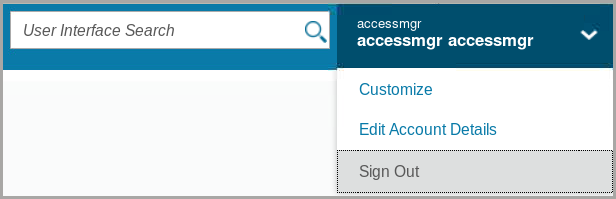
- To log out as user
labaccessmgr, from the account menu on the blue banner on the upper-right quadrant of the screen, click Sign Out.
Creating and running a security assessment
After you verify that the Guardium user has the correct role, you create, configure, and run a security assessment. A security assessment is associated with a datasource or a group of datasources. Each datasource contains the connection information that Guardium uses to access and run tests on a database. Add Guardium predefined tests to control what the assessment checks.
Generally, an assessment is an iterative process. You develop an action plan that prioritizes which vulnerabilities to concentrate on. The assessment is run periodically, and assessment results detail the progress in remediating vulnerabilities. After you fix the highest priority problems, you can address the lower priority tests.
In this section of the lab, we log in to the collector to create and use the assessment
-
Log in to the Guardium collector (C200) console as user
labadminwith passwordP@ssw0rd -
To begin the assessment, in the left navigation menu, go to Harden > Vulnerability Assessment > Assessment Builder.

- To add a test, click Create

-
For Description, type
Lab_VAand click Apply. -
To add a classification datasource, click Add Datasource.

- Select the raptor_DB2_DB2INST1 datasource and click Save.
The datasource is added to the security assessment.

Note that the datasource is listed but Configure Tests is not enabled
- To enable Configure Tests, click Apply.
You set up a security assessment and created a datasource for it to use. Now, you specify which tests the assessment runs.
- To configure the tests, click Configure Tests.

Vulnerability assessment is an iterative process. Generally, you initially choose only a high priority subset of available tests. After you resolve the security concerns for these tests, you can incorporate lower priority tests into the assessment.
- To filter the tests, select Severity Critical.

- Scroll down and select the DB2 tab.

Critical tests for the IBM® Db2® database are displayed.
- To select all critical tests, click the first test in the list, scroll down, press the Shift key, and click the last test on the list.

- Click Add Selections

-
To return to the Security Assessment Finder window, scroll down and click Return.
-
To run the security assessment, click Run Once Now.

-
On the confirmation window that indicates the test is in the Guardium job queue, click OK.
-
In the left navigation menu, go to Harden > Vulnerability Assessment > Guardium Job Queue.

- If the job does not have a status of COMPLETED, click Refresh
Keep in mind it might take a few minutes for the job queue to run, so wait a bit and refresh the page to see the completed job
- View a comprehensive report available through the Security Assessment Builder.
a. In the left navigation menu, go to Harden > Vulnerability Assessment > Assessment Builder
b. Lab_VA is autoselected. Click View Results
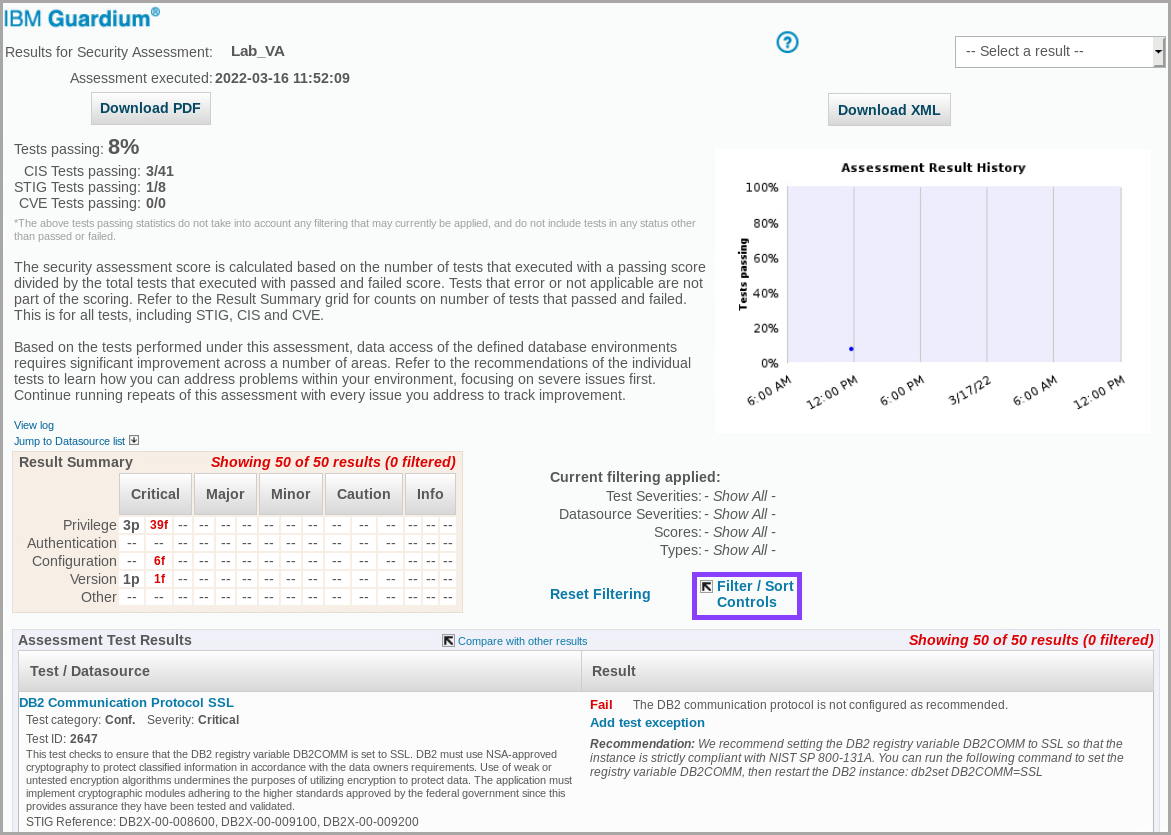
- Explore the various features of the report.
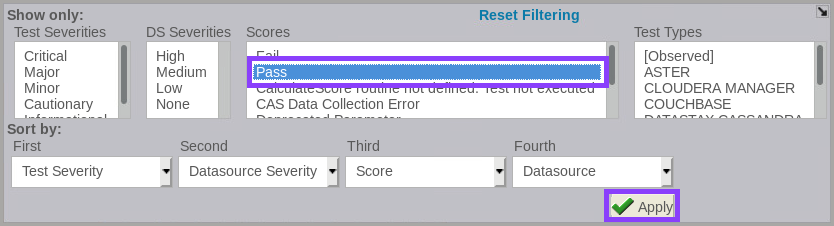
a. Click Filter / Sort Control.
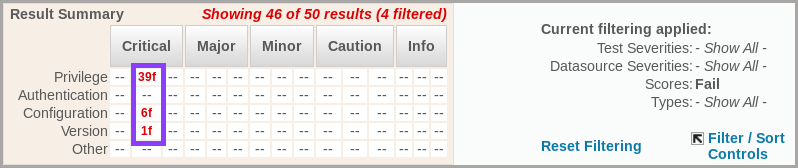
b. In the Show only window, from the Score column, select Fail and click Apply.
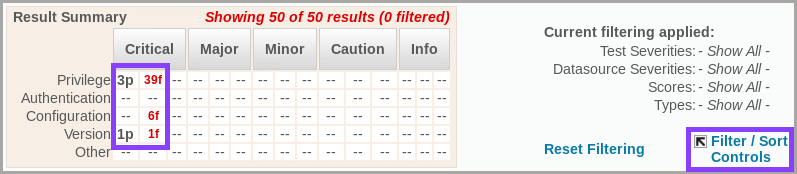
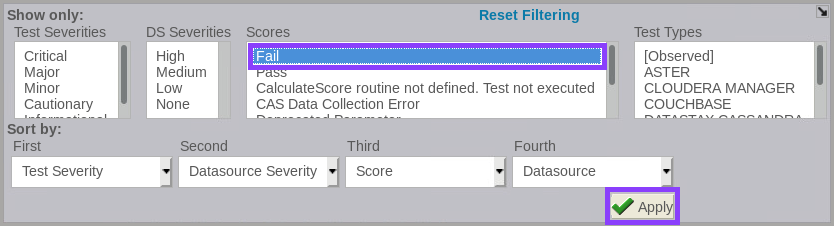
With this filtering criteria the results are filtered to show only assessment failures.
c. To download a PDF file of the security assessment, click Download PDF and click OK to close the open window. Then, select Open with Document viewer (default) and click OK.
- To return to the browser version of the report, close the PDF.
Using assessment results to harden the database
Fixing vulnerabilities is an iterative process. The security assessment report provides not only a picture of which tests failed, but a set of suggested actions to fix the vulnerabilities revealed by the failed tests. After you apply recommendations, you run the report again to determine which vulnerabilities remain. Repeat the process until your environment complies with organizational standards.
In this section of the lab we will learn how to use the report to harden a database.
- In the security assessment report, scroll through the assessment test results.
You will notice that the tests that failed have recommendations, including suggested commands, to fix the vulnerability.
- Locate the assessment tests with the following names:
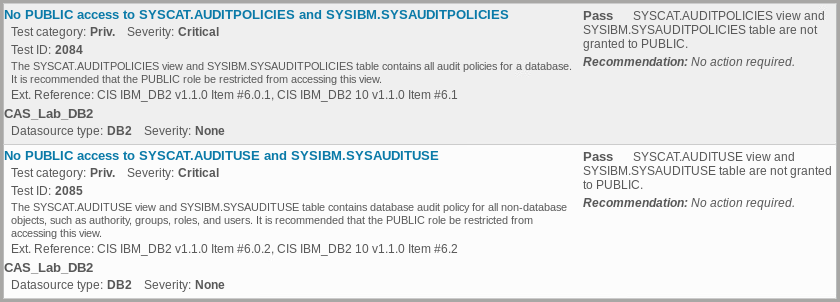
– No PUBLIC access to SYSCAT.AUDITPOLICIES and SYSIBM.SYSAUDITPOLICIES
– No PUBLIC access to SYSCAT.AUDITUSE and SYSIBM.SYSAUDITUSE
Note the cause of failure and the recommendations, which includes the database commands to remediate the failures.
-
Close the report window.
-
Now, we can run the SQL commands on the database server to remediate the failures. To access the database server, open a terminal console.
-
In the console, change to the
db2inst1user with the following command:
su - db2inst1bash
- To enter the Db2 command environment, run the
db2command in your terminal after changing the user.

- To connect to the database, use the following command:
connect to samplebash
- Apply the recommendations from the two tests in step 2 of the assessment.
Recommendations often contain two commands to run, separated by a period. When you have two commands, run them as two separate commands. For this lab, we only have one so run each command separately:
REVOKE ALL ON SYSIBM.SYSAUDITPOLICIES FROM PUBLICbash
REVOKE ALL ON SYSCAT.AUDITPOLICIES FROM PUBLICbash
REVOKE ALL ON SYSCAT.AUDITUSE FROM PUBLICbash
REVOKE ALL ON SYSIBM.SYSAUDITUSE FROM PUBLICbash

-
Return to the Guardium console on C200. and access the Security Assessment Finder at Harden > Vulnerability Assessment > Assessment Builder.
-
To begin the second assessment, click Run Once Now.
-
On the confirmation window that indicates the test is in the Guardium job queue, click OK.
-
In the left navigation menu, go to Harden > Vulnerability Assessment > Guardium Job Queue.
-
If the job does not have a status of completed, click Refresh .
-
To view the results, go to Harden > Vulnerability Assessment > Assessment Builder.
-
To view the results of the assessment, click View Results.

Note that the result summary shows an improvement in the pass rate. The Assessment Result History graph displays the progress improvement.
- To filter the results to show only tests that have a status of Pass, click Filter / Sort Controls, from the Score column, select Pass, and click Apply.
- Scroll down and view the details of the vulnerabilities you addressed.
Creating an Exception
Sometimes you want an assessment test to apply generally to your environment, but you want to create an exception. For example, the test might require that no database users have a particular role, but some users need or require that role. In this situation, you can create a test exception. The test runs, but allows the exception. The exception is documented in the test results.
In this task, you create an exception and view the results.
-
Reset the filtering to show all results.
-
In the Assessment Test Results section, locate the Db2 Roles granted to PUBLIC test.

- Click the Db2 Roles granted to PUBLIC link.

- Click Create Test Details Exception

- Select SYSTS_USR
The Add exception link is enabled.

-
Click Add exception.
-
Change the End date to two days after your current date.
-
For End date time, choose 11:00 PM.
-
For Justification, type
Lab Exercise.

-
Click Save
-
Close the confirmation dialog.
-
In the Add to test details exception list, click Close.
The “Db2 Roles granted to PUBLIC” report details window now displays the test exception.

- Close the Db2 Roles granted to PUBLIC details window and close the security assessments results window.
In this lab, we learned how to use the following functionality from Guardium Data Protection:
- Grant permissions to create and run security assessments
- Create and run a security assessment
- Use the report to harden the database and validate the assessment
- Create an exception to test the assessment
Continue onward to Lab 205