SNO MAS Installation
If you are an IBM Business Partner or an IBMer, this is a skinny but complete guide to create a MAS Manage environment in IBM TechZone.
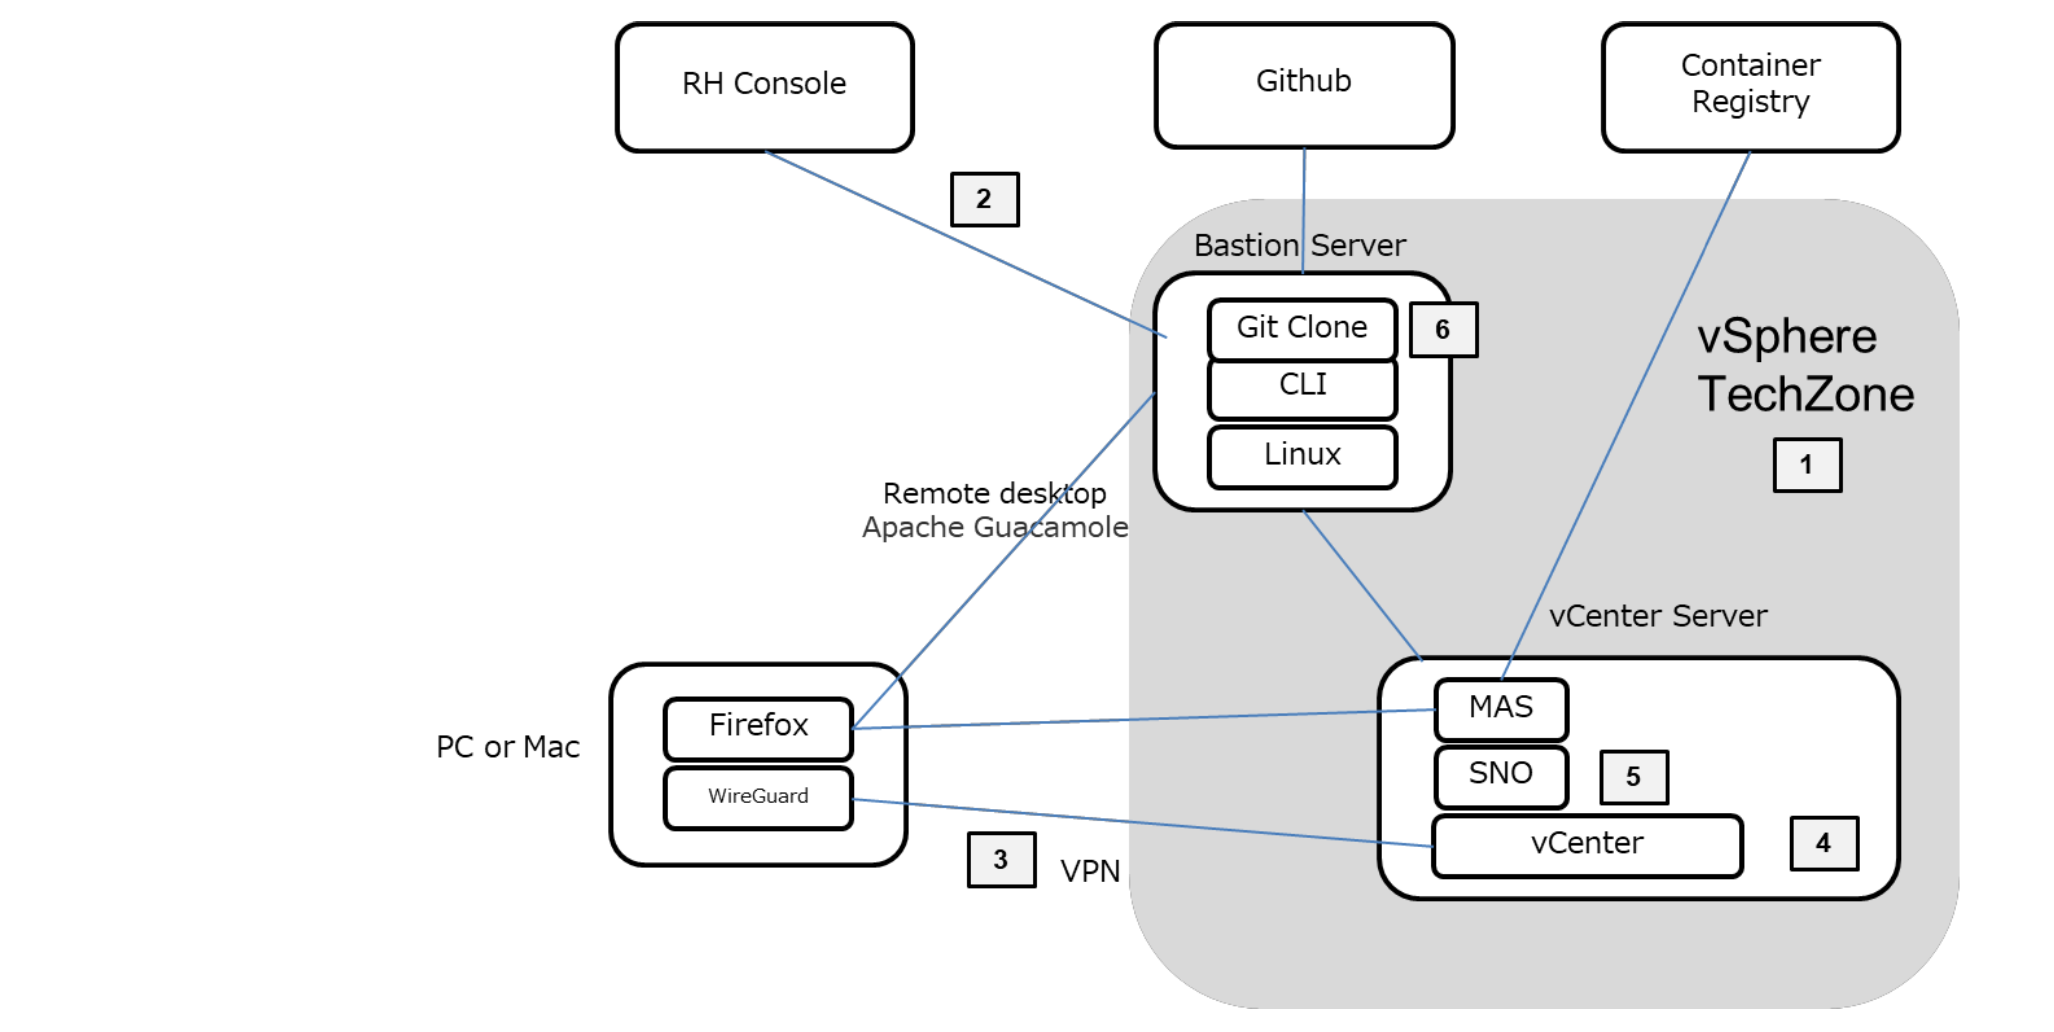
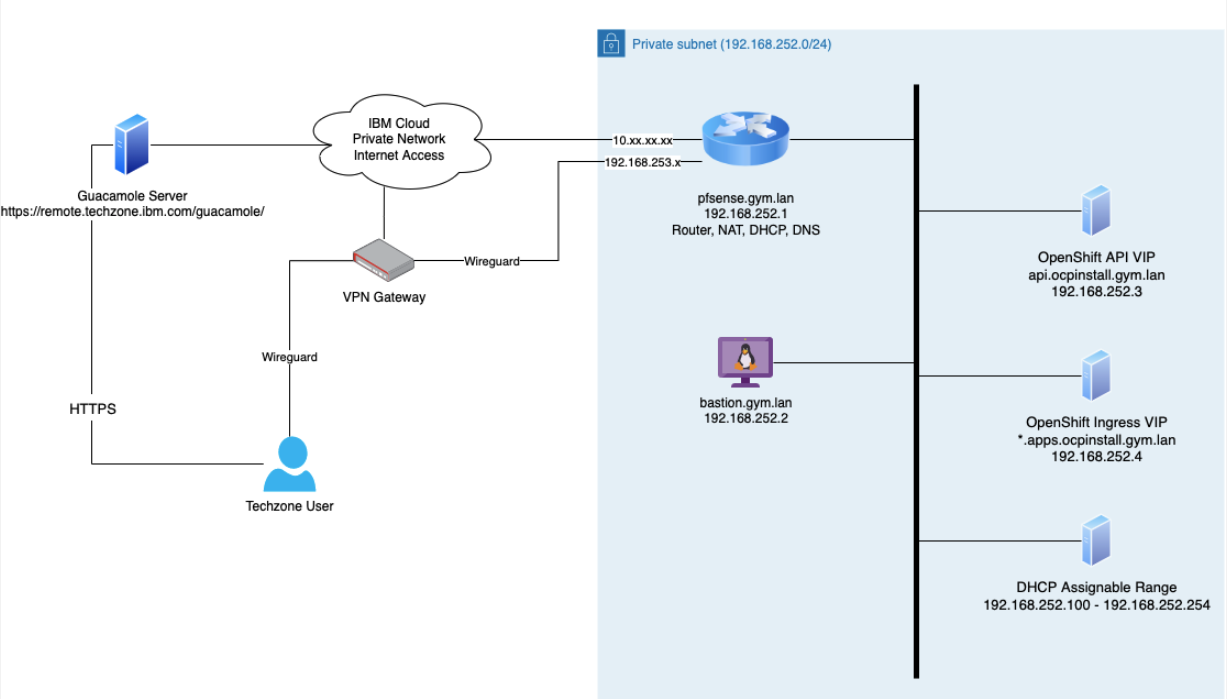
General diagram of Gym Network
At high level, the following steps are going to be described in this guide:
- How to create a vSphere-based environment in TechZone. This environment includes a Bastion
Server and a Router with DHCP, NAT and DNS. - The creation of an SNO iso file using the Red Hat Console and its download into the Bastion
Server - How to connect to the vSphere-based environment thru VPN
- The upload of the SNO iso file from the Bastion Server into vCenter
- How to create a VM instance that will run the SNO and use the uploaded iso file for booting
- How to clone from GitHub the Ansible collection that will be use to install MAS and run it
Create a vSphere-based environment in TechZone
-
Navigate to https://techzone.ibm.com/collection/ocp-gymnasium/environments and login using your IBMId
You will see following tile, click on Reserve button

-
In the Create a Reservation page input and click Submit button
Name: MAS SNO Workshop
Purpose: Practice / Self education
Purpose description: Educate myself how to install SNO and MAS
Preferred Geography: AMERICAS
VMware Datastore Size: 3 TB
VPN Access: Enable
You should also have received an email that “Your environment/access request is provisioning”
When the environment is ready, you will receive another email with subject “Your environment is ready”
- The environment that is being create contains a Bastion computer (RHEL based) and a Router (pfSense based). When it will be available, you can VPN into it and directly access the computers running in it.
Setting up the VPN is very simple. When the environment will be ready, you can click on the tile and you will see a page with lots of useful information. At the bottom of that page, you will find the button to download the Wireguard VPN configuration from reservation page.
Download the configuration, install Wireguard (https://www.wireguard.com/install/) if you don’t have it already and import the configuration. You can activate the VPN as needed and access also the OpenShift cluster we are going to deploy.
Creating new Cluster
-
Navigate to reserved instance in Techzone. Click on the blue button, which will open a new browser window. Click on the + signs to expand the sections:
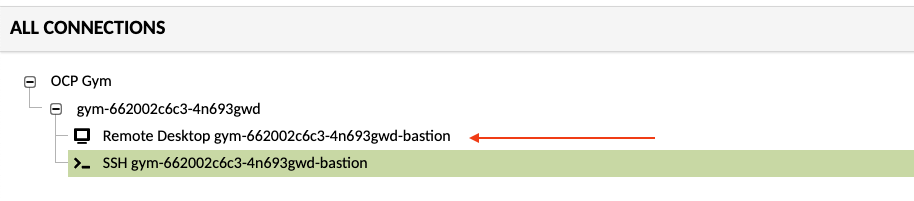
Click on the Remote Desktop option to open the Bastion remote desktop. The Bastion runs RHEL, therefore you can use the Activities button at the top left to open a tile and click on the Firefox icon.
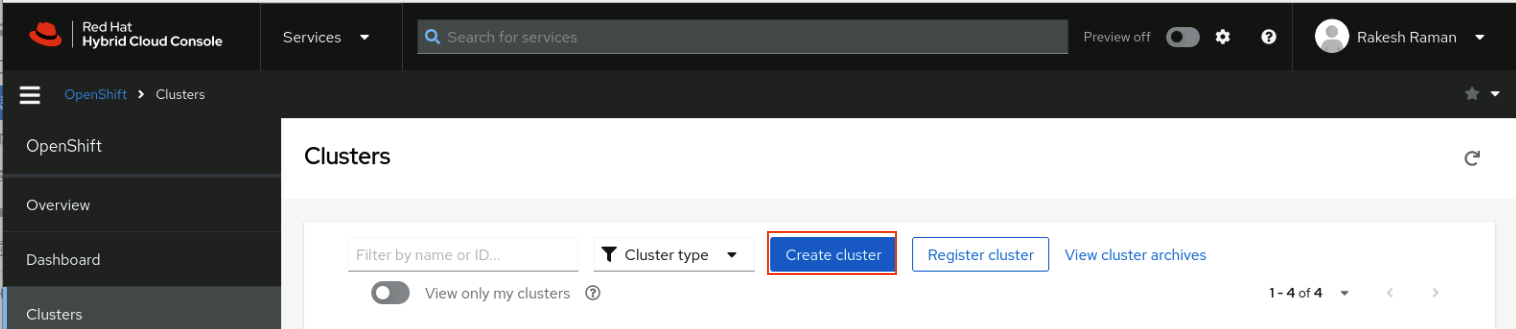
- Log into the Red Hat Console for OpenShift (https://console.redhat.com/openshift). You should see a blue Create cluster button. Click it.
Note: You can register, if you have not registered yet.
-
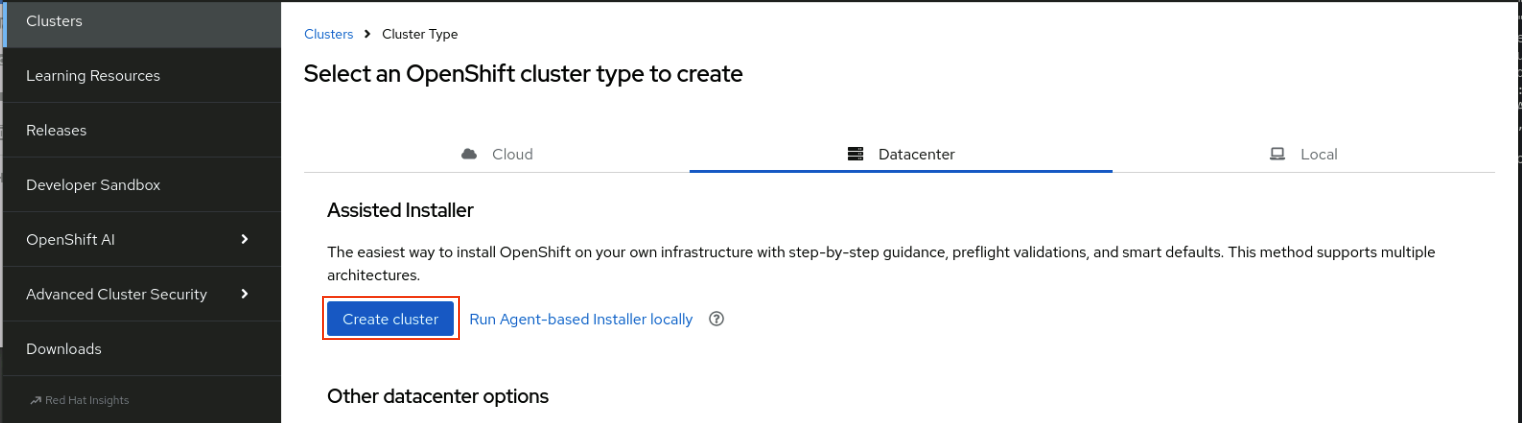
In the following screen, click on the Datacenter tab, and click on the blue Create cluster button.
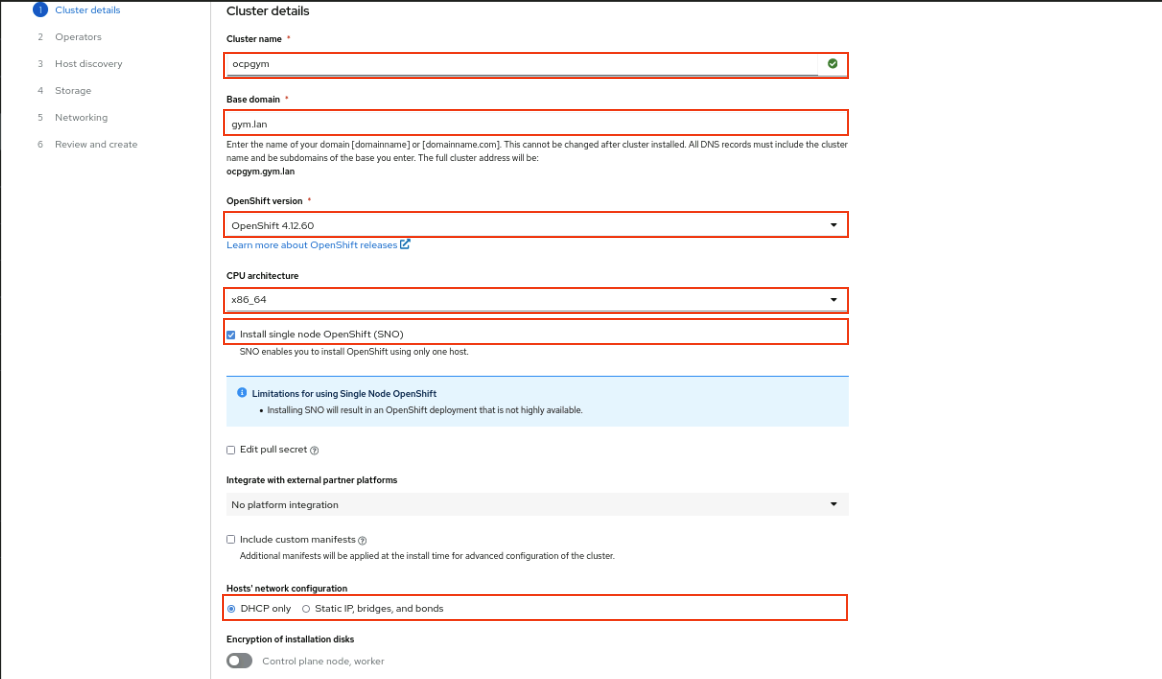
Fill the form that shows up in this way:
Cluster name: ocpgym
Base domain: gym.lan
OpenShift version: OCP 4.12.x
select “Install single node OpenShift (SNO)”
Hosts' network configuration: DHCP Only
-
Click the Next button. Don’t change anything in the next screen and click again Next.
-
Click the Add host button. In the dialog that will be shown, select Full image file: Download a self-contained ISO, upload your SSH public key and click on the Generate Discovery ISO button.
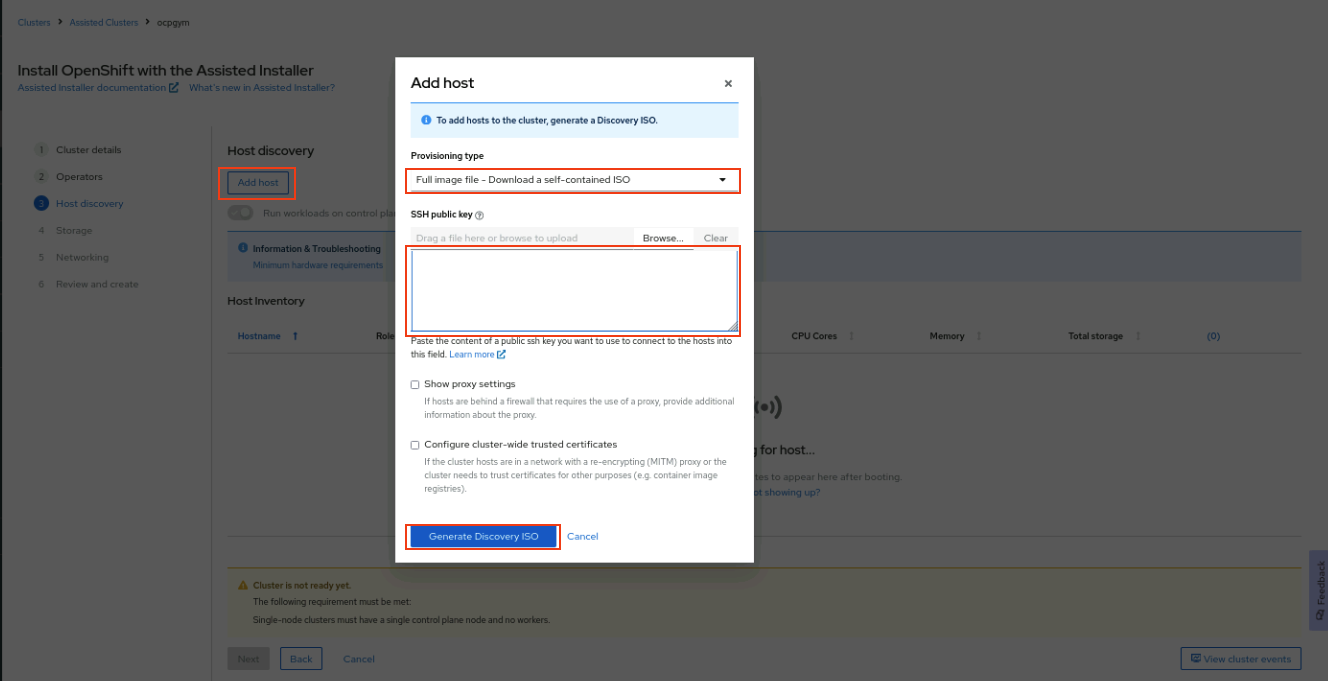
Note In case you have never used SSH and you need to generate your private/public keys, use the ssh-keygen tool. Open a Terminal window on the Bastion computer, type ssh-keygen and accept all the defaults (i.e. location of files, no passphrase, etc.). When done, you can find your SSH public key in the ~/.ssh folder. Keep in mind that you may also avoid to upload your SSH public key, but this will prevent you in the future from accessing the node using SSH.
$ ssh-keygen
$ cat .ssh/id_rsa.pub
bash- After the Discovery ISO has been generated, in the following dialog, click the Download Discovery ISO button and save the ISO file on the Bastion computer. It will have a filename like this: e430fdbb-8c63-4b42-b15f-62bd3d8fbef0-discovery.iso
Close the dialog. We’ll come back to this screen later, but now we want to upload the ISO into the TechZone vCenter.
Create a Virtual Machine in vSphere
-
In the Firefox window, notice that there is a predefined button to access the vCenter.
Click on that button. You can find credential for vCenter at the bottom of the Techzone reservation page.
-
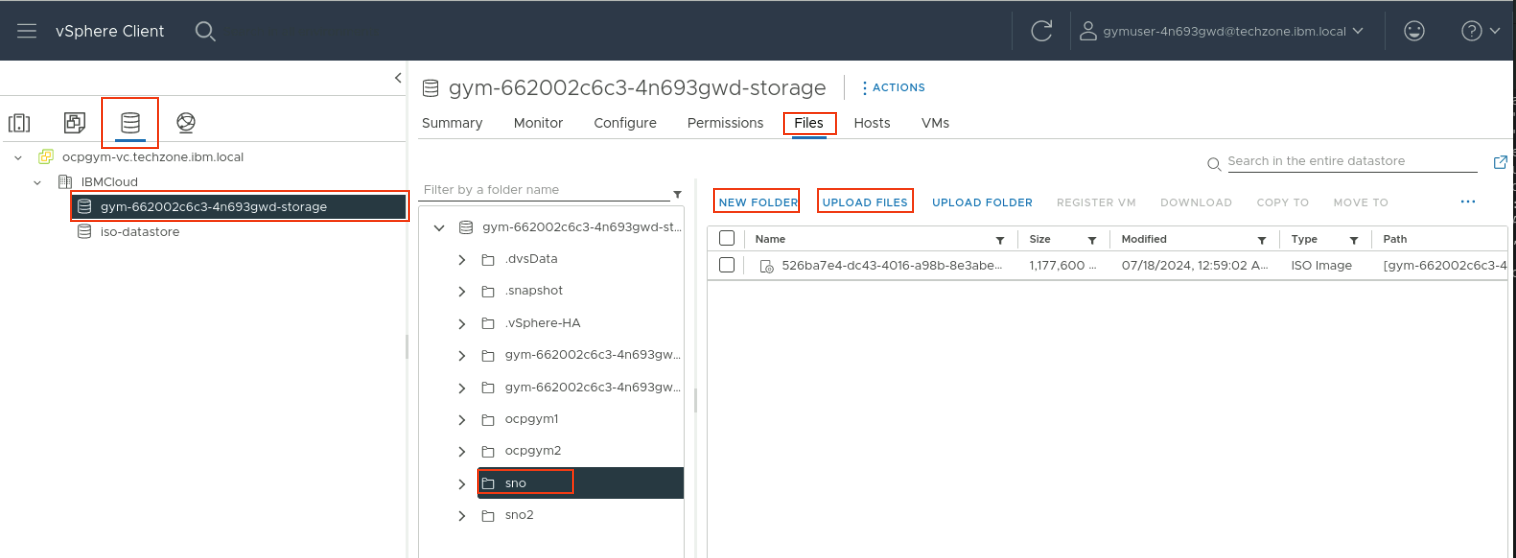
Once you login, At the top left of the screen you should see a symbol of a drum disk. Click on it. Open the pull down and select the storage with the name that start with “gym-“. On the right side select Files.
-
Create an iso folder called “sno” under the main storage element using the NEW FOLDER option shown in the previous picture. Click on the newly created sno folder and upload in it the ISO you downloaded from Red Hat using the UPLOAD FILES option. You can check the upload progress from the status window.
-
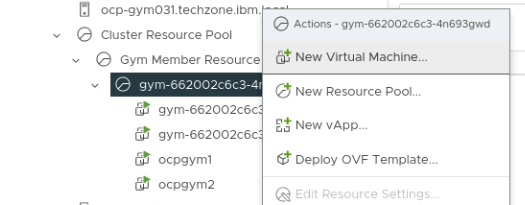
When the ISO has uploaded, we create a new VM that will become the Single Node OpenShift. Click on the servers icon at the top left of the screen and open all the sections

-
Right click on the resource pool highlighted and chose New Virtual Machine
-
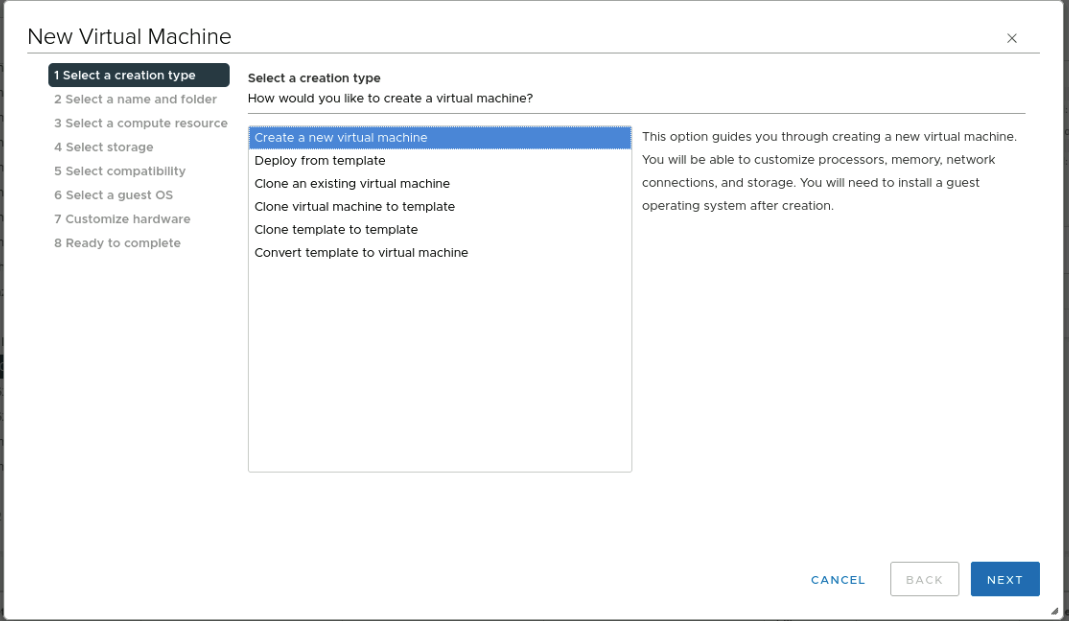
In the dialog that will be shown, select Create a new virtual machine and click Next
-
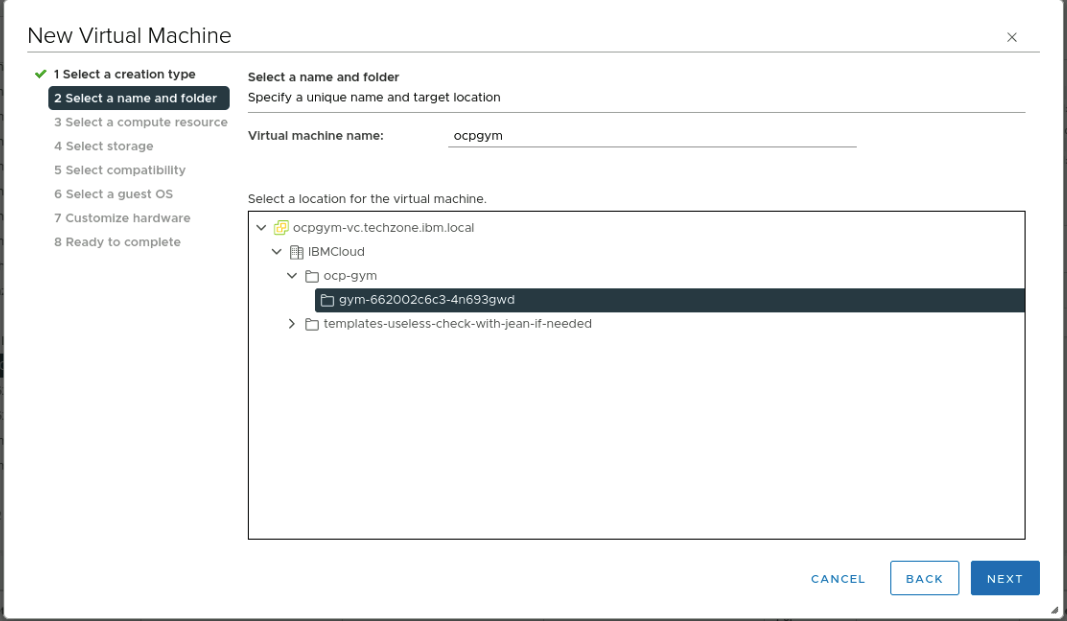
Set the virtual machine name as ocpgym and select the folder the one starting with gym-...
-
Click Next. Select the compute resource starting with gym-...

-
Click Next. Select the storage starting with gym-...
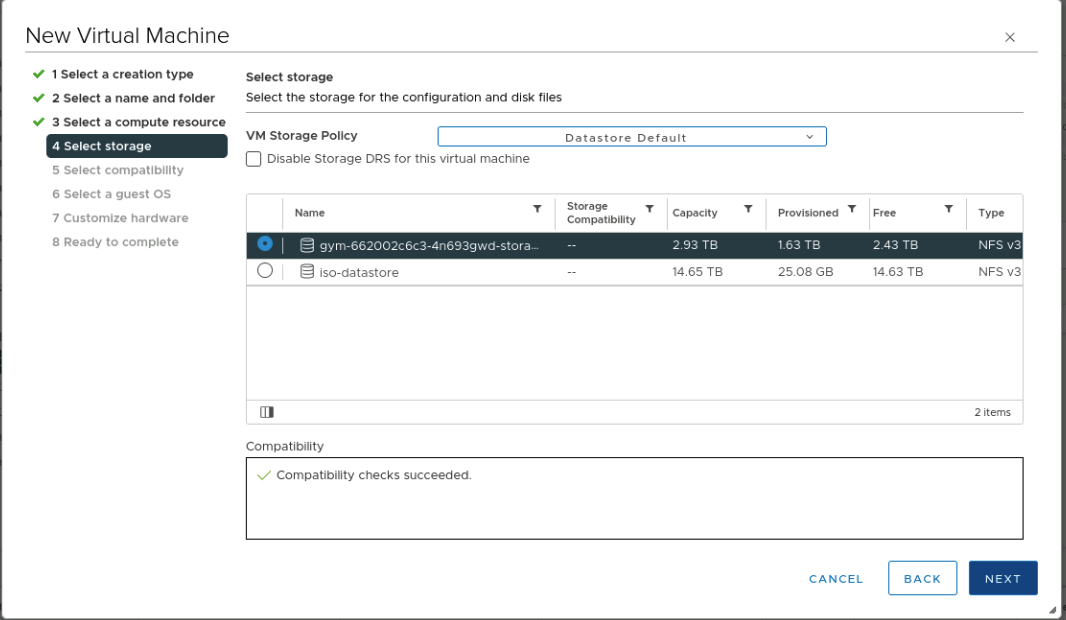
-
Click Next. Select compatibility ESXi 7.0 U2 and later.
-
Click Next. Select Guest OS Family Linux and Version RHEL 8 64 bit
-
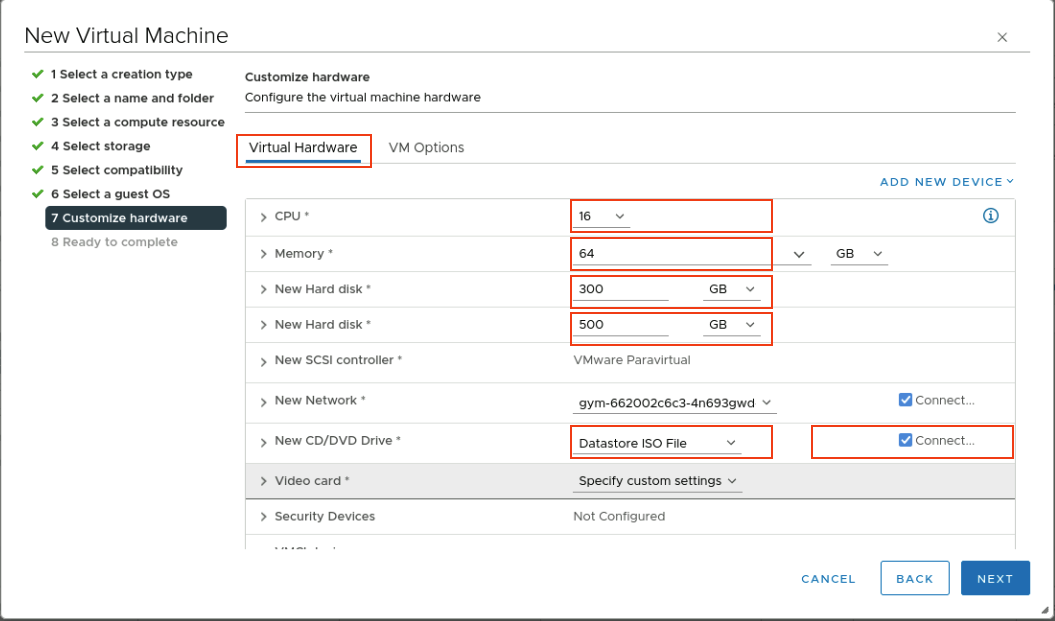
In the next panel set CPU to 16, memory to 64, primary disk 300 GB, use the ADD NEW DEVICE to add a secondary Hard Disk of 500 GB, set the New CD/DVD Drive to “Datastore ISO File” and select the ISO you uploaded before.
Make sure to select the Connect checkmark. The final result should look like the following picture.
-
At this point click on the VM Options tab and open the Advanced section. Find the Configuration Parameters section and click on EDIT CONFIGURATION. In the following panel, click on ADD CONFIGURATION PARAMS. Type in the name disk.EnableUUID and set the value to TRUE

Click OK on the Configuration Parameter panel.
- Click Next. Review one more time everything and click Finish.
The new VM should now show in your pool under the bastion and the router. Select it by clicking on it and start it by either typing crtl+alt+b or by right clicking and using the Power->Power ON menu item.
Installing OCP Cluster
-
Switch back to the Redhat Window where you have created new cluster. If you are on the host page, you should see a host appeared.
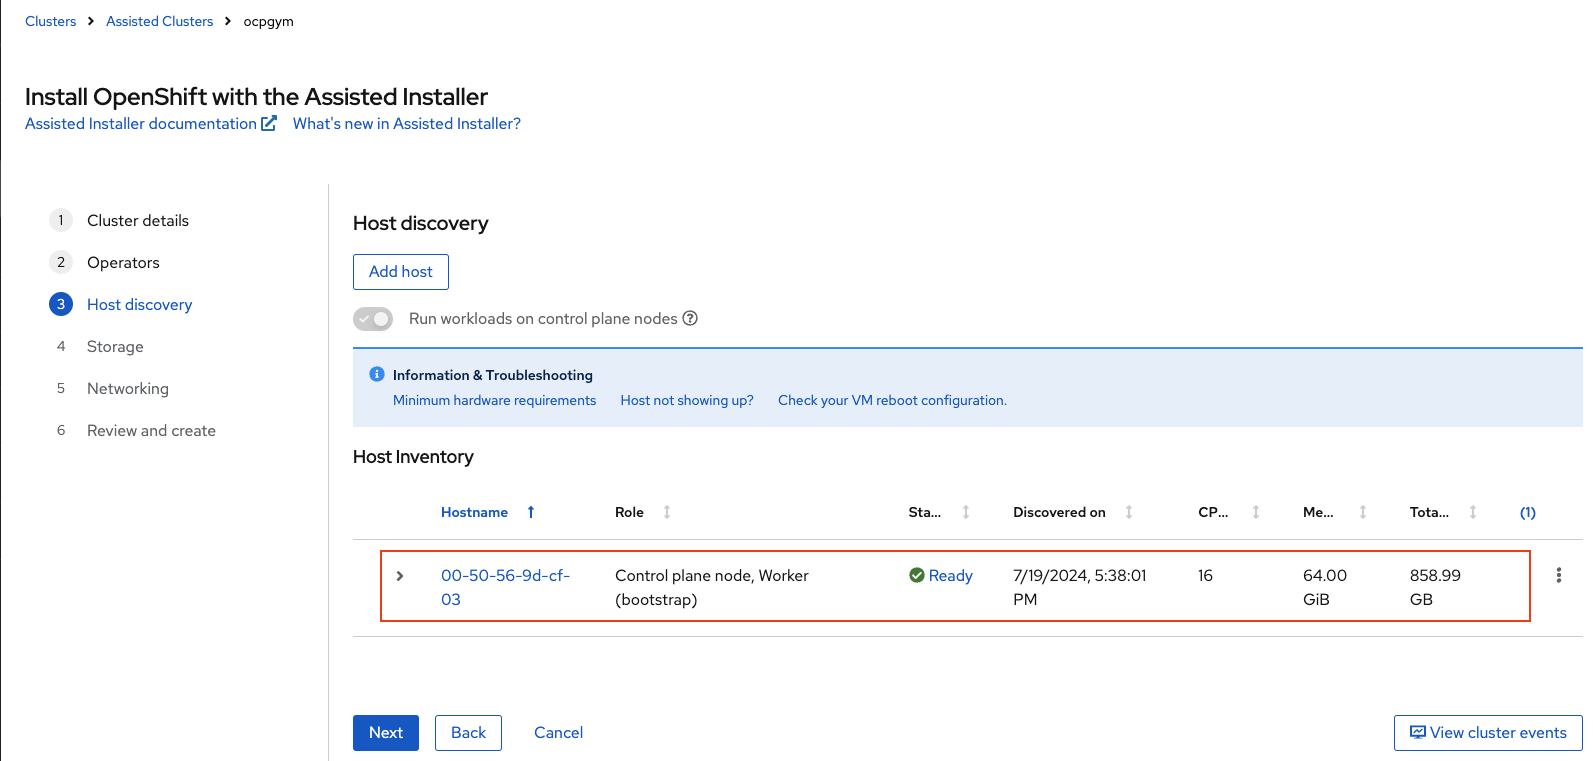
-
Change its hostname to ocpgym. The line should look like this:

-
Click Next. In the Storage screen click Next. In the Networking screen don’t change anything and click Next. Some times it takes a bit of time to get to a Ready state, due to NTP to be unreachable. Don’t worry, be patient and wait for the state to become ready and then click Next.
-
In the Review and create all the validations should be good and you can click the Install Cluster button.
-
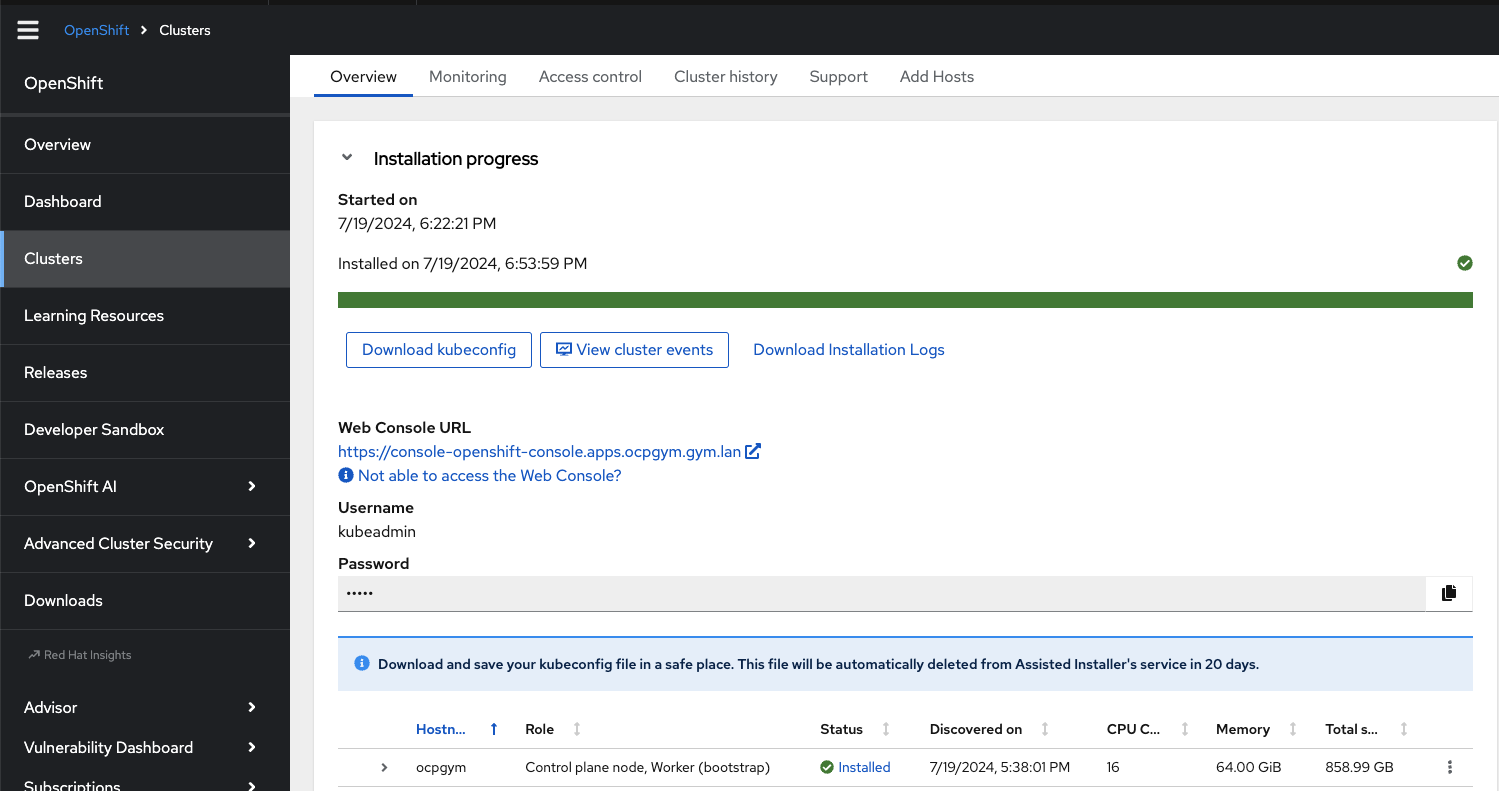
The next screen will allow you to follow the cluster installation till its end. It will take around 45 min to complete.

You can follow the details of the progress by using the View Cluster Events button at the bottom of the page. You can move to next step while installtion is in progress.
Router Configuration
While we are waiting for the SNO to be installed, let’s configure the router.
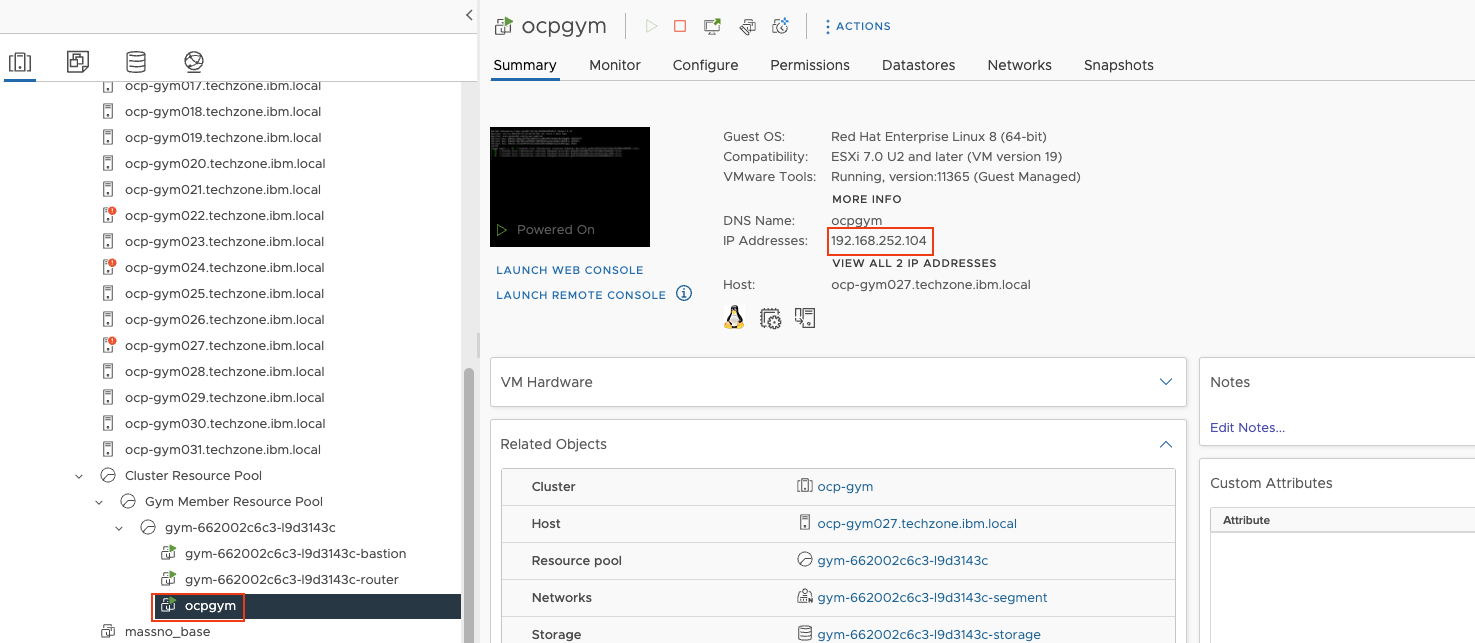
-
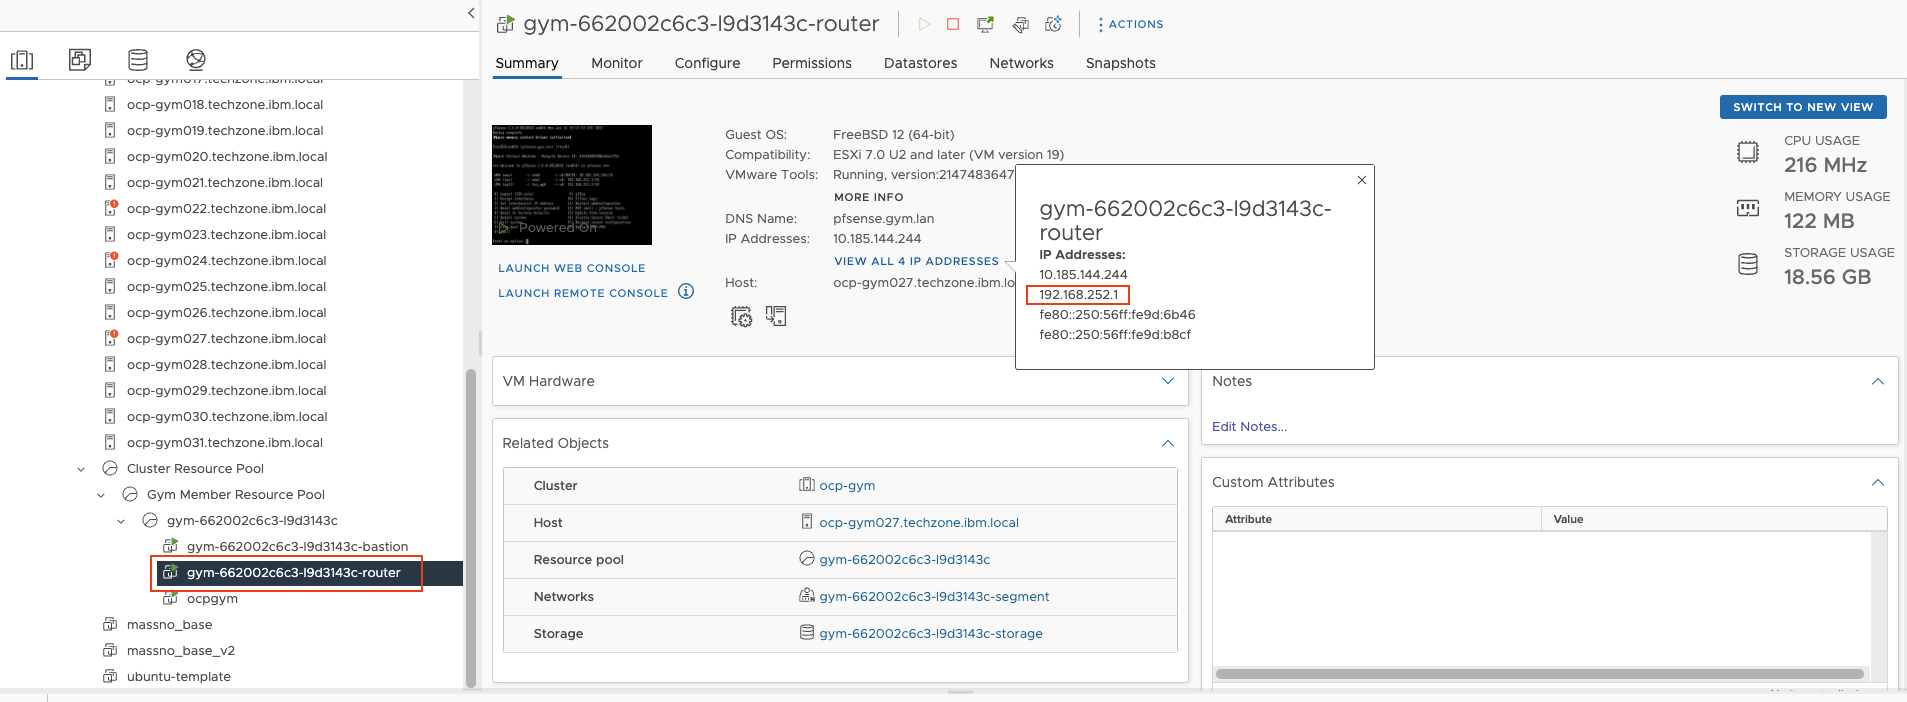
Go back to the vCenter panel and click on the ocpgym VM, On the right panel that will be shown, note the IP address of the VM, In this case the IP address is 192.168.252.104.
-
Then click on the router VM in the left panel. On the right panel that will be shown, click on the VIEW ALL 4 IP ADDRESSES and pick the one from the 192.168.252.x subnet. In this case it’s 192.168.252.1.
-
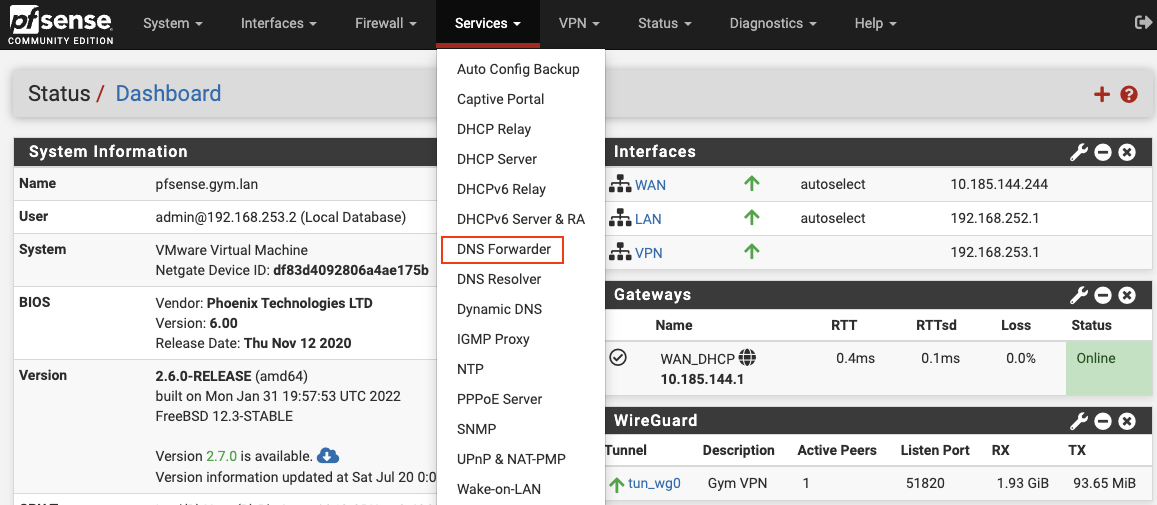
Open a new browser window and navigate to the address 192.168.252.1. You should see the pfsense login panel. Use admin as username and the vCenter password you used before to login to vCenter (which is in the Reservation page).

-
At the top, use the Services pull down and chose DNS Forwarder
-
In the page that will be shown, there are a few configurations to make at the bottom of the page using the ocpgym IP address.
-
Add address=/apps.ocpgym.gym.lan/192.168.252.104 to the Custom options and Save.
-
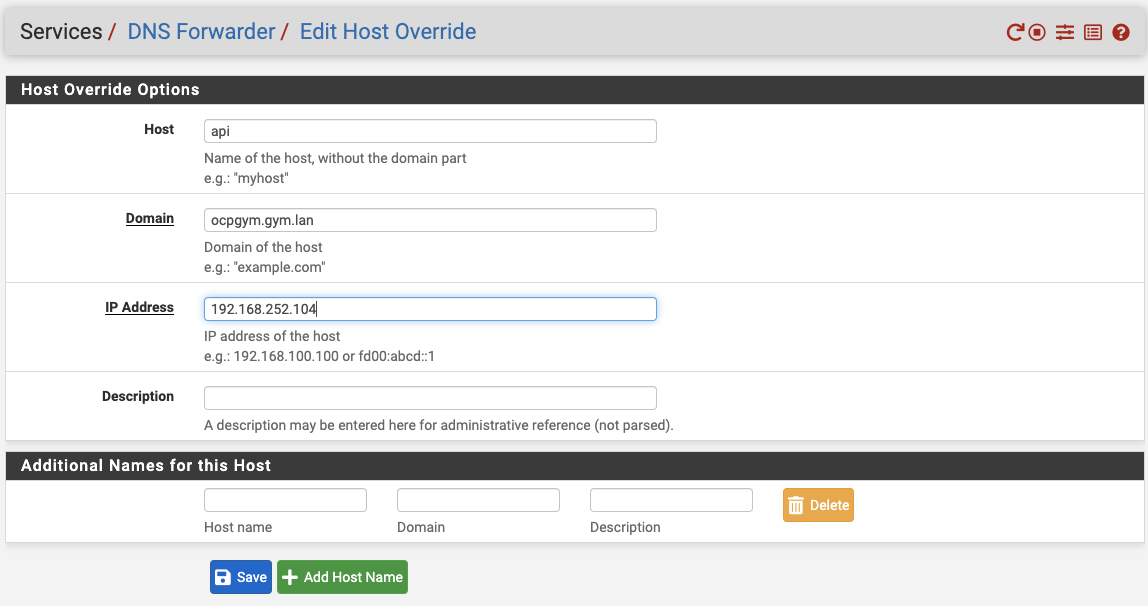
Add two Host Overrides using the Add button:
Host: api, Domain: ocpgym.gym.lan, IP Address: 192.168.252.104
Host: api-int, Domain: ocpgym.gym.lan, IP Address: 192.168.252.104
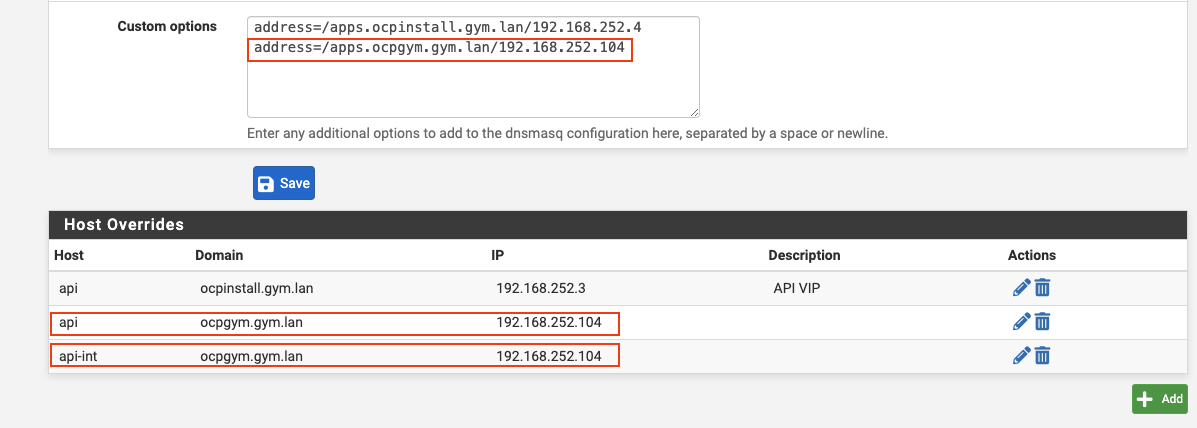
Your page sould look like this in the end:
-
-
Go to the top of the page and apply changes using the button Apply Changes

You can log out from pfSense using the exit door icon at the top left of the page.
Hopefully at this time the cluster is installed. Go back to the Red Hat Cluster installation page and you should see a page including this:
Configure OCP Cluster
-
Switch to Redhat Console browser tab and check if OCP cluster creation is completed.
-
You can click the Web Control URL to access the Single Node OpenShift. Use the Username and Password shown in cluter page to log in. Check around to see if everything is in shape.
-
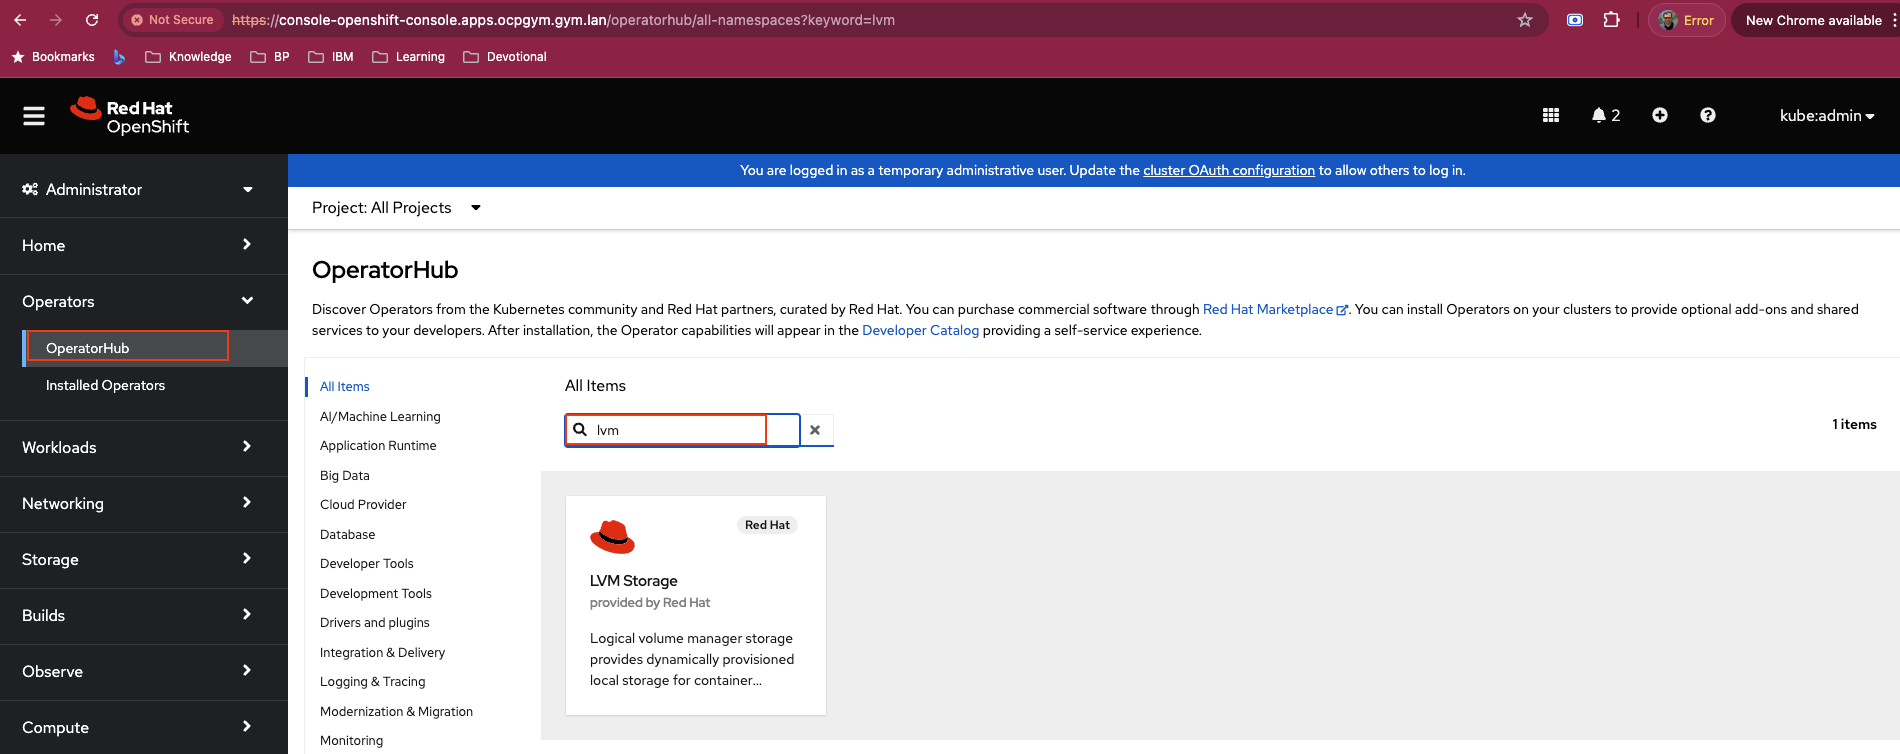
The next step is to provide the cluster with a storage class and related provisioner. Go to the OperatorHub (left menu under Operators) and search for LVM.
-
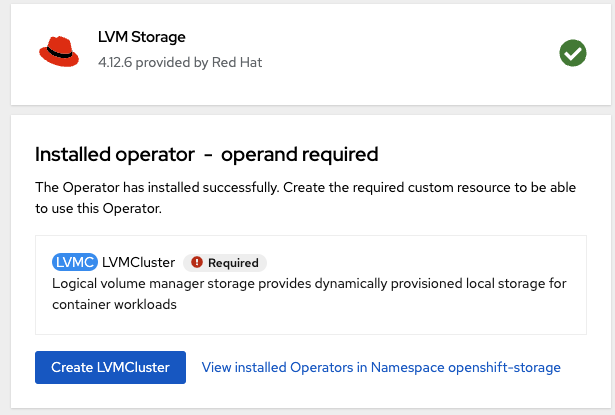
Click on the LVM tile and install the operator using default parameters. When the operator becomes ready for use, click on the Create LVMCluster button
-
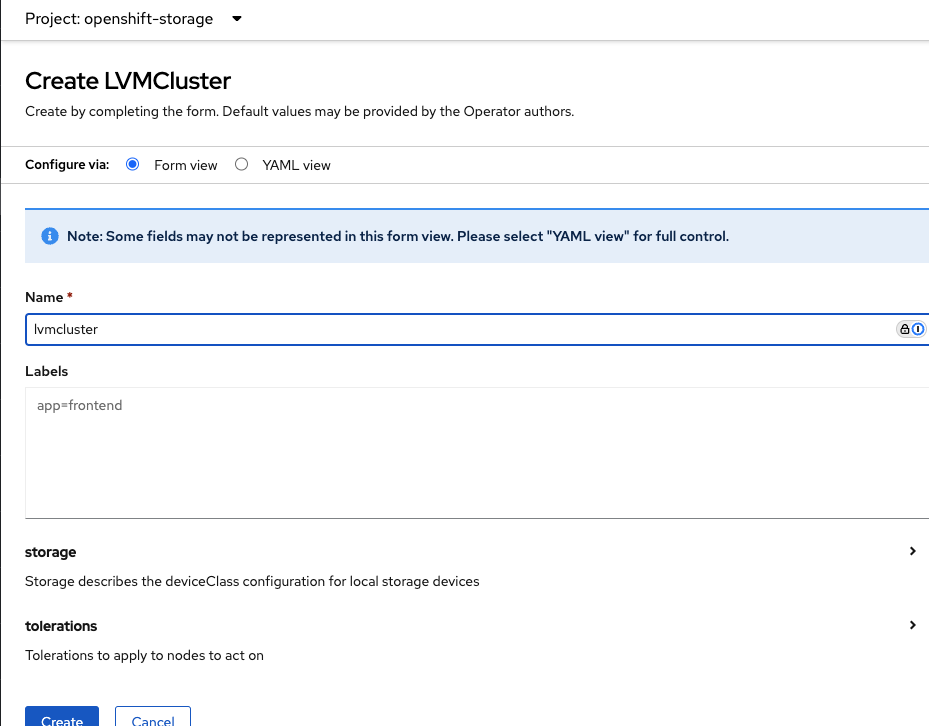
In the page that will appear, leave all the defaults and click on the Create button at the bottom of the page.
-
Wait for the LVMCluster status to become Ready.

-
At this point we will have to do some configurations, that can be done either via the OpenShift Console UI or via command line. Lets start with OpenShift Console UI to enable the local image registry.
Click on Home -> Search, type config in the search field, you should see
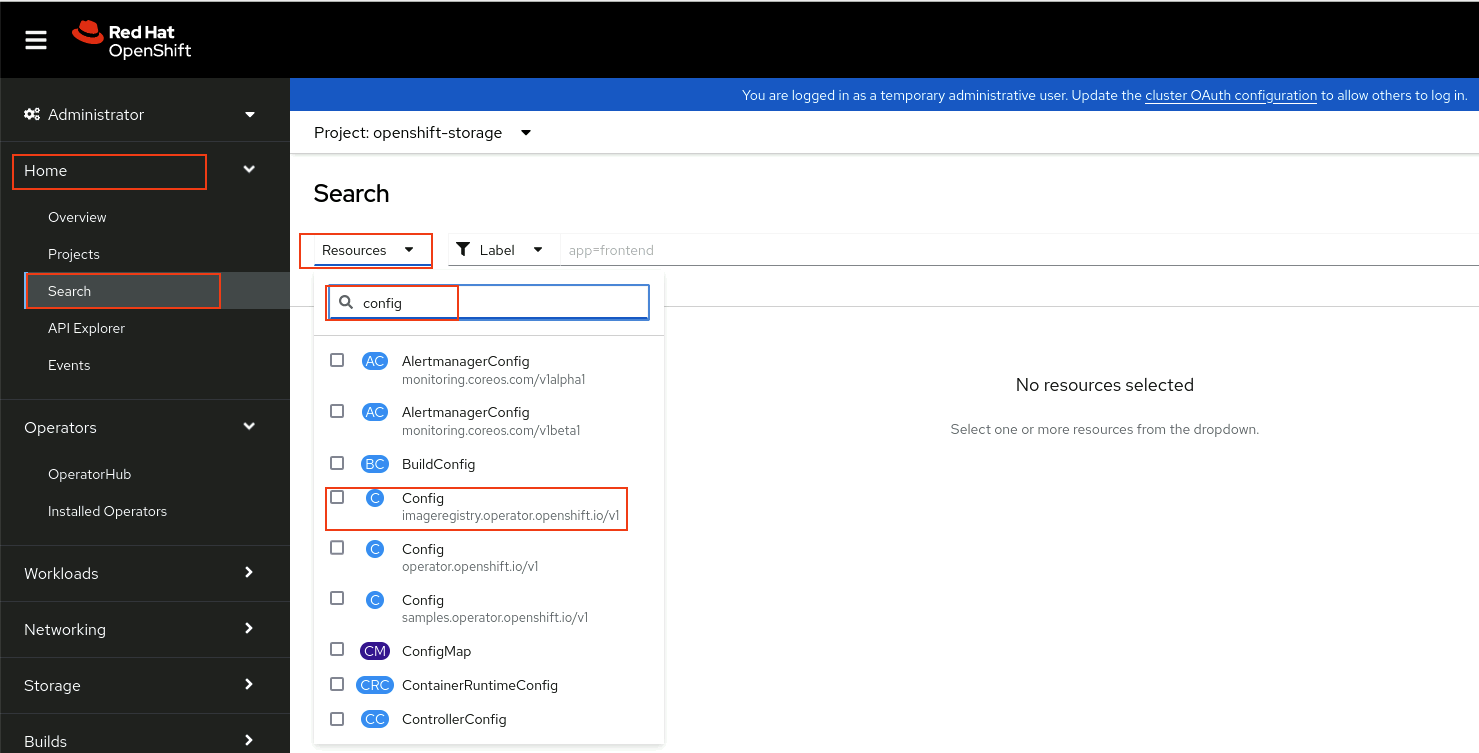
Choose the first config, which is the one for the image registry. You should see:
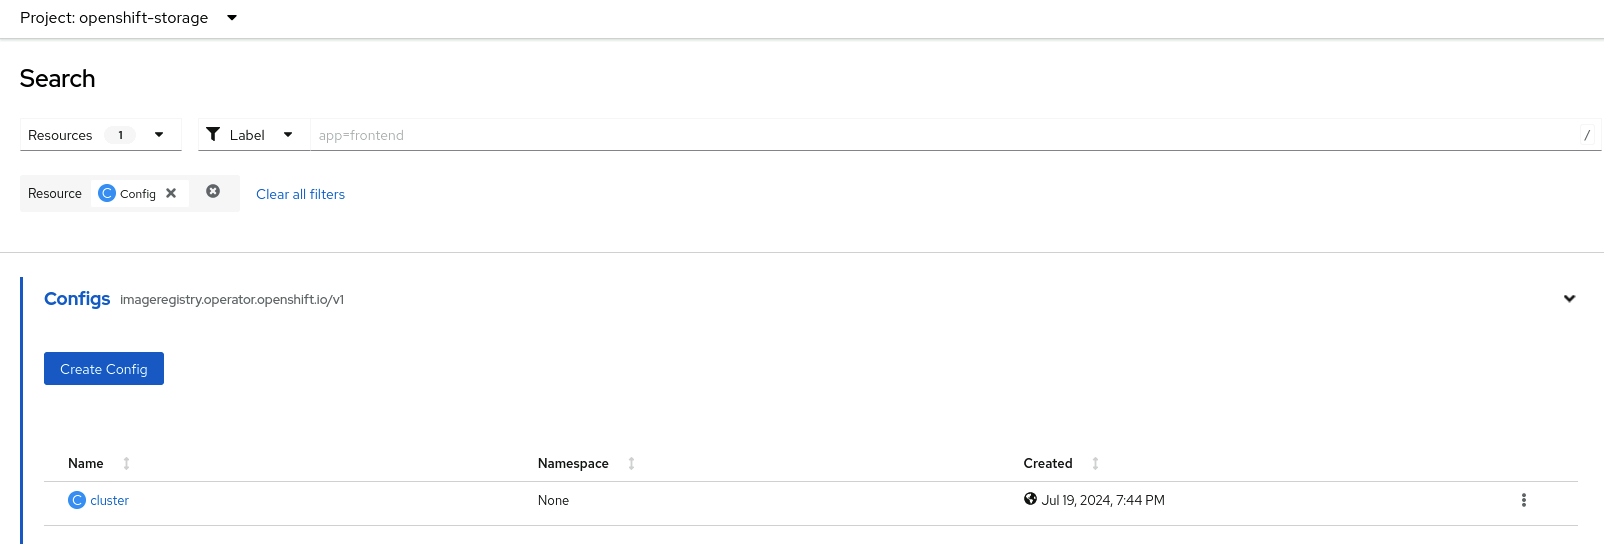
Click on the cluster resource and click on the YAML tab. Edit the yaml in the following way, save frequently otherwise you will get an error when the yaml has changed:
Modify rolloutStrategy from this:
rolloutStrategy: RollingUpdatebashTo this
rolloutStrategy: RollingUpdatebashSave and then modify managementState from this:
managementState: RemovedbashTo this
managementState: ManagedbashSave and then modify storage from this:
storage: {}bashTo this
storage: pvc: claim: ''bash -
Optional : To use the command line, open a bash shell either on the bastion or a computer that has a VPN connection with the TechZone environment.
Use the OpenShift Console top right pulldown menu to grab the login command to OpenShift.

Click on the Copy login command, the click on the Display Token word that will be shown in the page that just opened, and then copy the login command shown under Log in with this token

Use following command to edit in a vi-like editor
oc edit configs.imageregistry.operator.openshift.io/clusterbash -
Unfortunately the registry operator has a bug and has created a wrong PVC, therefore you will find it that that PVC is pending and not bound:
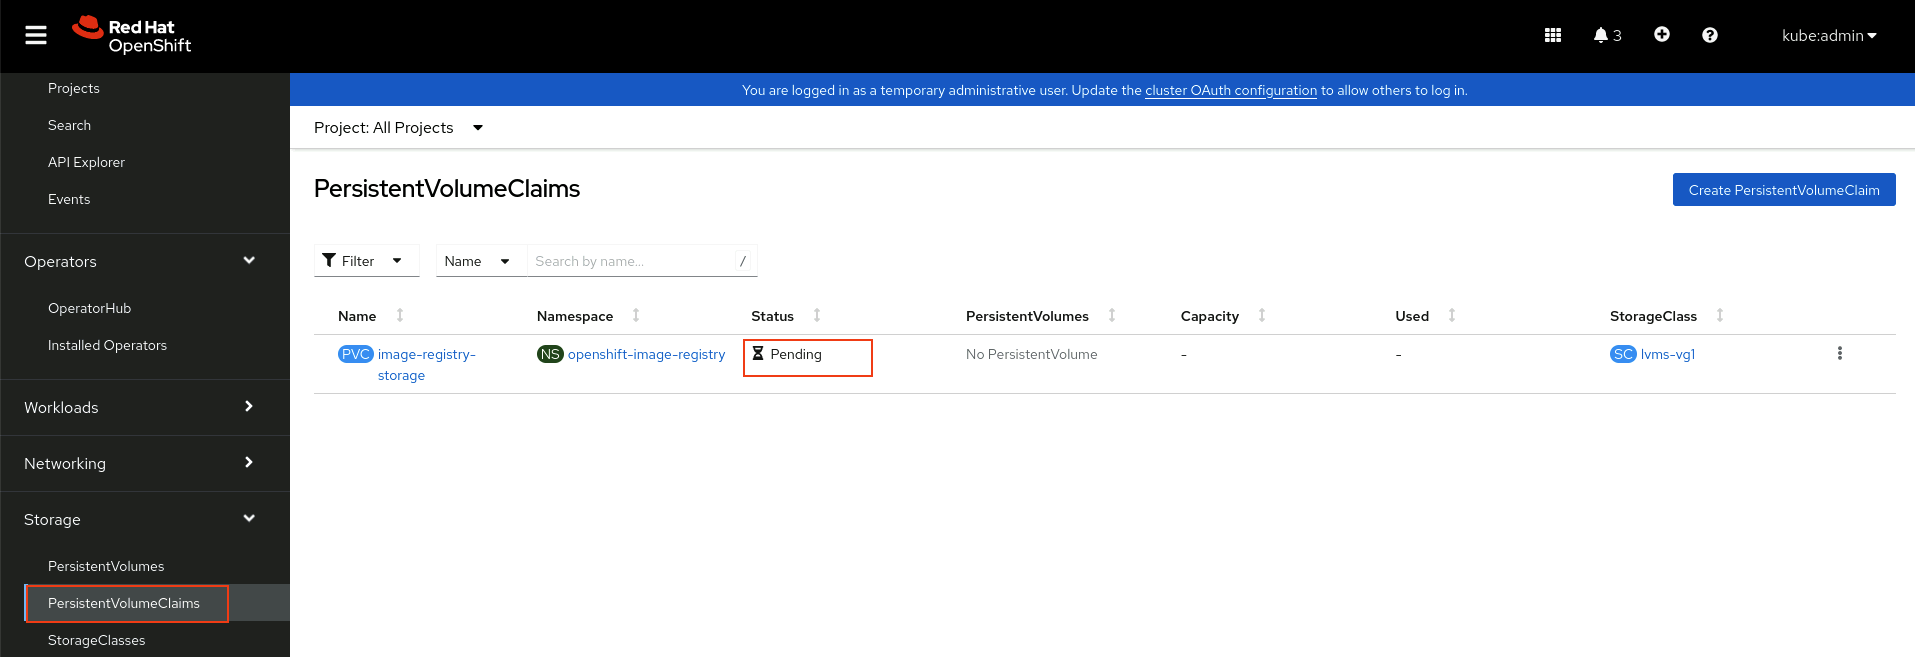
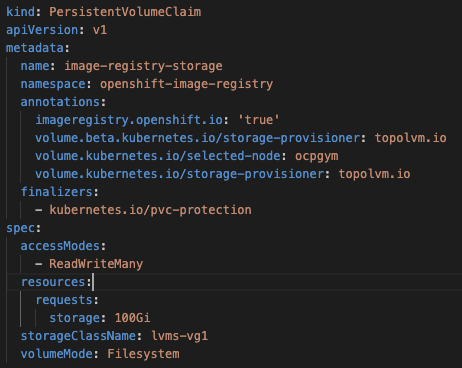
To resolve this problem, click on the image-registry-storage PVC, click on the YAML tab, download the YAML and edit it to:
- Remove the metadata fields uid, resourceVersion, creationTimestamp
- Remove the manageFields section
- Remove the status section
- Modify the accessModes from ReadWriteMany to ReadWriteOnce
In the end it should look something like this:
Go back to the PersistentVolumeClaim list and delete the image-registry-storage PVC using the three dots pulldown.

Use the Create PersistentVolumeClaim button to create a new one (the project at the top right should still be openshift-image-registry). Click on the Edit YAML link at the top right of the screen.
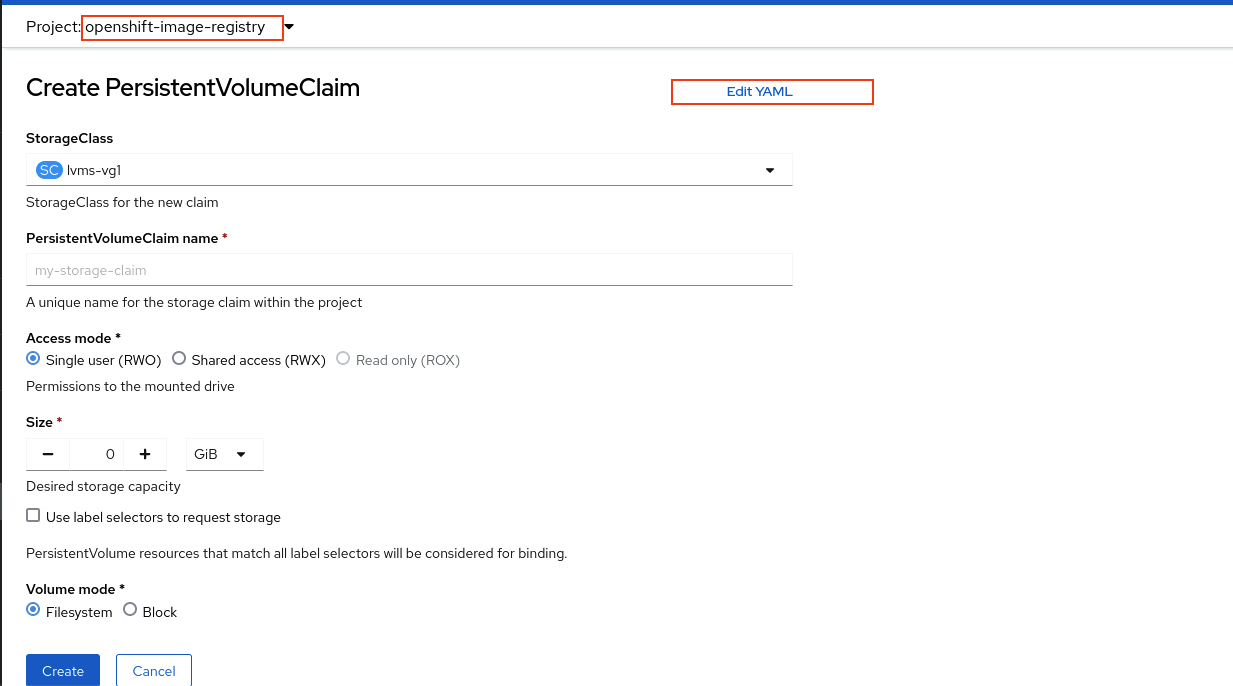
Replace the content of the yaml with the modified one you edited.

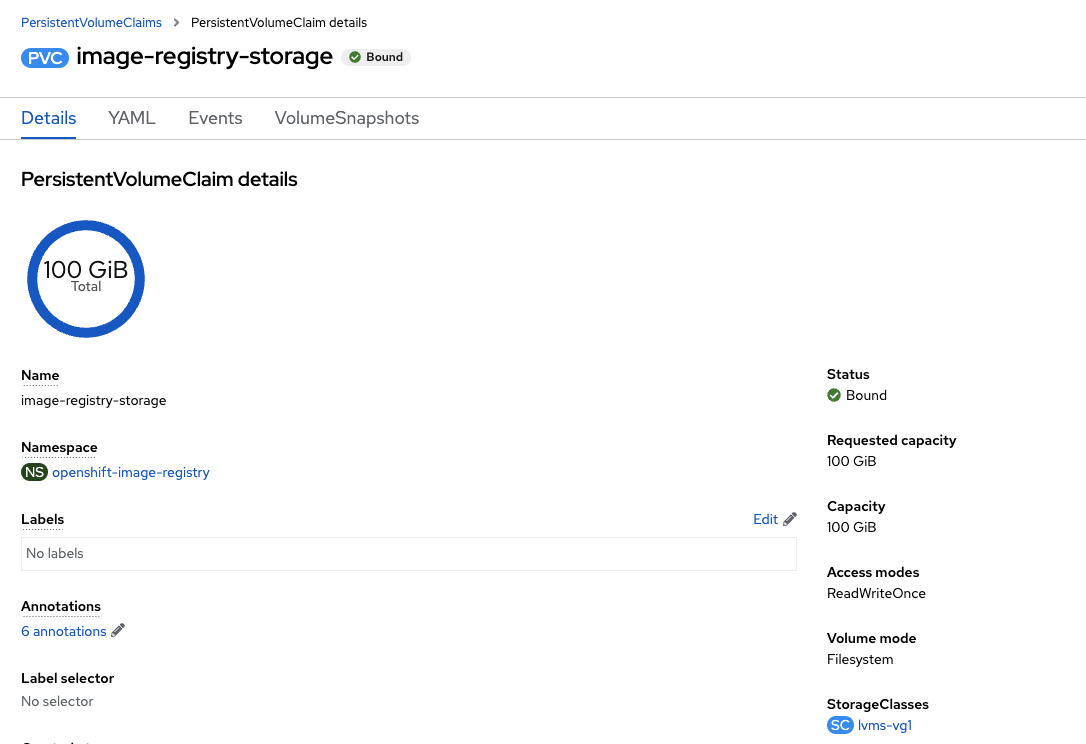
Click the Create button at the bottom. The new PVC should immediately go into the bound state.
Install MAS
At this point we are ready to install MAS and this will take more or less an hour.
Before starting this step, make sure you have two things:
-
The Entitled Registry (ER) key. With this key you must have access to the Maximo Application Suite and CloudPak for Data images. You can get it by logging into - My IBM and click on Container Software & Entitlement key
-
A MAS license file. This file is named license.dat and you can get it from the License Key Center (First link in the list at this url: https://www.ibm.com/support/pages/ibm-support-licensing-start-page. You can also navigate to https://techzone.ibm.com/collection/mas-manage-sno/resources and click on Getting Started Guide - Business Partners for direction to get license file.
-
Open a terminal using the Activities button at the top left of the Bastion desktop. Issue the following commands to get a few files from GitHub
sudo su –bashdnf -y install git-allbashexitbashgit clone https://github.com/evilADevil/mas-techzonebashcd mas-techzonebashchmod 755 masinst.shbash -
In the same mas-techzone directory you need to put your license.dat file that you got from the License Key Server.
Note that you can transfer files from your computer to the bastion when the VPN is active by using SFTP and its IP address (192.168.252.2). The credentials are admin and the vCenter password. An example session looks like this:

You can also use different way to tranfer these file like, uploading in to google drive, box, OneDrive or email from your laptop and download from Bastion server
-
Before starting the installation of MAS, is to customize the masocpl.yml.
- Replace your ER key with your ER key from step 0 above. Remove less than and greater than symbol as well.
- Replace your license id with the license id of your license.dat file. You can find out what this is by opening the license file in an editor, and check the first line. The license id will be the second-last number. For example, if your first line is SERVER sls-rlks.... 0272bc34... 27000 then your license id is 0272bc34....
- You should have these 4 files in the current mas-techzone directory:
license.dat
masdevops.yaml
masinst.sh
masocpl.yml
Optionally, you may also want to update the mas_channel, the mas_catalog_version and the mas_app_channel for Manage that you want to install. A list of MAS catalog versions can be found at static catalog .
-
At this point we need to download the OpenShift command line. It is better to download the CLI of the same version of OCP used, 4.12 in this case. Use the following command:
curl -O https://mirror.openshift.com/pub/openshift-v4/x86_64/clients/ocp/stable-4.12/openshift-client-linux.tar.gzbashthen untar the downloaded file in a directory on the path:
sudo tar -xf openshift-client-linux.tar.gz -C /usr/sbinbash -
Now we want to log into the Single Node OpenShift cluster using the command line. Click on the Copy login command menu item. Re-authenticate in case it asks and then click on Display token.
Copy the login command and issue it in the terminal window.
oc login --token=sha256~2gFkqieVhsRqtNPgUk2nsZdAvr0d8Ixk0TZGVwv563s --server=https://api.ocpgym.gym.lan:6443bash
-
Now we are ready to launch the MAS installation. Issue the following command:
./masinst.shbash -
You can always retrieve the userid and password of the MAS superuser from the masdemo-credentials-superuser secret in the mas-masdemo-core namespace
-
After the installation completes successfully, you may want to log into MAS administration using the MAS superuser credentials. You can find the urls to use by navigating in the OpenShift cluster console to Networking -> Routes of the mas-masdemo-core namespace.
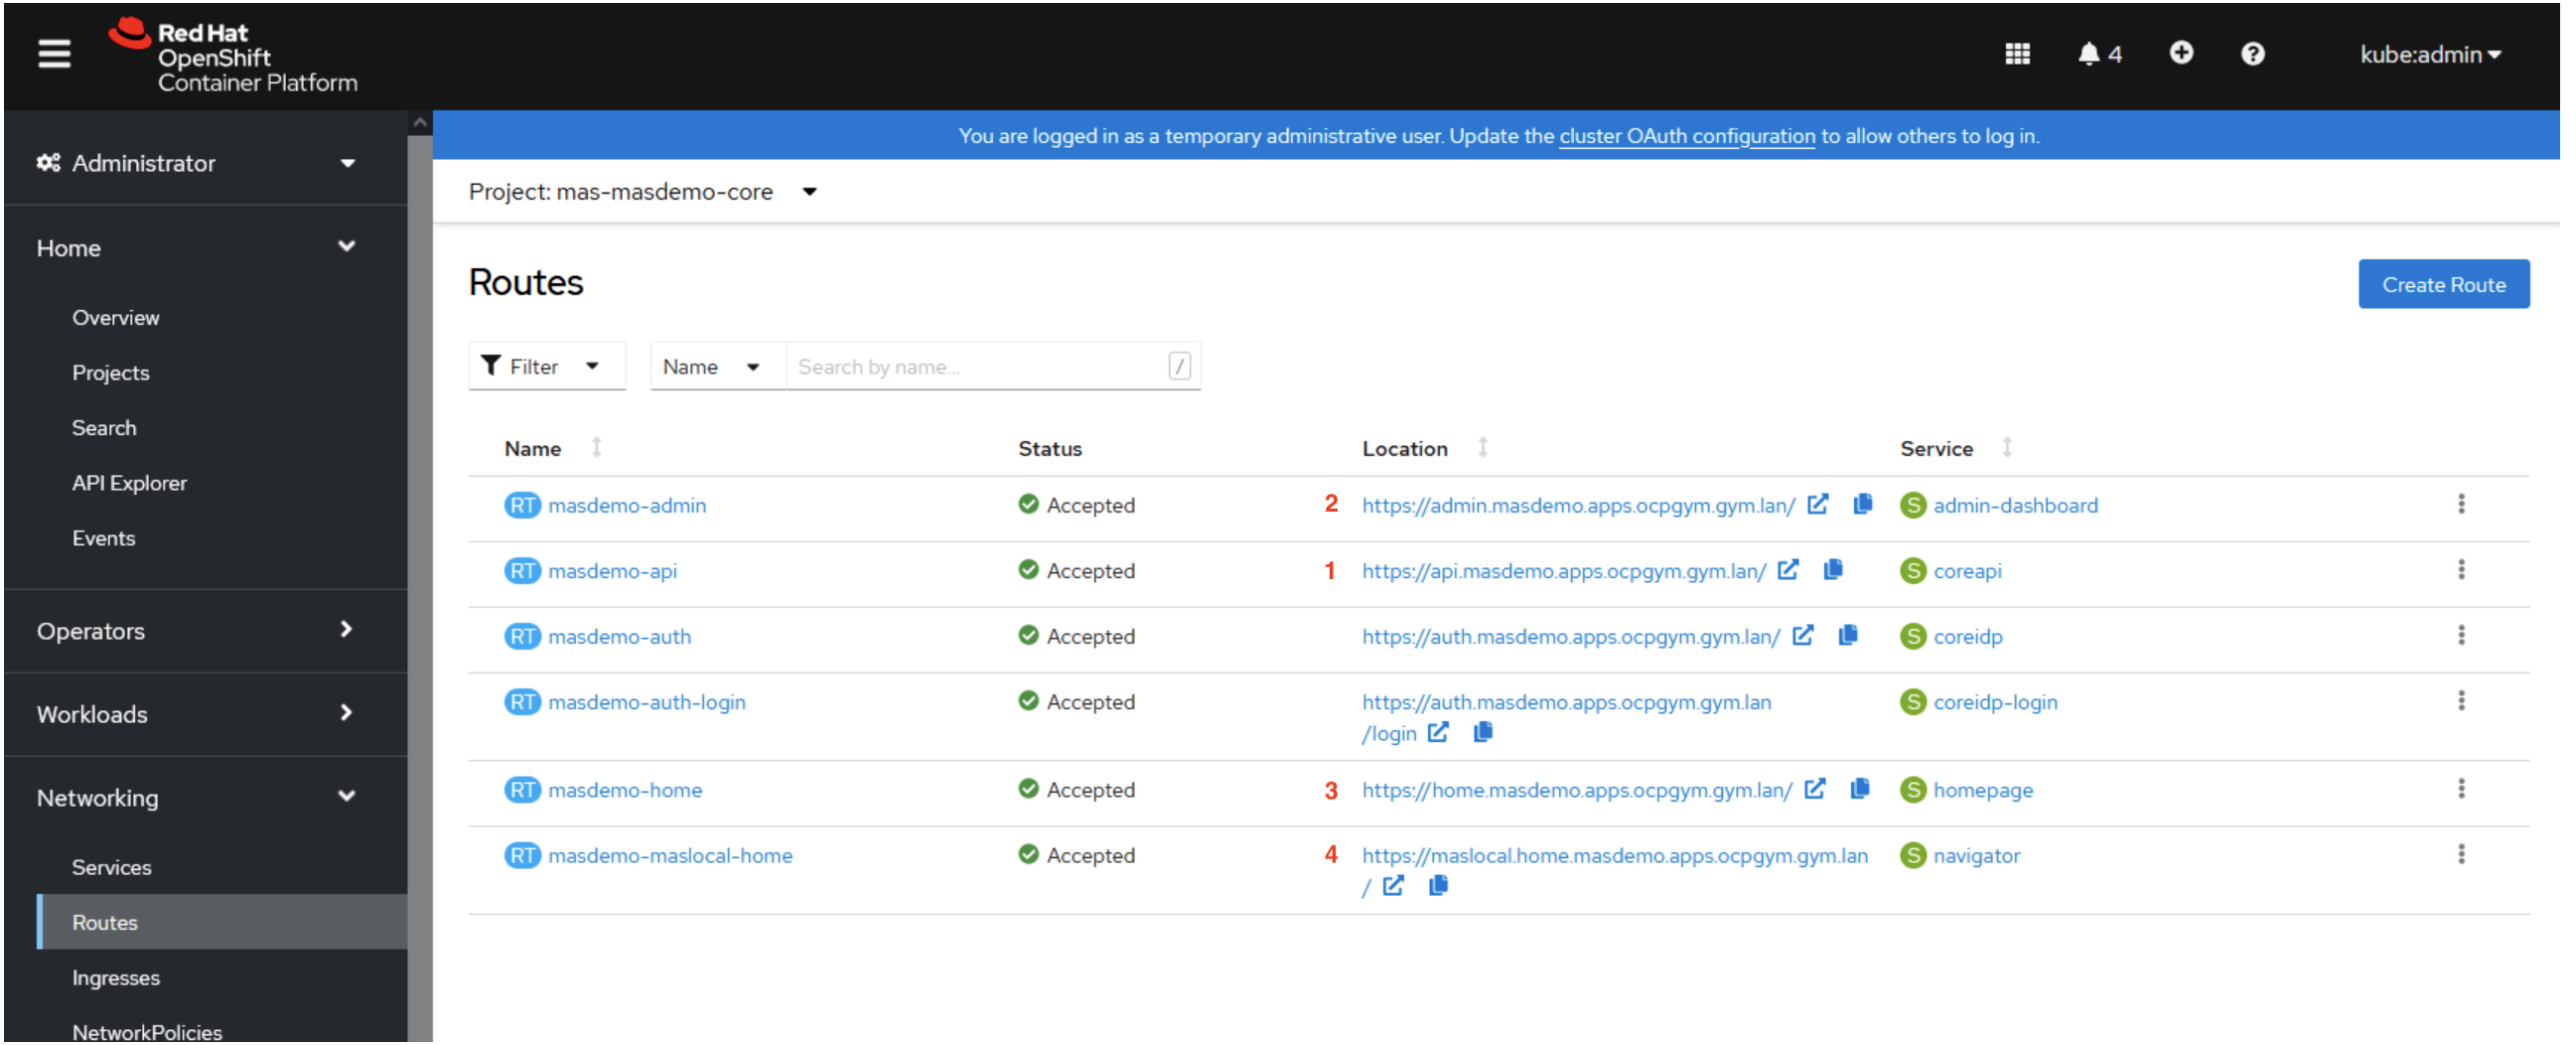
First of all click on the masdemo-api url (the one in the Location column) and accept the self-signed certificate. In this way your browser won't have a problem in accessing the MAS APIs later on. Ignore the exception you will get and close that window.
Then go back to the cluster UI and click the masdemo-admin url. Log into MAS.
Once in MAS, click on the Users tile.
You should see the list of users that have been inherited by the Manage demo data. Filter by Wilson.

Click on the wilson user. Edit this user by using the pencil icon at the top right. Open the Login details section and click Replace forgotten password. Click on the Custom radio button and set a password. Save the changes and close the information dialog that follows.
Wait for the synchronization to finish. Log out and login as Wilson. Accept any self-signed certificate. In the MAS Navigator you should see the Manage tile and you should be able to launch into it. Hover your mouse on it to show the Launch link.