203: Netezza data warehouse modernization
Heads Up! Quiz material will be flagged like this!
Goal
The goal of this lab is to showcase how IBM watsonx.data can be used for data warehouse modernization for a Netezza Performance Server as a Service (NPSaaS) instance running on Microsoft Azure to move a workload to watsonx.data.
Prerequisites
watsonx.data Environment
This lab requires that you already have a provisioned IBM watsonx.data environment. This is done in Module 1: Environment Setup
Setting up a Data Warehouse Connector for Presto
- Open the console (user interface) for your watsonx.data environment in a new browser window.

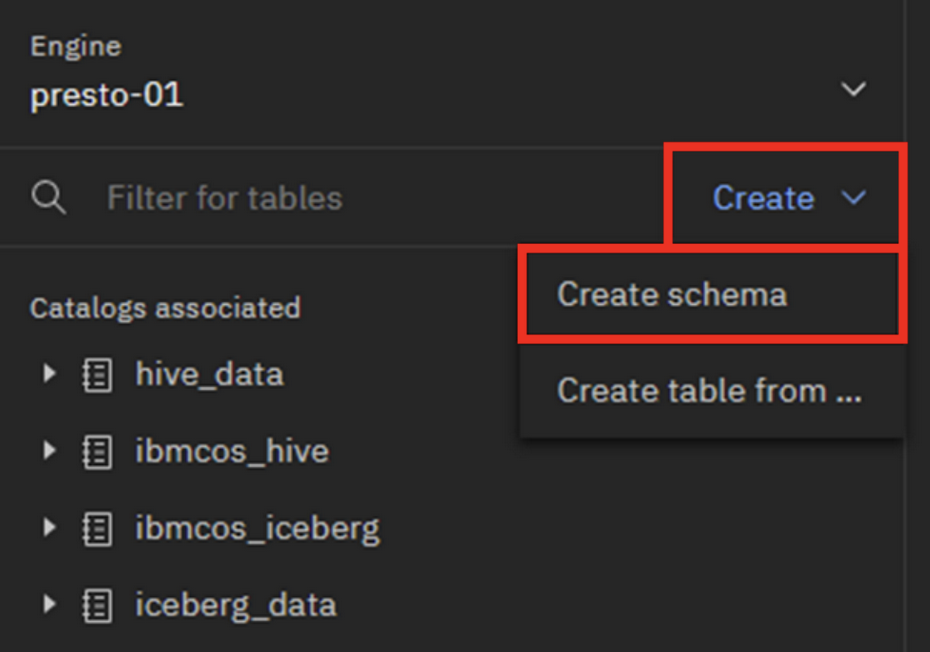
- In the watsonx.data UI, select the Data manager icon on the left-side menu.
- Click the Create dropdown menu and select Create schema.
-
In the Create schema pop-up window, select iceberg_data for the Catalog and enter
flight_delayfor the Name. The Path field is automatically set based on the schema name, but it can be overridden as needed. However, do not change it here. Now click the Create button. The flight_delay schema is now created under the iceberg_data bucket. -
In the watsonx.data UI, select the Infrastructure manager icon on the left-side menu.
- Click the Add component dropdown on the right side and select Add database.

- In the Add database pop-up window, enter/select the following information to add the Netezza Performance Server as a Service (NPSaaS) database on Microsoft Azure and then click Register:
Note: Credentials to the Netezza Performance Server as a Service (NPSaaS) database on Microsoft Azure will be provided to you by your lab host
- Database type: IBM Netezza
- Database name:
NZ_FLIGHTS - Display name:
NZ_FLIGHTS - Hostname: Get from lab host
- Port: Get from lab host
- Username: Get from lab host
- Password: Get from lab host
- Connection status: Click Test connection. If the connection test is successful, Connection status will show Successful. Note: If the test wasn’t successful then you’ll receive an error message as shown below with the reason for the failure. Re-enter all of the fields again and click Retest to test the connection again. The most common reasons for an error here are that you mistyped something incorrectly.
- SSL Connection: Turn on the SSL connection toggle switch
- Catalog name:
netezza
The Netezza database has been added to watsonx.data, but there is no connection between the Netezza catalog and the Presto (presto-01) engine. The two will need to be linked to use the Presto engine to query the Netezza database.
There is a quiz question related to adding the connection to Netezza
- In the Catalogs section, hover your mouse pointer over the netezza tile and the Manage associations icon will appear. Click it.
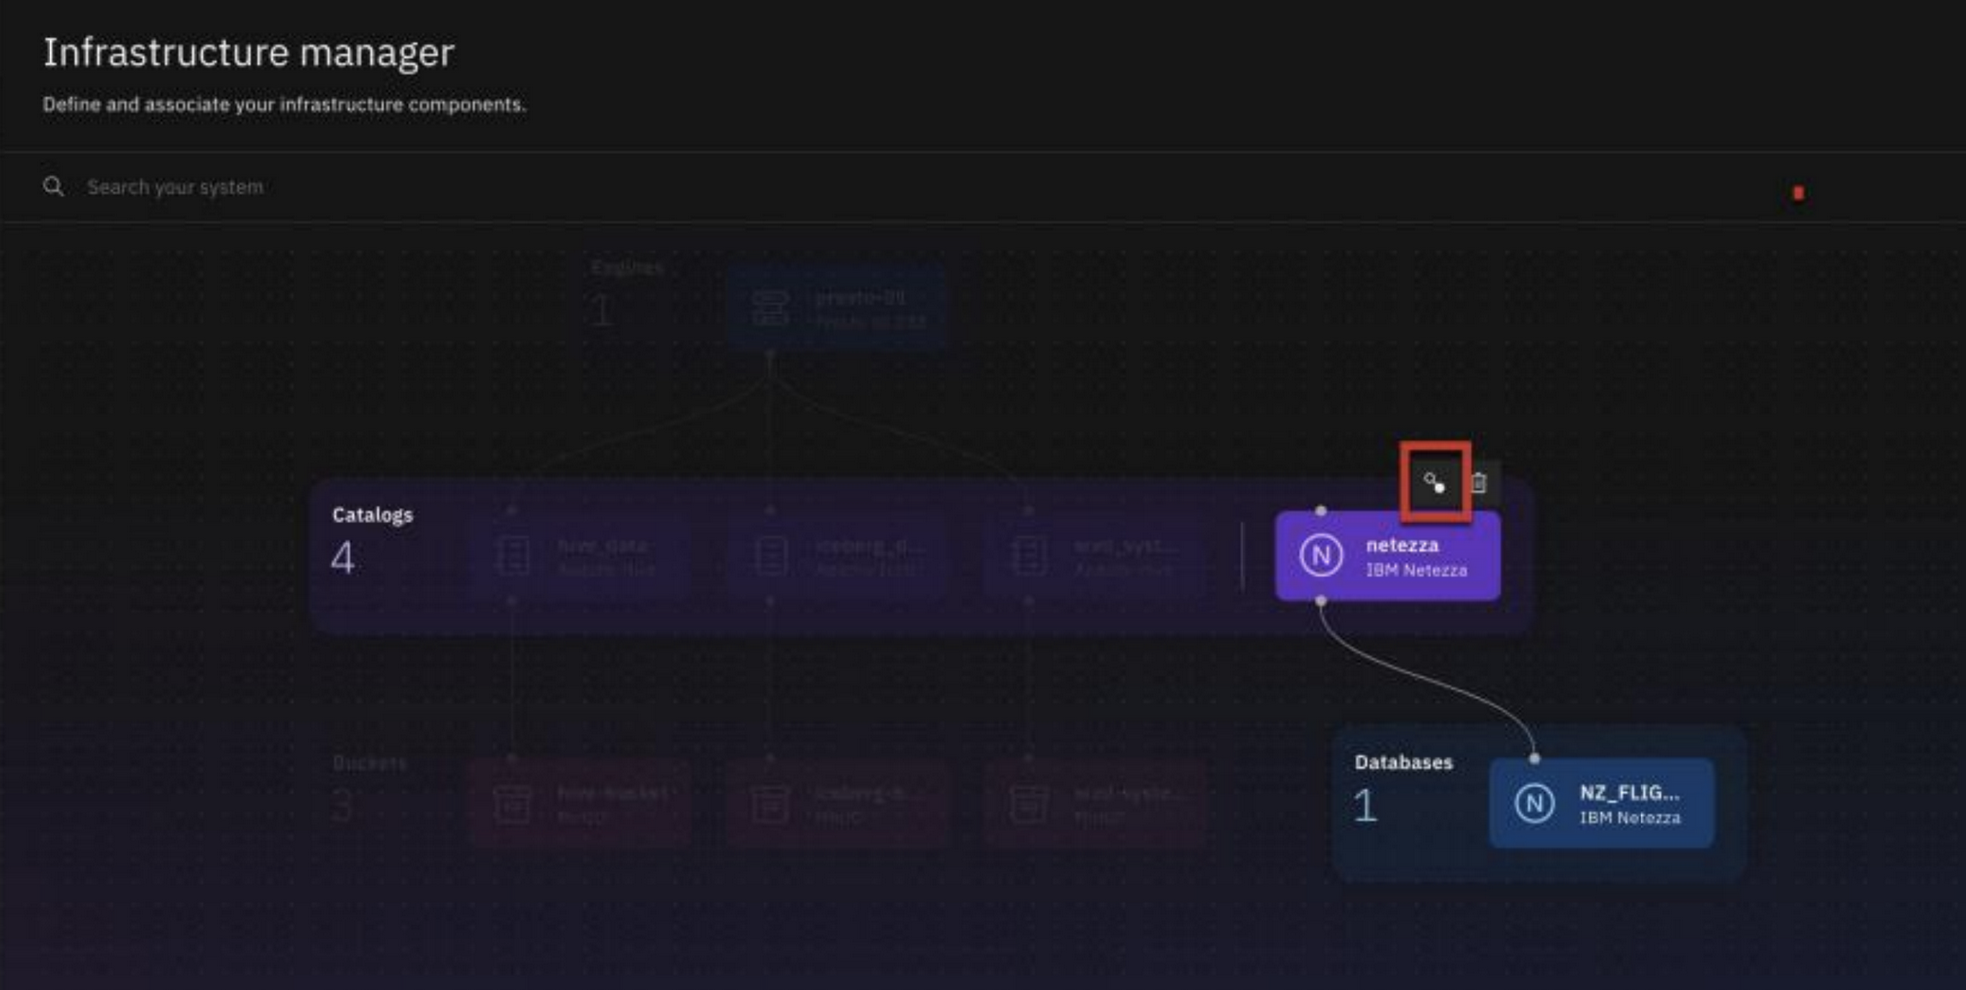
- In the Manage associations pop-up window, select the checkbox for the presto-01 engine and then click Save and restart engine. A line should now connect the presto-01 tile in the Engines section with the netezza tile in the Catalogs section. This connection indicates that the resources are now associated.
There is a quiz question related to your database being accessible by the Presto query engine
-
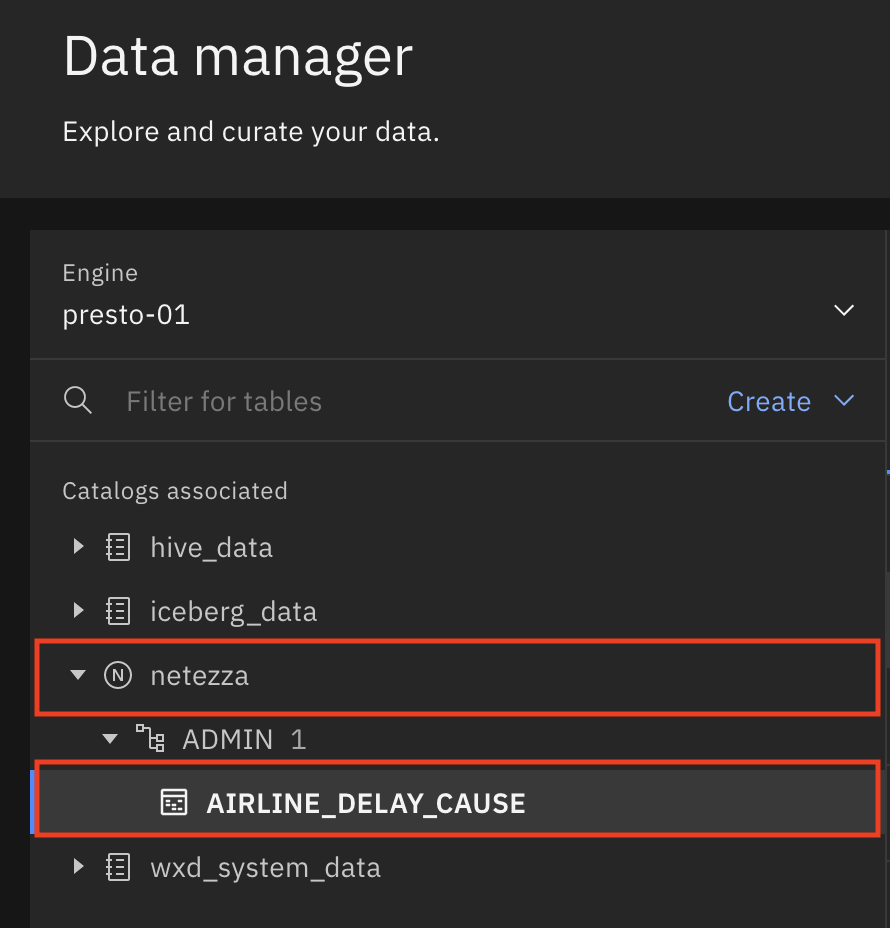
In the watsonx.data UI, select the Data manager icon on the left-side menu.
-
Select the netezza catalog and expand it. The AIRLINE_DELAY_CAUSE table should be displayed under the ADMIN schema indicating that the database connection is operational and working correctly.
Although this section used an IBM Netezza database connector, the process is identical for configuring the Presto connector for any supported data warehouse. Comparable information will be required for any data warehouse being added (hostname of database, database name, username and password that has privileges on the database, the database port number, and whether the connection is Secure Sockets Layer (SSL) or not).
Creating tables and loading data within watsonx.data
-
Within the Data manager window, select the AIRLINE_DELAY_CAUSE table under the ADMIN schema and view the Table schema tab to see the table structure (column names, data types, and whether the column in nullable).
-
Move to the Data sample tab and examine the contents of the table.

- To get an idea of the volume of data within the AIRLINE_DELAY_CAUSE table, in the watsonx.data UI, select the Query workspace icon on the left-side menu.
- Clear the SQL editor and hover over the </> symbol to the right of the AIRLINE_DELAY_CAUSE table name and choose the Generate SELECT option.

There is a quiz question related to generating query templates in the Query Workspace
- Edit the generated SQL statement to look like the SQL statement below. Then click the Run on presto-01 button on the right.
SELECT
COUNT(*)
FROM
"netezza"."ADMIN"."AIRLINE_DELAY_CAUSE";
sqlThe Result set in the lower portion of Query workspace window indicates that the Netezza AIRLINE_DELAY_CAUSE table contains 336,028 rows.
- To build the CREATE TABLE AS SELECT (CTAS) statement is a two-step process. Clear the SQL editor and hover over the </> symbol to the right of the flight_delay schema under the iceberg_data entry and choose the Generate path option. Within the SQL sub-window add
CREATE TABLEbefore the path string and add."flight_delay_cause" ASto the right of the path information. Ensure the cursor is at the end of the statement at conclusion of the edit process (after the AS). Your SQL statement should look like the SQL statement below.
CREATE TABLE "iceberg_data"."flight_delay"."flight_delay_cause" AS
sql- Continuing with the second step of the CTAS statement, hover over the Netezza AIRLINE_DELAY_CAUSE table entry and select the </> symbol to the right of the table name and choose the Generate SELECT option. The SELECT statement for the Netezza AIRLINE_DELAY_CAUSE table should appear after the CREATE TABLE...AS portion of the statement. Edit the generated SELECT statement to delete the LIMIT 10 portion (do not delete the semicolon ; delimiter). Your SQL statement should look like the SQL statement below. Then click the Run on presto-01 button on the right.
CREATE TABLE "iceberg_data"."flight_delay"."flight_delay_cause" AS SELECT
*
FROM
"netezza"."ADMIN"."AIRLINE_DELAY_CAUSE"
;
sqlThere is a quiz question related to the result set of this SELECT statement
After the statement execution completes successfully, there should be a new flight_delay_cause table under the flight_delay schema within the iceberg_data catalog. The CREATE TABLE... statement will have a green checkmark to the right to show the execution was successful and the rows (count) in the new table are 336,028 (matches the original Netezza table row count).
After a table is created and data is loaded, it is common practice to perform a quick test to ensure that the table data looks reasonable and there are no obvious issues with the new table. Once the flight_delay_cause table was loaded as an Iceberg table in the data lakehouse, the row count in the new table matched the original Netezza table’s row count. As another test, let’s verify that the flight_delay_cause table contains the expected date range (2003 to 2023) of data. This test will be accomplished using the Data manager and Query workspace portions of the watsonx.data UI.
There is a quiz question related to viewing a table’s column definitions
-
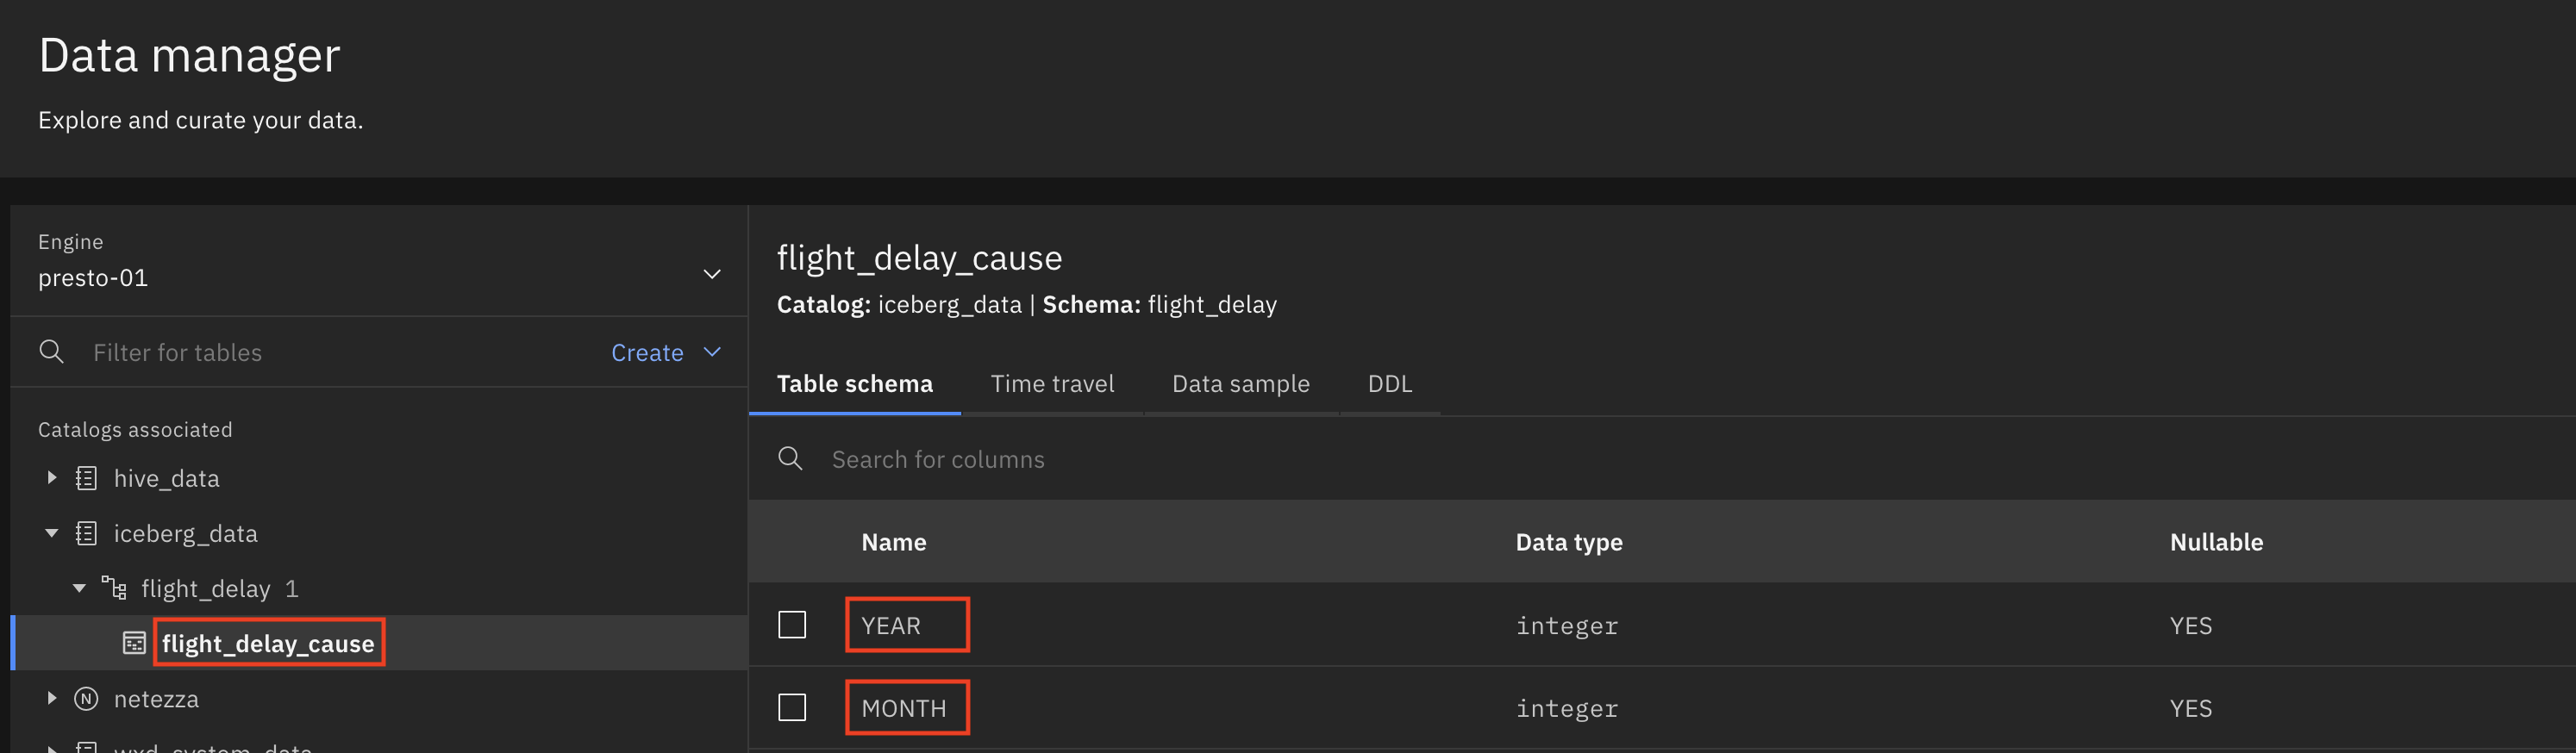
In the watsonx.data UI, select the Data manager icon on the left-side menu.
-
Select the flight_delay_cause table under the iceberg_data catalog and look at the columns defined for the table. Since we want to verify the correct months and years of data have been loaded, the column names needed are MONTH and YEAR.
-
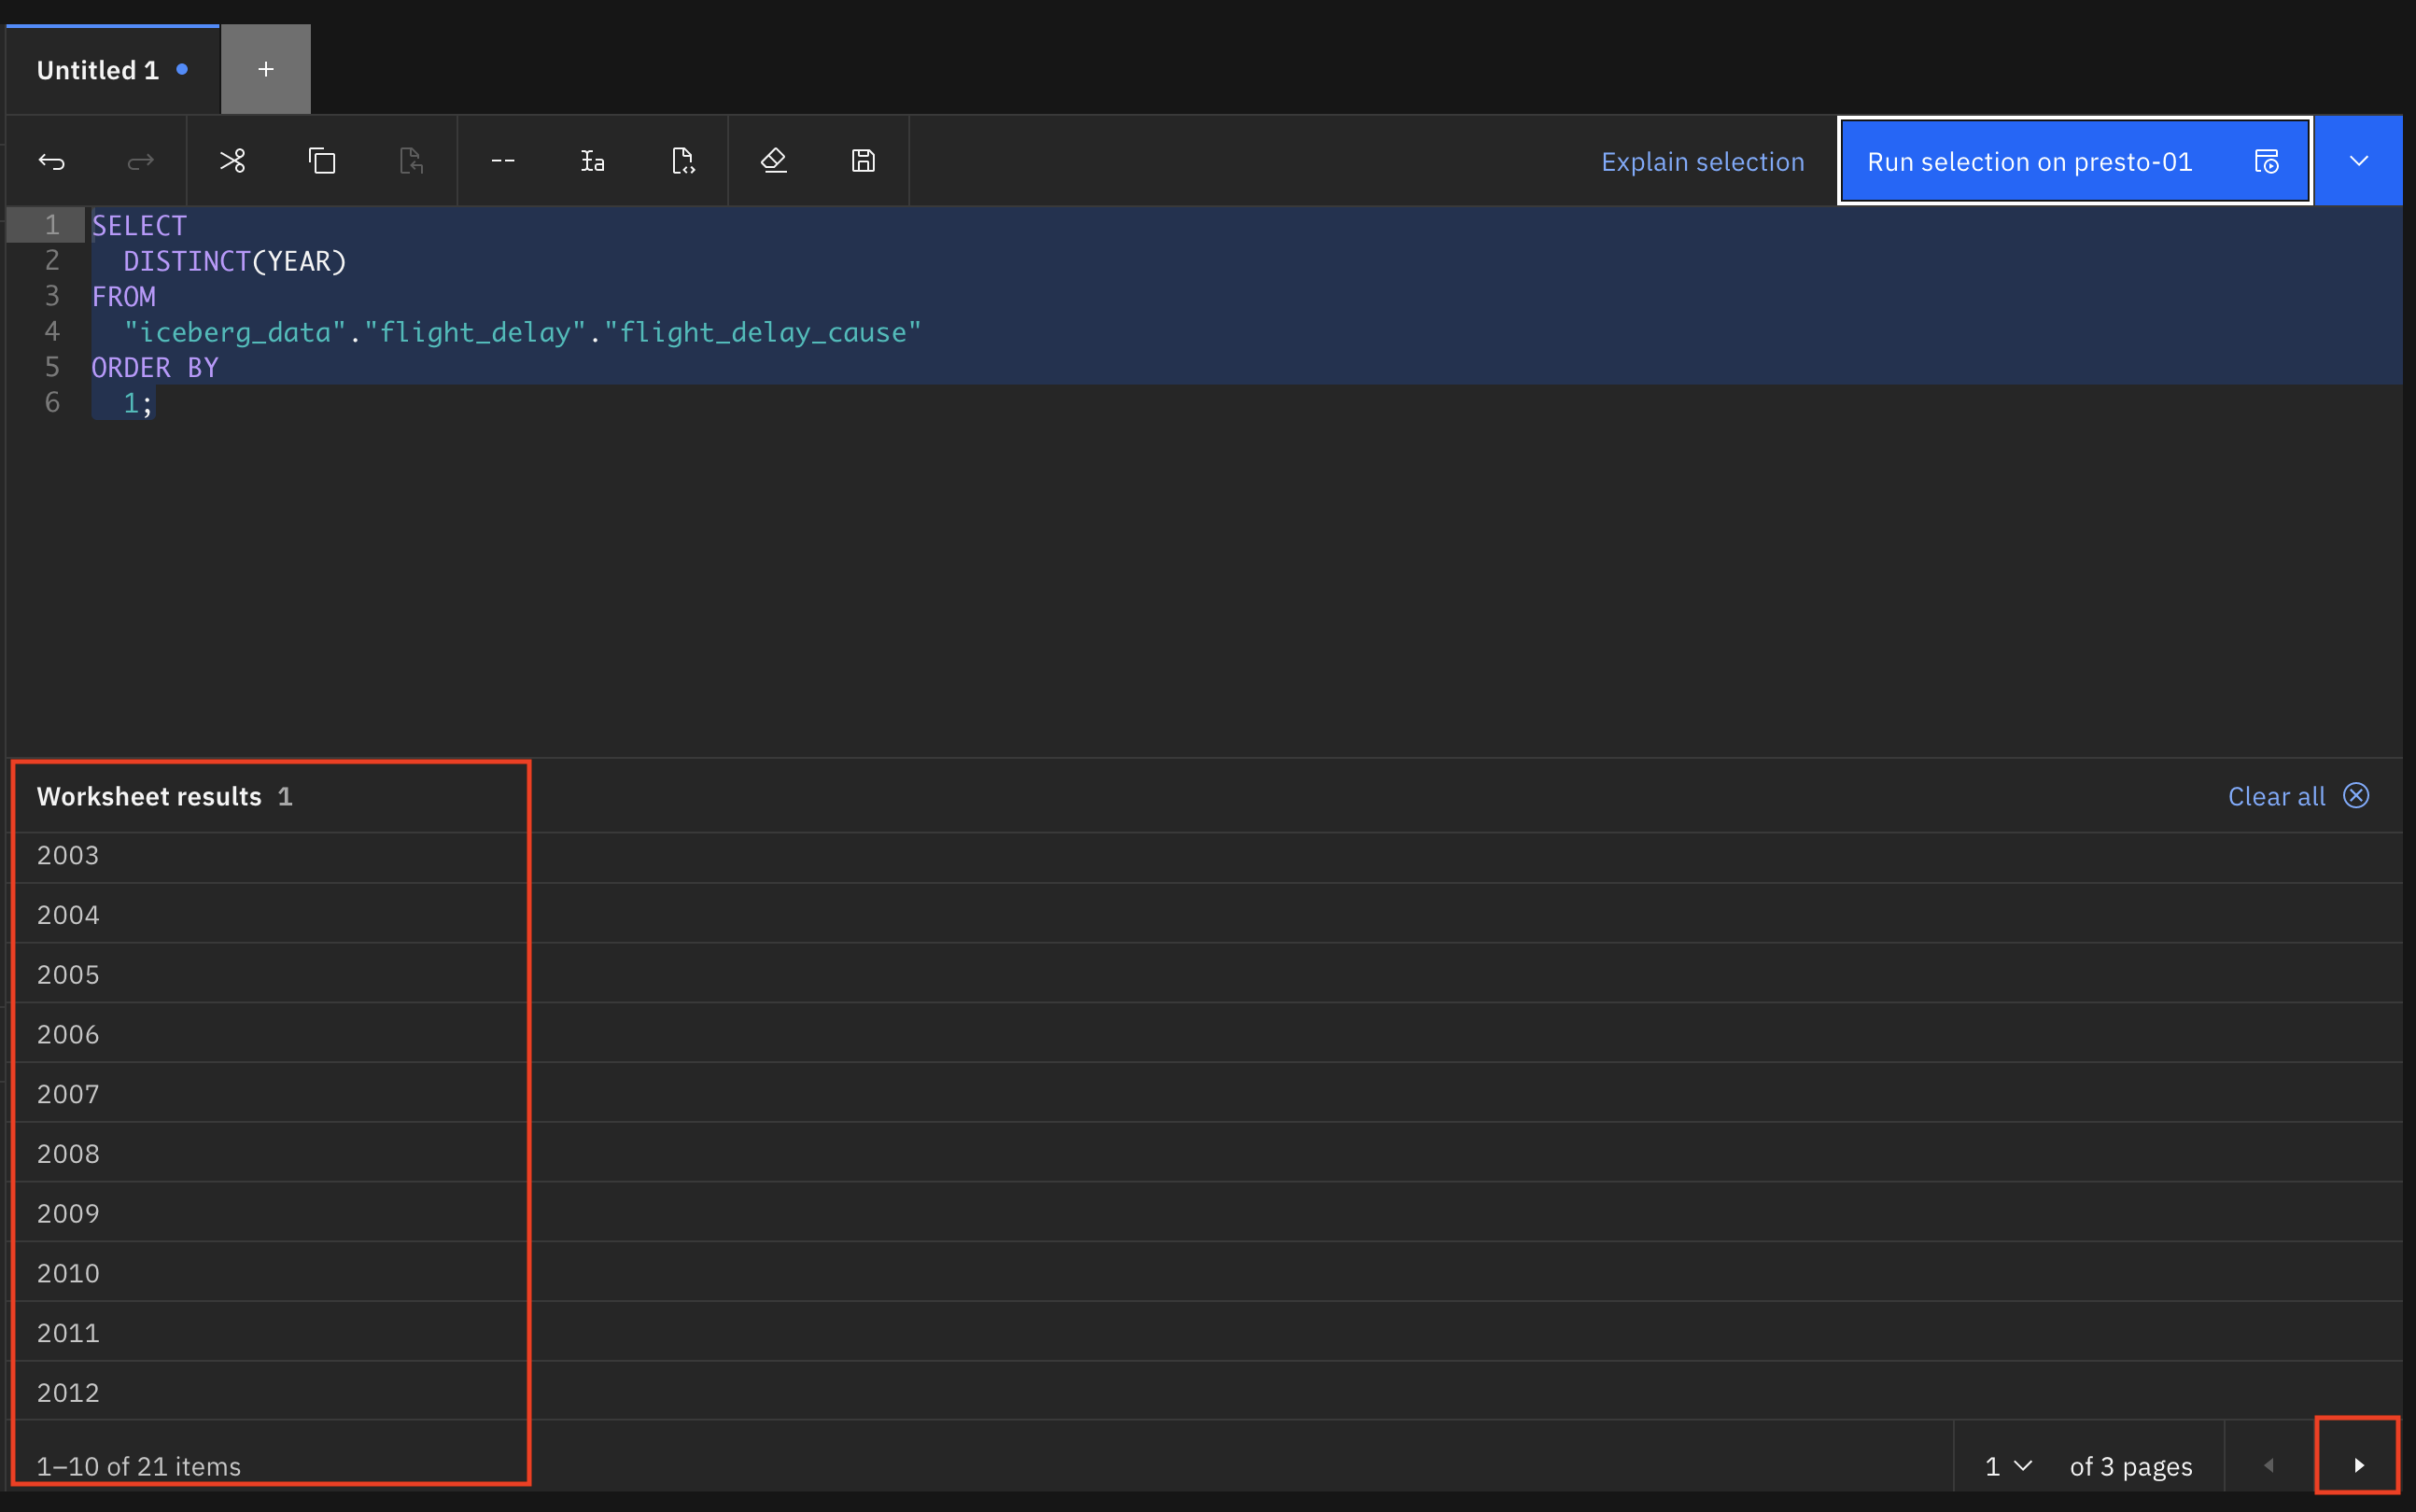
In the watsonx.data UI, select the Query workspace icon on the left-side menu.
-
Clear the SQL editor and hover over the </> symbol to the right of the flight_delay_cause table under the iceberg_data entry and choose the Generate SELECT option.
-
Edit the generated SQL statement to look like the SQL statement below. Then click the Run on presto-01 button on the right.
SELECT
DISTINCT(YEAR)
FROM
"iceberg_data"."flight_delay"."flight_delay_cause"
ORDER BY
1;
sqlThere is a quiz question related to the SQL query table name
- Scrolling through the Result set at bottom of window (using the > key in the lower right) verifies that data for the years 2003 through 2023 are contained in the table. Combined with the earlier row count verification, the flight_delay_cause table has been correctly moved to an Iceberg table.
Object Privileges
After the tables have been created and the data loaded into the data lakehouse, the final step is to ensure that the necessary applications, individuals, or groups/roles have been granted the access required to be able to use the new data within the data lakehouse. This section describes the granting of privileges to the flight_delay_cause table that was created in the earlier portion of this lab.
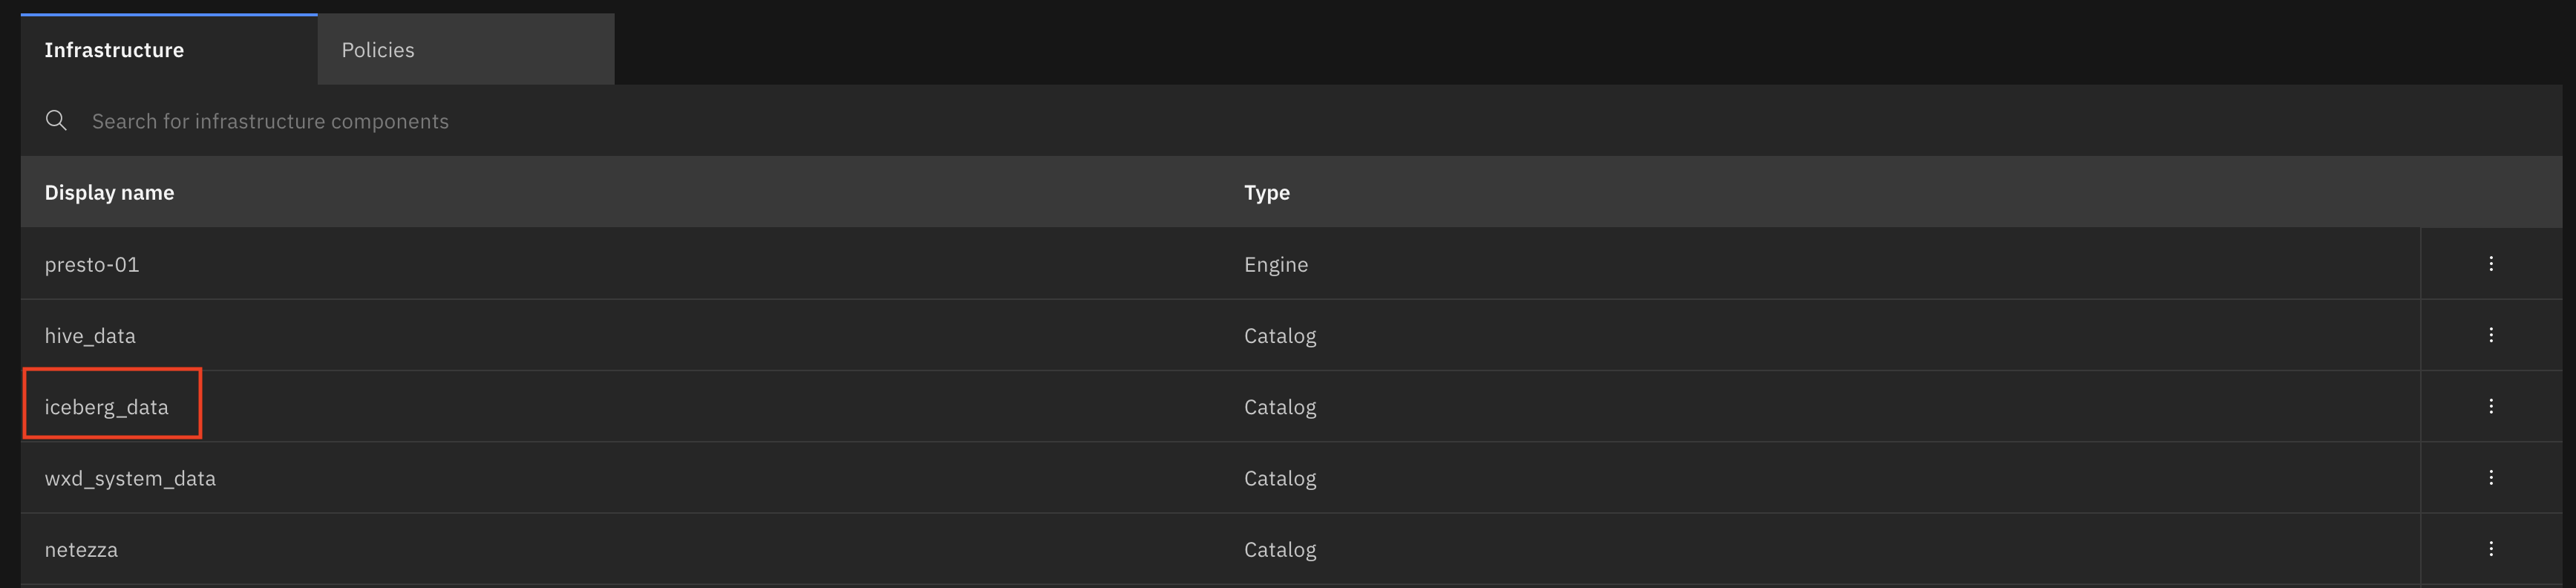
- In the watsonx.data UI, select the Access control icon on the left-side menu.
- Select the iceberg_data row to display the Access control (default) window.
-
By default, the Admin role is assigned to the ibmlhadmin username (the login used when starting the watsonx.data UI). Additional access can be added by selecting the Add access button. Selecting Add access will display all usernames known to the watsonx.data lakehouse and allows these usernames to be granted access to the iceberg_data catalog.
-
Select the Data objects tab at the top of this window. This will display the flight_delay_cause table (as that is the only physical object under iceberg_data). The information provided in the tabs is information that is part of other menus within the watsonx.data UI except for Time Travel tab. Time Travel allows a table to be reverted to earlier versions of the table for recovery from unintended table changes. Since the flight_delay_cause table has no other activity except for the initial data load, Time Travel is not possible. If there were multiple Time Travel entries, then the table could be reverted to earlier versions of the table.

- Close the iceberg_data Access control (default) window.

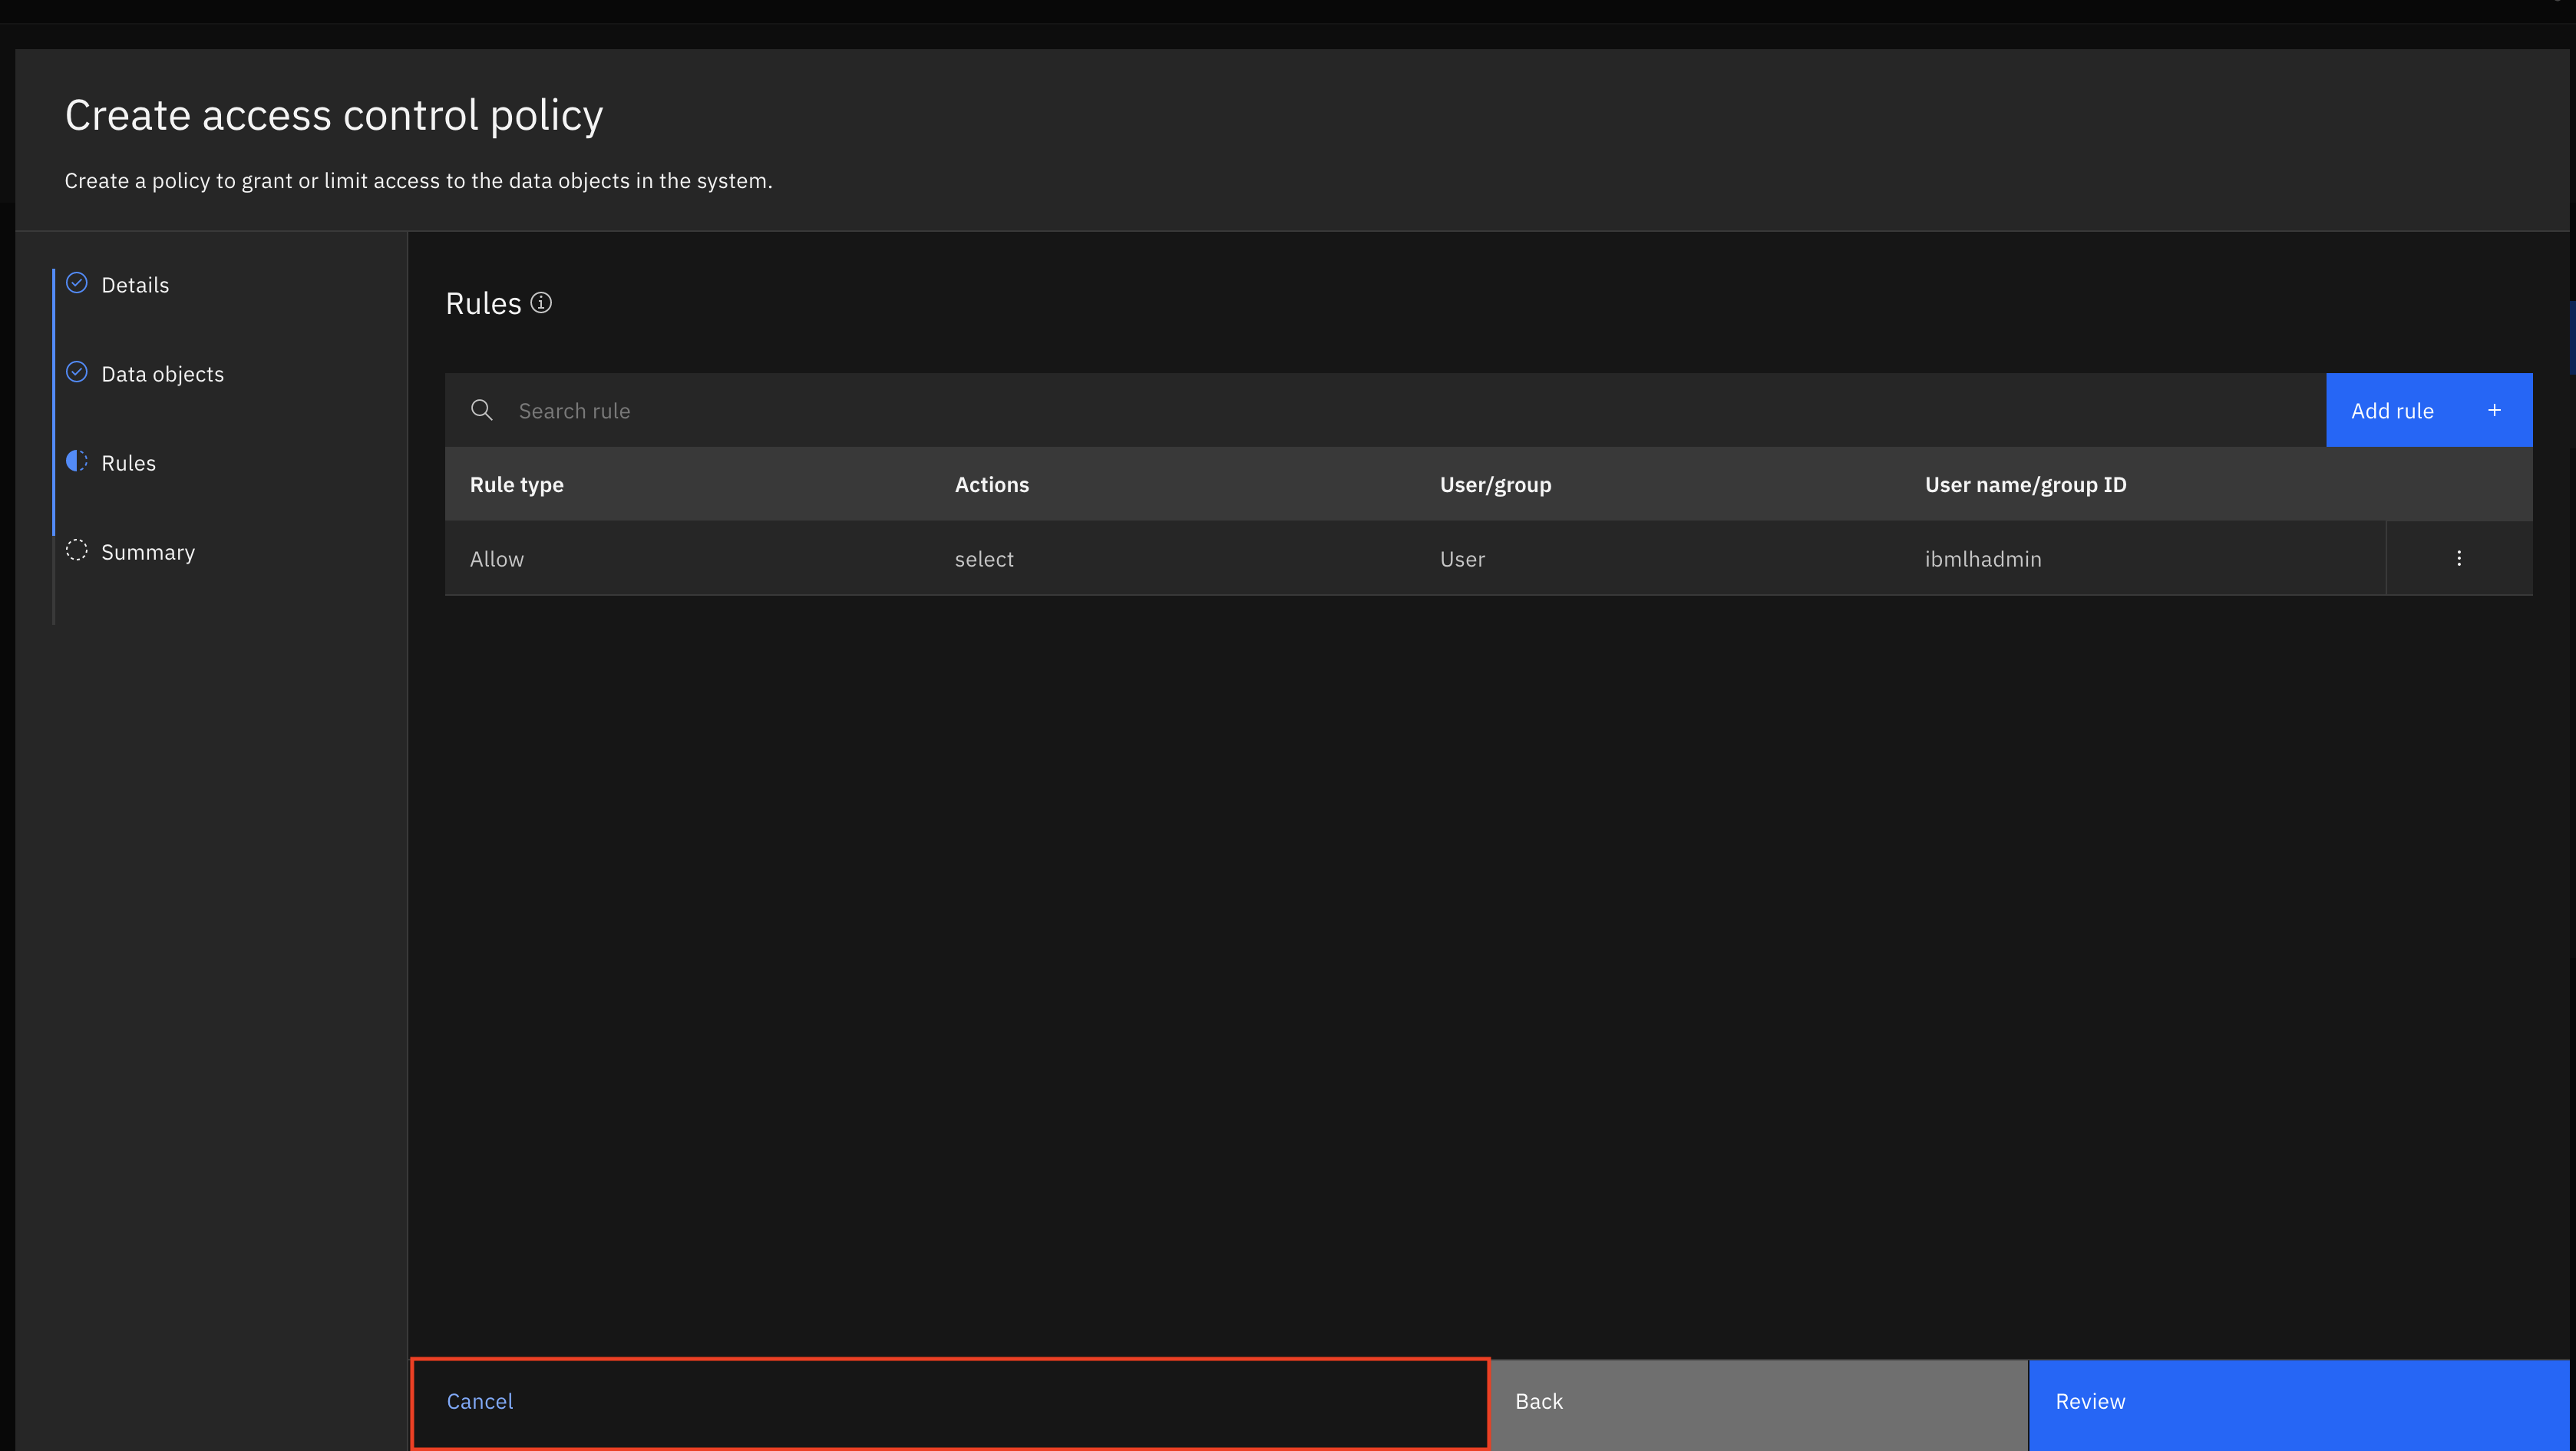
- On the main Access control window, select the Policies tab at the top. No policies are defined, as this window has no entries shown. Select the Add policy button to understand a watsonx.data policy and what defines a policy.

-
The first panel asks for basic information, such as the policy name and a description (optional). By default, the policy is Inactive upon creation, and this is a good practice to maintain (can activate the policy after it is created and verified as correct). Give the policy the name
flightdelaycausepolicyand select the Next button to continue. -
In the next panel select iceberg_data for the catalog, flight_delay for the schema, flight_delay_cause for the table, all for the table columns, and select the Next button to continue.
There is a quiz question related to viewing a table’s column definitions
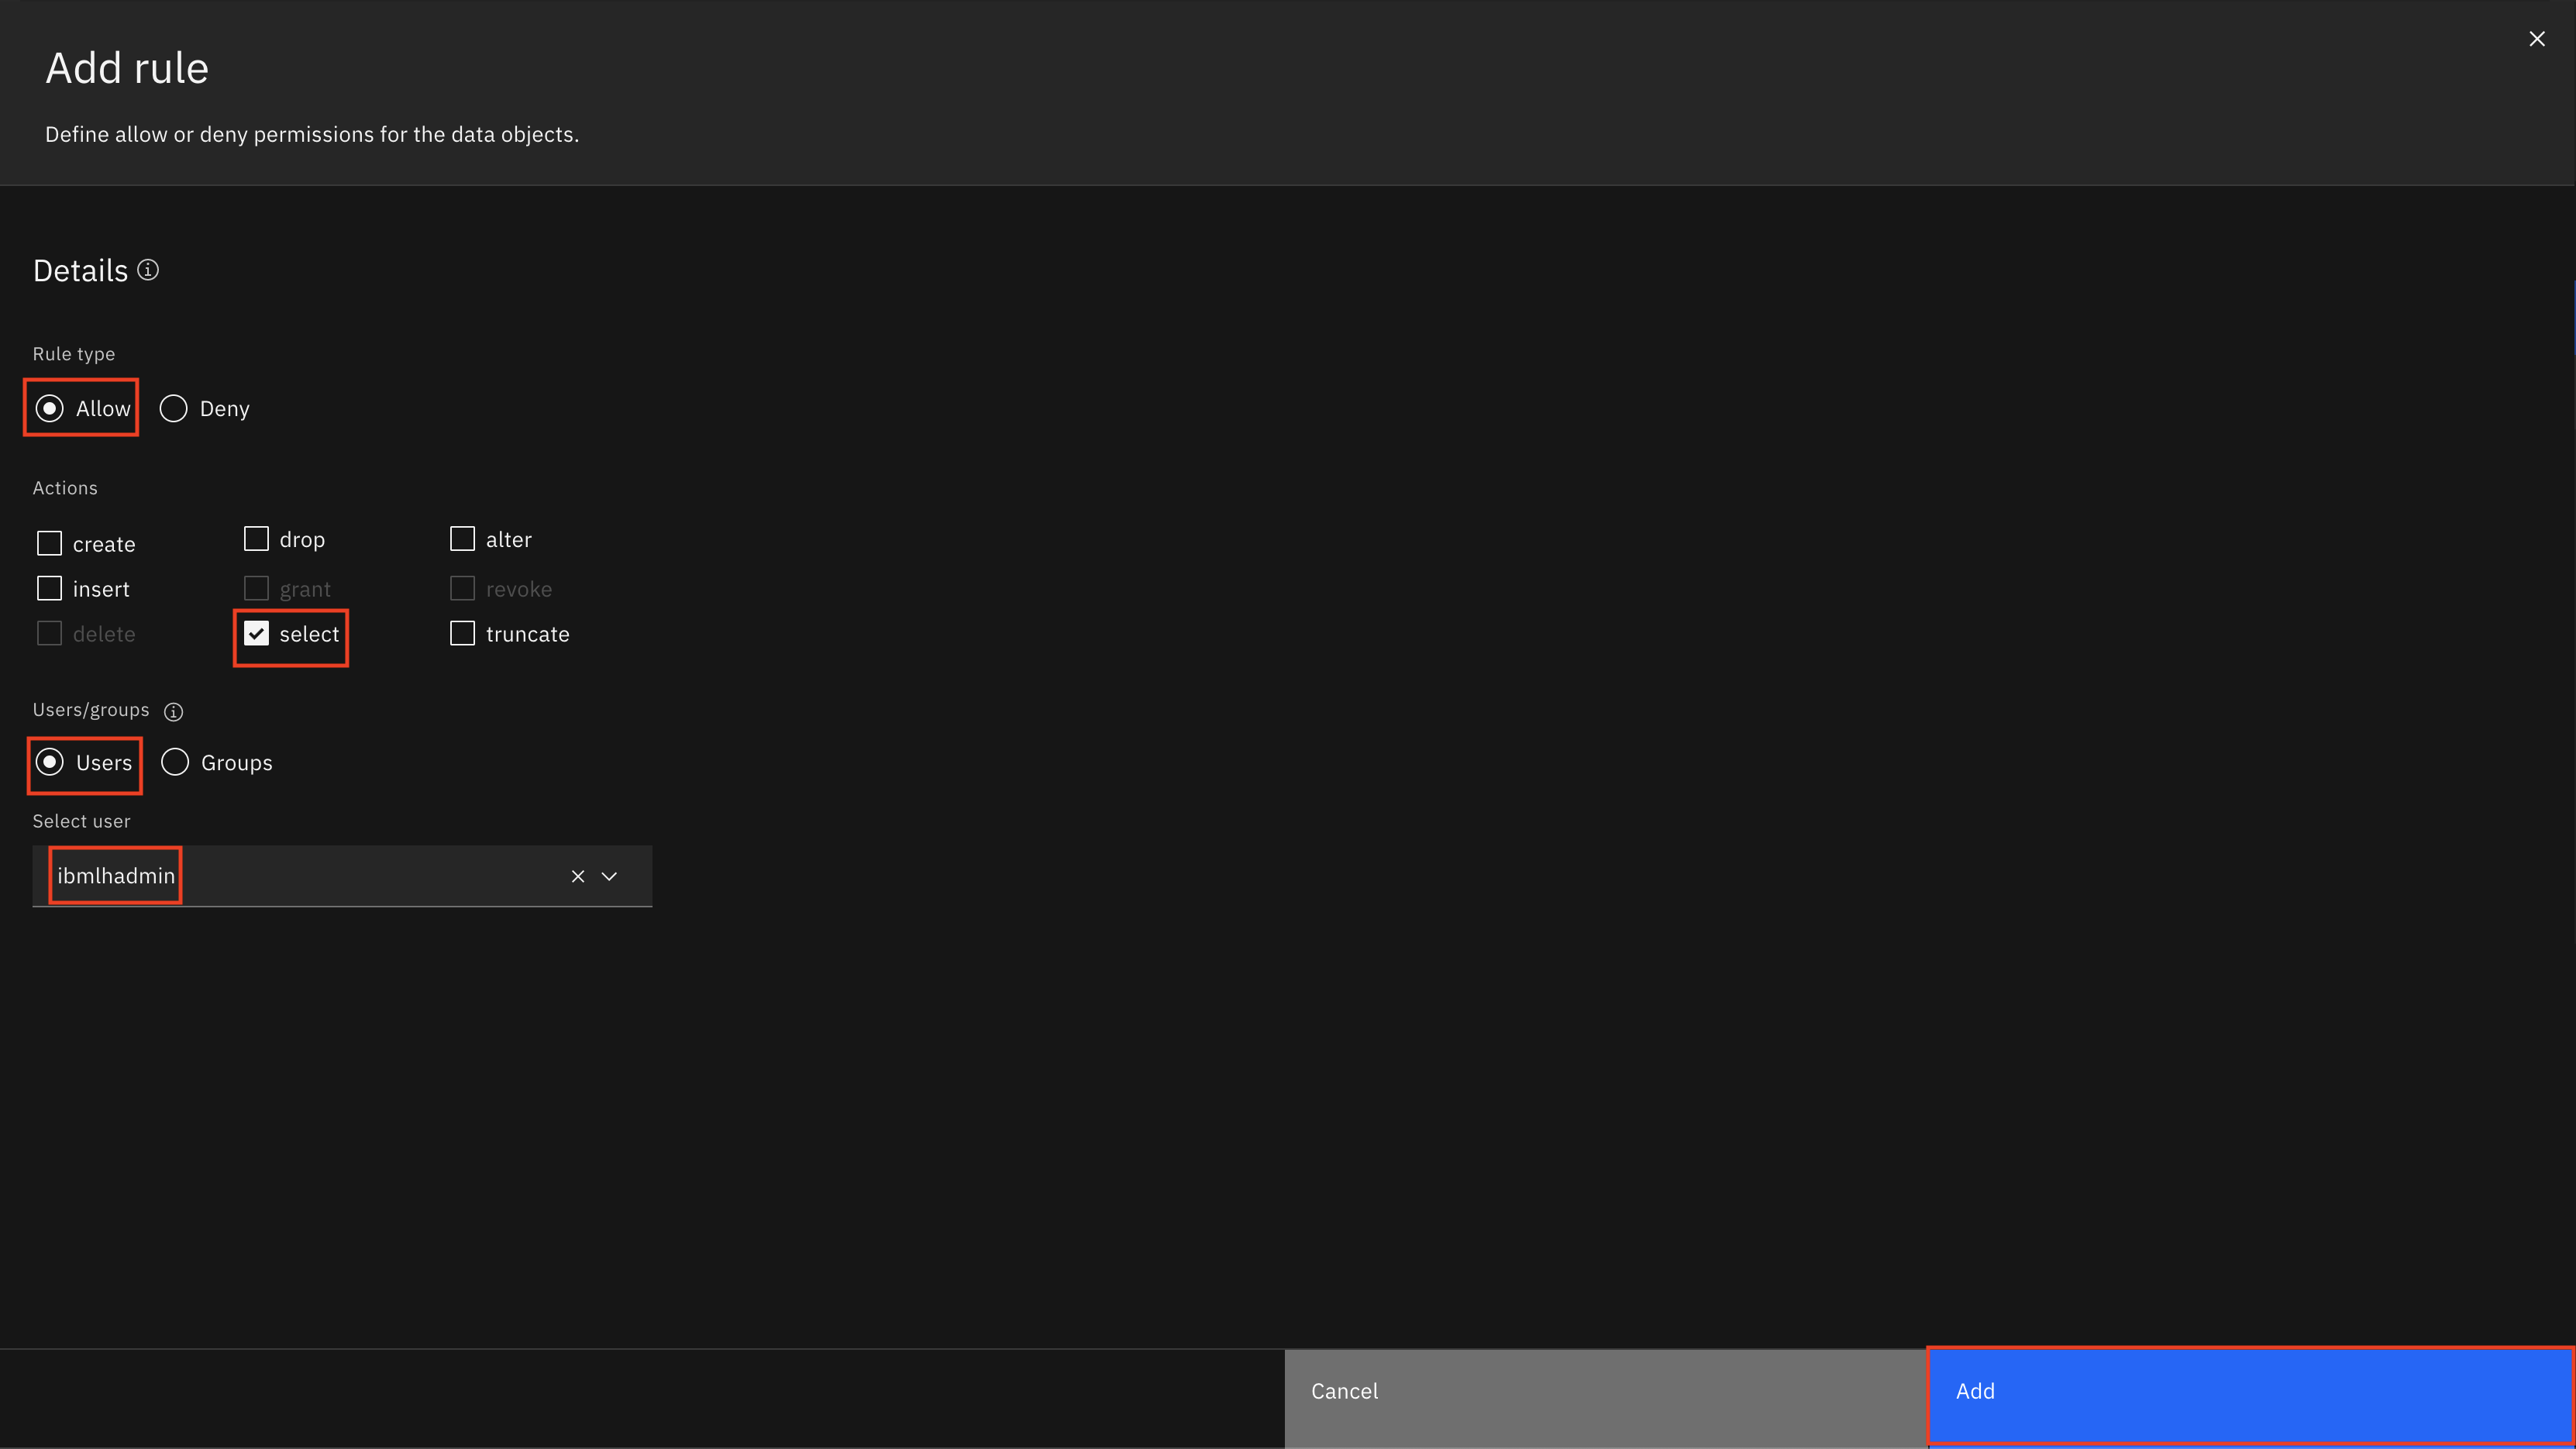
- The next panel allows rules to be defined by selecting the Add rule button. The panel has no rules shown as none are defined by default. Select the Add rule button. This displays another window to input that allow specific access rules such as actions (create, drop, alter, insert, select, and truncate) and which groups or users to include in the rule. Select Allow for the Rule type, select for the Actions, Users for the Users/groups, ibmlhadmin for the Select user, and select the Add button to add the new rule.
- Since this watsonx.data Developer image has no additional users (only ibmlhadmin) and no groups defined, there is no need to go further with Access control. Select the Cancel button to exit out of the Create access control policy window.
Congratulations, you have reached the end of lab 203.
Click, IBM watsonx.data to go to the IBM watsonx.data home page.