201: Custom Extensions
In this lesson
Learn how to integrate watsonx Assistant with external services, like CRM systems, ticketing
services, or databases, with custom extensions.
Prerequisites
Complete this section with the assistant you used in the 104 section or your own assistant. If you
want to use your own assistant, you must upload this Action skill which reflects the skill after
completing section 104.
In order to learn how to build custom extensions with third party applications, this section will
require you to setup a HubSpot CRM account, as well as a Zendesk account.
Introducing Integrations
The previous sections of this lab covered many new and exciting ways in which watsonx
Assistant makes building conversational flows easy. However, for your assistant to reach its full
potential as a comprehensive support solution, it also needs to seamlessly call out to—and pull
information from—an ever-growing world of web apps.
In fact, anyone that has had to create real-world conversational flows with a virtual assistant will
attest that almost every conversational flow ends up relying on integrations. In addition, one of
the biggest challenges they would have faced is having to integrate various Application
Programming Interfaces (APIs) into the virtual assistant platform—whether watsonx Assistant or
another conversational AI platform—to deliver the solution.
Types of integrations
watsonx Assistant generally groups integrations into three types: channel integrations, live agent
or service desk integrations, and extensions.
Channel integrations connect your virtual assistant to your end users. Channels include web
chat (like the Lendyr assistant at Lendyr.com), phone (like the Lendyr assistant at +1 (732) 481-
4918), SMS, WhatsApp, Facebook, and more.
Some channel integrations can include a live agent or service desk integration. For example,
the web chat channel integration can include a service desk integration with Zendesk Chat, or the
phone integration can be set up with a live agent integration to NICE CXone, a leading contact
center platform provider.
Extensions connect your virtual assistant to external services, and in your Actions, you can
define steps that interact with an external service by calling an extension. Extensions can connect
to a variety of tools, including CRM systems, ticketing services, databases, search engines, and
more.
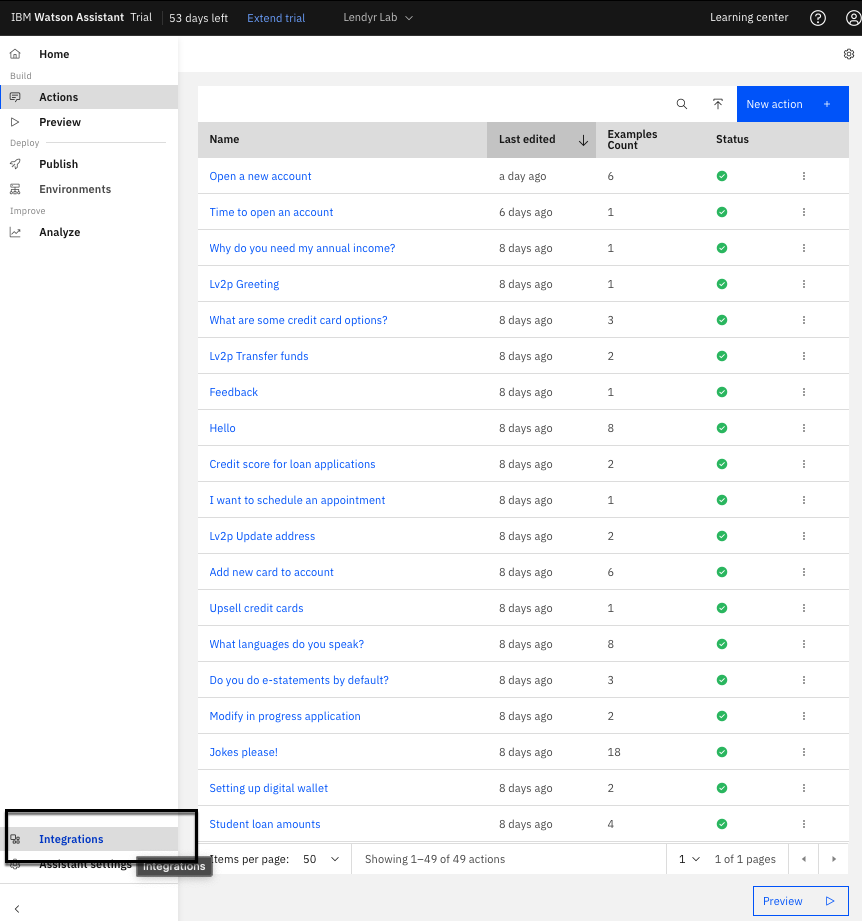
The Integrations page
The idea of managing all these types of integrations may seem daunting at first, but watsonx
Assistant keeps things stress free with its Integrations page. The Integrations page consolidates
all your channel integrations and extensions in one place.
Use the left menu of your assistant to open the Integrations page. It’s at the bottom of the menu,
so you might not spot it at first:
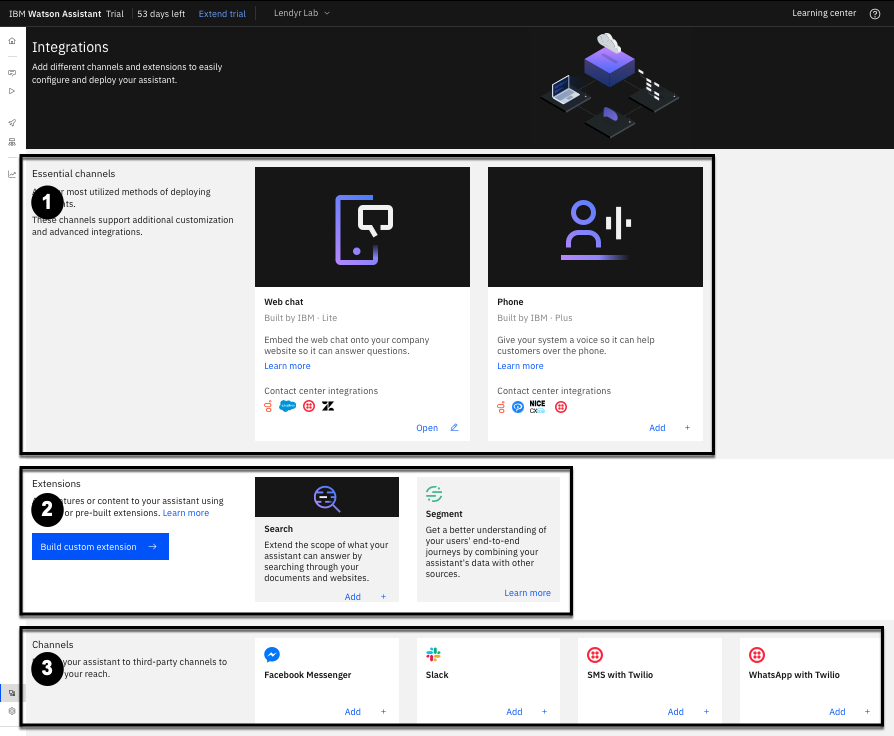
The Integrations page is organized into three sections (as can be seen below):
- Essential channels — The bedrock of any assistant: Web chat or Phone.
- Extensions — Customize your assistant by connecting to third-party APIs.
- Channels — Deploy your assistant to additional channels, like Slack, Facebook Messenger, or SMS and WhatsApp via Twilio.
The web chat channel integration is automatically configured for every virtual assistant.
Organizations that build virtual assistants for the phone, Slack, Microsoft Teams, or other
channels still tend to use the web chat channel for drafting and testing. Later sections of this lab
will discuss the phone channel integration and other channels in more detail.
Extensions
What is an extension?
An extension is a direct connection between watsonx Assistant and an external service’s RESTful
API.
As can be seen in the screenshot above, watsonx Assistant offers two prebuilt extensions called
Search and Segment (2), and it also lets developers and builders build their own custom extensions.
Search extension
The Search extension lets an organization connect watsonx Assistant to a search service. The
search service is typically connected to the organization’s existing knowledge base. The
extension allows watsonx Assistant to send questions to the search service, which then searches
the organization’s knowledge base for relevant answers. watsonx Assistant receives these answers
from the search service and uses them to answer end users’ questions.
Later sections of this lab describe the prebuilt Search extension and custom search extensions in
more detail.
Segment extension
The Segment extension lets an organization connect watsonx Assistant to Twilio Segment, a
customer data platform. Once the Segment extension is enabled, watsonx Assistant streams
conversation data to Segment, where the data is combined with other customer journey data.
Organizations can use Segment’s many prebuilt connectors to send their data to a variety of
destinations, such as CRM systems or cloud databases. Organizations can use Segment to create
complete views of the end user journey across channels and touchpoints.
Later sections of this lab describe the Segment extension in more detail.
Custom extensions
Custom extensions combine the power of integrating with an API with ease of use for both
developers and builders – driving down time-to-value and total cost of ownership (TCO). Let's
learn all about them!
How do custom extensions work?
To create a custom extension, a developer uploads a description of an external service’s API.
The description is a JavaScript Object Notation (JSON) file that describes the external service’s
API per the OpenAPI Specification. The OpenAPI Specification is a widely adopted standard for
describing RESTful APIs. (For more on RESTful APIs, visit this Red Hat page.)
Where do developers get this description of an external service’s API? Given that OpenAPI is a
widely adopted standard, many software vendors publish OpenAPI specs publicly on their
websites or documentation. If an OpenAPI spec is not readily available, there are various ways to
create one from scratch or from existing information – such as from IBM App Connect or a cURL command.
Once a developer creates a custom extension in watsonx Assistant, a non-technical builder can
use the extension in Actions. Remember that Actions have steps, and each step can ask the end
user to provide a response. Actions also store information in variables. When a builder uses an
extension, they can pass information to the extension, which was gathered in earlier steps or
stored in variables. The extension also hands information back to the Action, and the builder can
reference these in later steps or store them as variables. All of this is done in the Actions page,
without writing any code.
If you’re having trouble visualizing this, that’s okay – let’s build an example together!
Custom extension starter kits
To build out the examples in this lab, you will reference a few starter kits maintained by the
watsonx Assistant development team to help organizations get started with custom extensions.
You can view the starter kits here. The starter kits include CRM systems (HubSpot), ticketing
services (ServiceNow, Zendesk Support), search engines (Coveo, Google Custom Search,
Magnolia, Watson Discovery), and more.
Building Custom Extensions
Build a custom extension to a CRM system
One of the most common types of custom extension is integrating with a customer relationship
management (CRM) system. Virtual assistants often pull in information from a CRM system to
personalize the end user experience.
For example:
- The virtual assistant can greet the end user by name, pulling the name from the end user’s
profile in the CRM system. - The virtual assistant can pre-populate fields in a form or skip steps in an action, so it
doesn’t ask the end user for information that the organization has already learned from
previous interactions and stored in the CRM system. - The virtual assistant can provide different levels of access and service depending on the
membership status of the end user in the CRM system. - The virtual assistant can make special offers to up-sell or cross-sell to the end user,
pulling a list of offers most likely to appeal to this end user from the CRM system.
Let’s build a custom extension to HubSpot. You will begin by building the custom extension,
and you will finish by incorporating the extension into your Actions.
Download the OpenAPI spec, which describes the HubSpot API, from the starter kit
Navigate to this link, which stores an OpenAPI spec for the HubSpot API. Download the file by
right-clicking anywhere on the page and selecting "Save Page As..." or "Save as..." Save the
file to your system, and assure the file extension is .json; the file name should be
hubspot.basic.openapi.json. (Rename it if necessary.)
You now have a description of the HubSpot API.
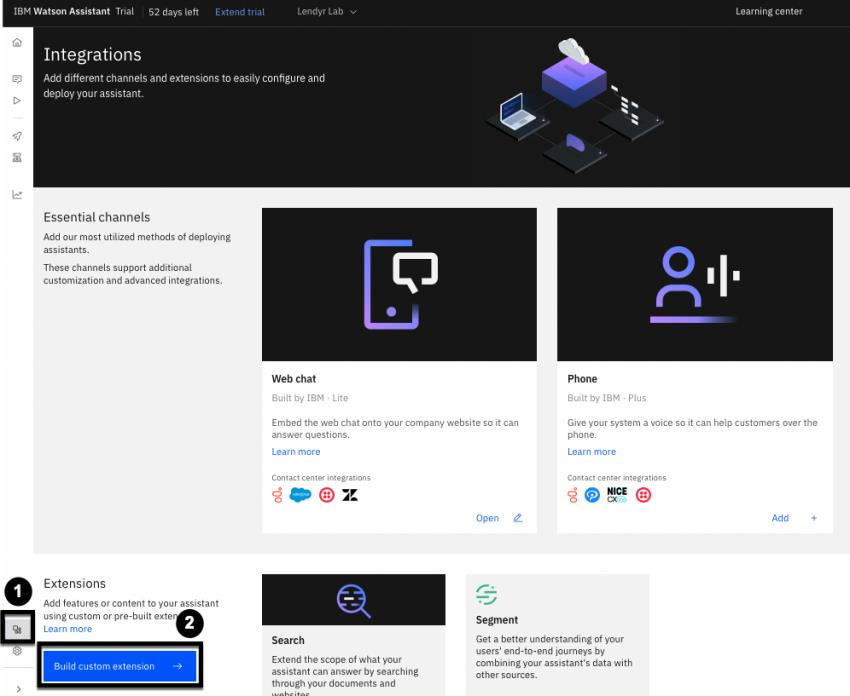
Create a custom extension by uploading the OpenAPI spec to watsonx Assistant
In watsonx Assistant, use the left menu to open the Integrations (1) page. Then, scroll down and
click the Build custom extension (2) button:
This first screen describes what you’ll need to create the extension. Note that the OpenAPI JSON
document, which you just obtained, is key to the setup. Click Next in the top right to proceed to
the next screen:

The second screen asks you to name and describe the custom extension. Name the custom
extension HubSpot CRM as shown in the image below (1) and add a description, like
"Personalizes the end user experience with information from Lendyr's CRM system" (2). Click
Next (3) in the top right to proceed to the next screen.

In the next screen, either drag-and-drop or click to upload the OpenAPI spec you downloaded,
then click Next in the top right to proceed to the next screen:

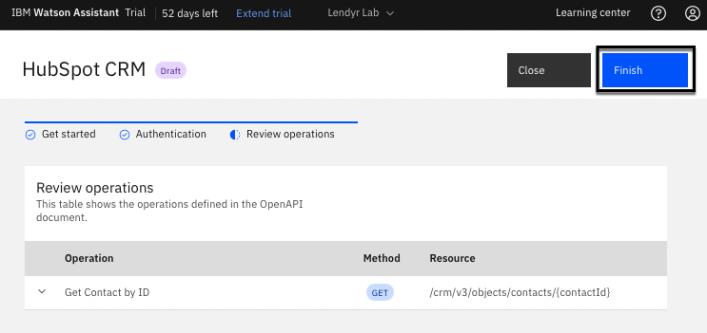
Take a moment to review the extension on the following screen. Note that this extension will
allow us to call the HubSpot API to get a Contact’s details by their ID (1). You can click the
arrow next to this Get Contact by ID (1) operation to see more details:
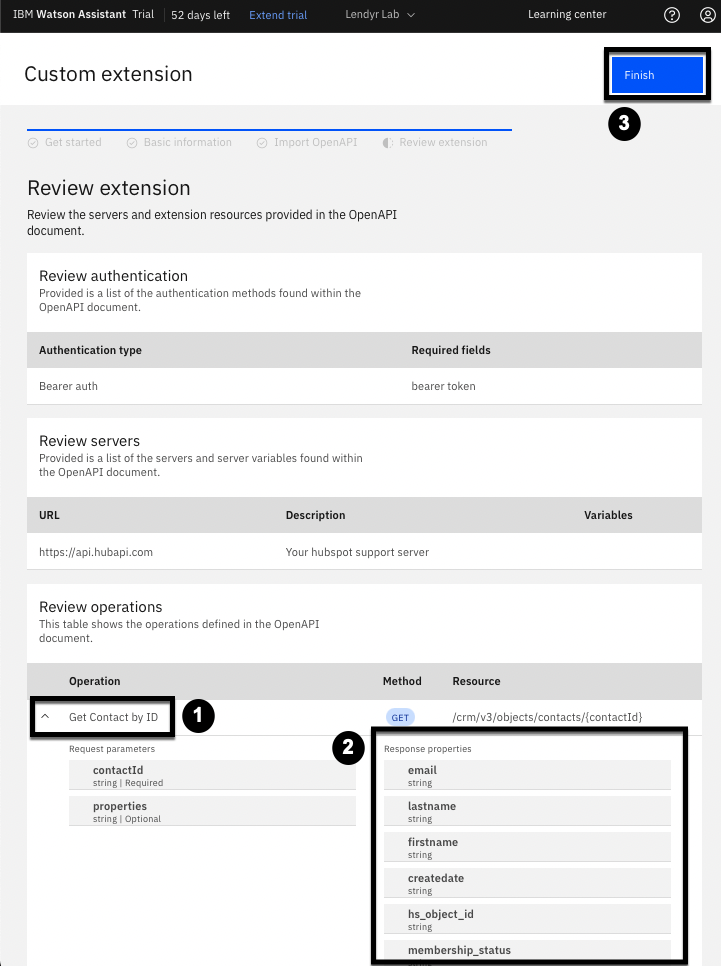
In the above image, watsonx Assistant will share the end user’s contactid with the extension,
which will call the HubSpot API and then return various information, including the end user’s
email, lastname, firstname, and membership_status (2).
Click Finish (3) to create the custom extension. You should now be able to see the HubSpot
CRM extension in your Integrations catalog:

Create a HubSpot account and add some end user data
Next, you will create a HubSpot CRM account (if you haven’t already created one in the past).
This will be the specific instance of HubSpot with which the extension integrates.
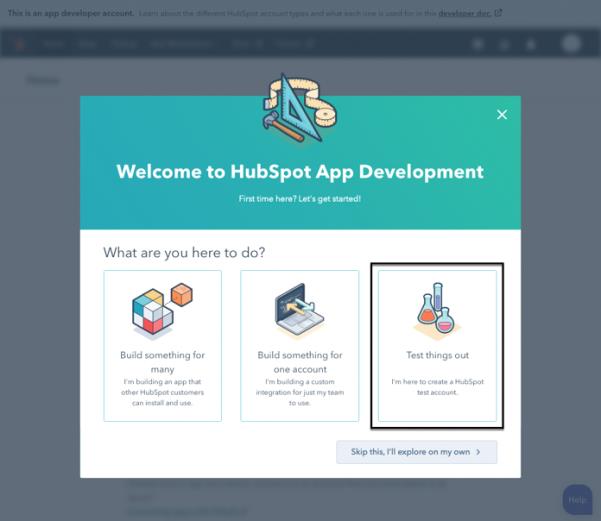
Navigate to this link to create an app developer account. This account is free and it does not
require a credit card:

Follow the prompts as you sign up. HubSpot will ask you to verify your email. Once you have
verified your email, click Test things out to create a test account:
Click Manage test accounts on the following screen:

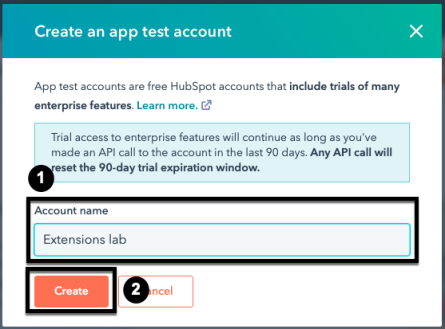
Next, click Create app test account in the top right.

On the popup window, name the test account Extensions lab (1) and click Create (2):
Open the test account in a new window by clicking its name:

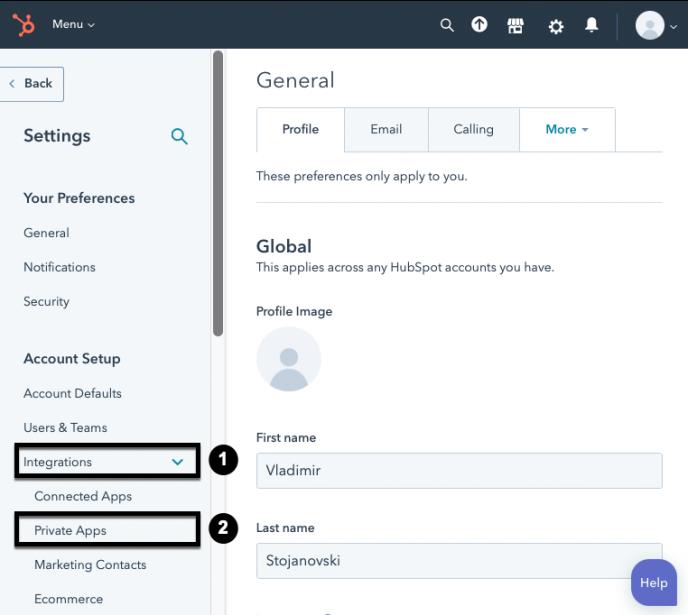
Next, in the newly opened window, click on Settings (the cog wheel icon in the top menu bar):

On the Settings screen (shown below), click to expand the Integrations (1) left menu option, and
select Private Apps (2):
Now, create your own private HubSpot CRM app:

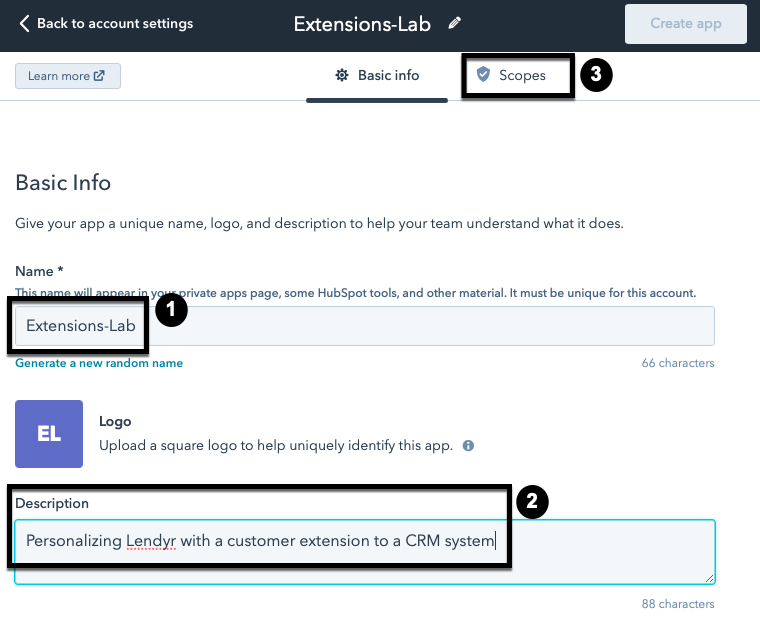
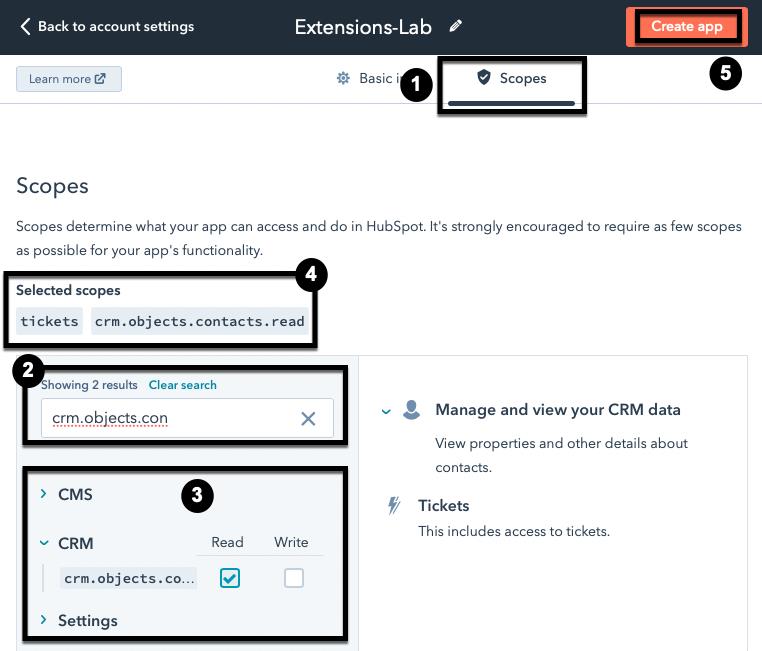
In the following screen, enter your app’s name, for example Extensions-Lab (1), enter a
description (2), such as “Personalizing Lendyr with a customer extension to a CRM system”),
and then click Scopes (3):
Next, you will set the scope of your new HubSpot CRM app as one that handles support tickets:
- Go to the Scopes tab.
- In the search box, first search for tickets, and then search for crm.objects.contacts.read.
- When you find tickets in this box, select it. Do the same for crm.objects.contacts.read.
- Confirm that they both appear as Selected scopes.
- Click Create app:
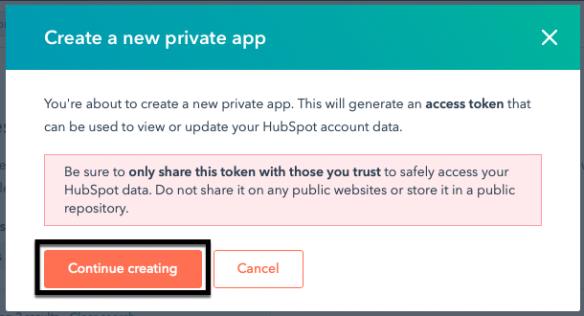
The next popup screen informs you that an access token will be generated. You will need to save
this elsewhere for future use. Click Continue creating:
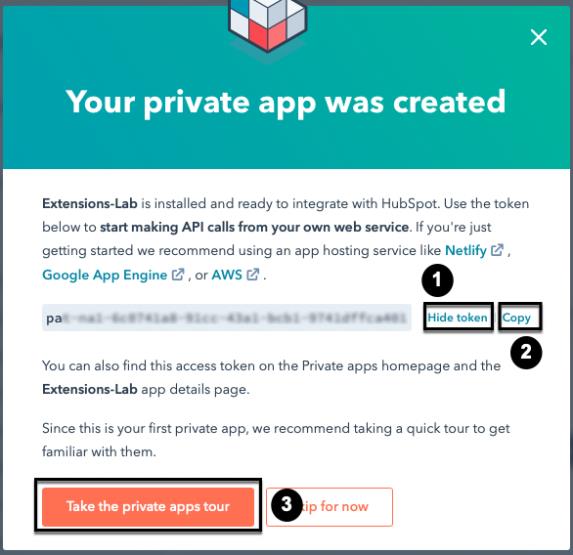
In the ensuing popup, click to show the token (1), Copy it (2), and save it. Then, it’s
recommended that you take the quick private apps tour (3):
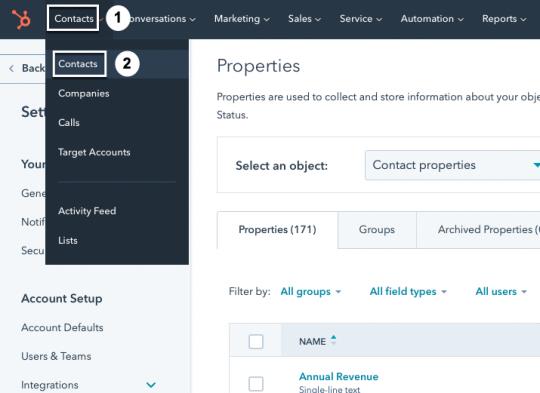
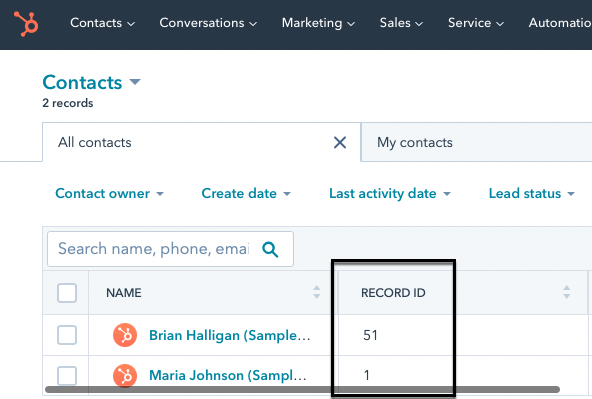
Once you complete the tour, you will need to add contacts to your CRM system. Contacts are
end customers which your assistant will need to support. To do so, open the Contacts page by
clicking Contacts (1) in the top menu, then Contacts (2) from the dropdown menu:
Note that, on this Contacts page, HubSpot has created two example contacts for you: Brian
Halligan and Maria Johnson. Each contact has a set of properties associated with them. These
properties are columns in the Contacts table; for example, phone number and contact owner.
You will add a new property: membership status. Click Actions (1), then Edit properties (2):

Then, click Create property:

Next, you will create the property with Object type: Contact (1), Group: Contact information(2),
and Label: Membership status (3). Make sure the label is exactly membership status. The
OpenAPI spec you uploaded to create the extension expects a label with that exact name and
spelling. You can double check by clicking the </> icon (4) and noting that the Internal name is
exactly membership_status (5). When ready, click Next (6):

Select Single-line text as the field type (1), then Next (2):
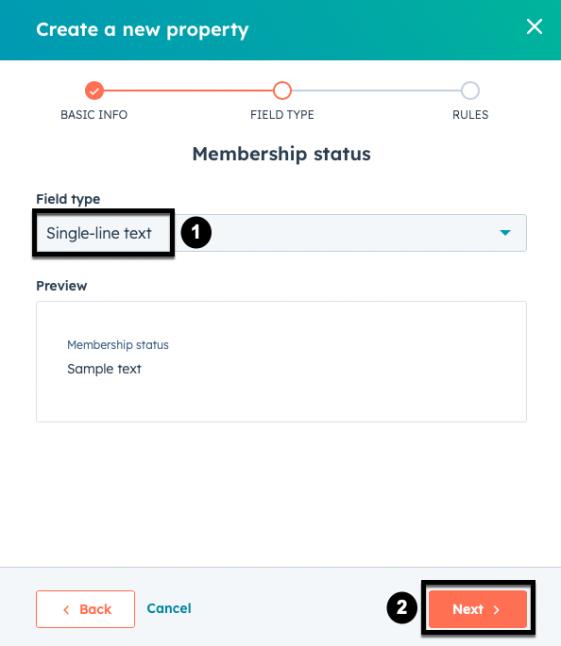
Click Create in the bottom right:
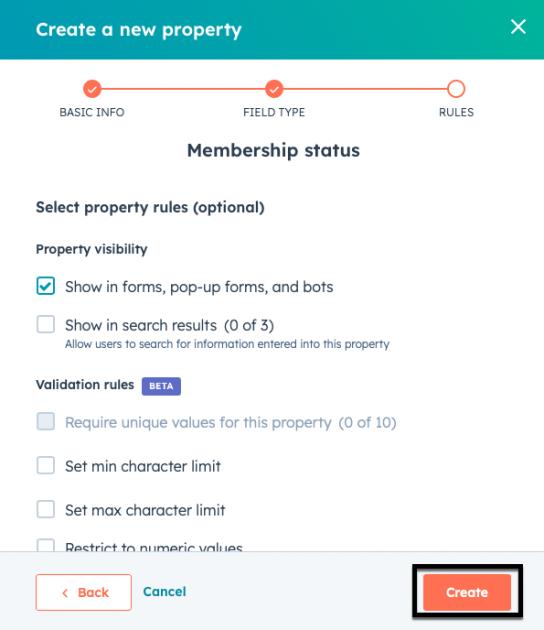
Note that a popup on the top of your screen confirms that the new property was created:

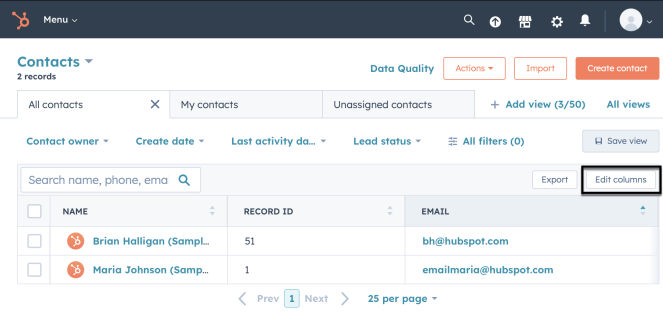
Now, return to the Contacts page by clicking Contacts (1) in the top menu, then Contacts (2)
from the dropdown menu. Next, you will add data to the contacts in your CRM system. Click Edit columns:
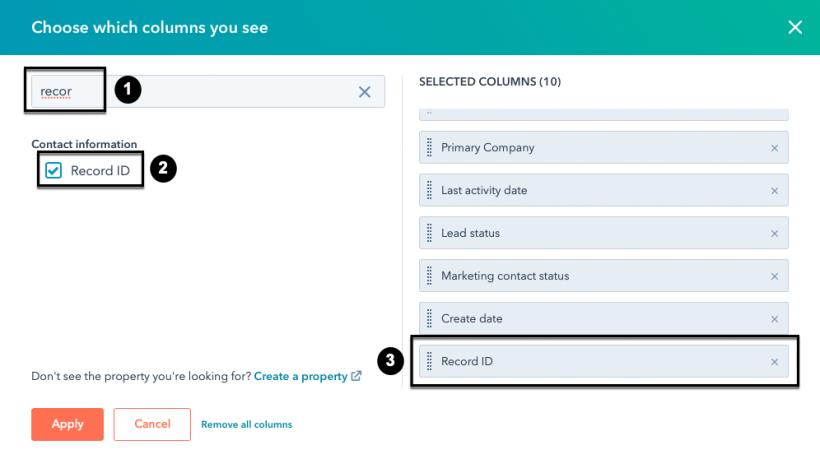
Search for the Record ID (1) and check its checkbox (2) to add it. Note that it appears at the
bottom of the list of selected columns (3):
Next, search for Membership status (1) and check its checkbox (2) to add it. It will also appear
at the bottom of the list of selected columns (3):

Drag Record ID and Membership status (1) up to be the second and third columns,
respectively. Name will be the first column. Then, click Apply (2):

Your table should now look similar to the image below. Select Brian Halligan’s record by
clicking his checkbox (1), then click Edit (2):

In the ensuing popup, select Membership status (1) from the dropdown,
and type in Lendyr Topaz (2) as its value. Click Update (3):

You should now see in the Contacts table that Brian Halligan’s membership status is Lendyr
Topaz (not shown). Do not change Maria’s membership status.
Congratulations! You’re ready to work with the custom extension in watsonx Assistant. Don’t
close your HubSpot browser window just yet, you may need to come back to it once more.
Add the custom extension to your virtual assistant
Earlier, you created a custom extension to HubSpot. This tells watsonx Assistant how to connect
to HubSpot, but it doesn’t tell watsonx Assistant which instance of HubSpot to pull data from.
In your assistant, navigate to the Integrations page (1) and click Add (2) on the HubSpot card,
then click Add (3) in the pop-up confirmation.

In the following screen, you can read about how to add the custom extension. When ready, click
Next:

Select Bearer auth (1) as the authentication type, then paste in the access token you saved from
HubSpot (2). (You don't need to specify the server because that was included as part of the JSON
file provided earlier when adding the integration.) Click Next (3).

You’ll see a summary of the custom extension on the final page. Review the operations provided
by the extension, then click Finish:
Click Close:

As a builder, write the extension in an Action
You now have a custom extension to your HubSpot CRM system, and you’re ready to use it to
personalize the experience of Lendyr’s end users.
Earlier we noted several ways to personalize the end user experience with CRM data. Now, you
will simply greet the end user by name and store their name, email, and membership status in the
virtual assistant. Storing their information allows you to reference it in future Actions.
Some step-by-step screenshots will be omitted—if you don’t know how to follow these
instructions, please refer to the 102 section of this lab on building Actions.
Open the Actions page, then create a New action from scratch. The end user should say
“Authenticate me” to start this interaction. (Not shown.)
In Step 1, have the assistant ask “What is your Lendyr member number?” and define the
customer response as a number. Your screen should look similar to this:

Add a second step. In Step 2, have the assistant say “Pulling in your information now…” Change
And then to “Use an extension,” which will open up an Extension setup popup window:

In the panel, as shown above, select HubSpot CRM as the extension (1), Get Contact by ID as
the Operation (2), and set contactId to the end user’s response to step 1, “1. What is your Lendyr member number?” (3)
Notice how you, as the builder, are easily configuring this Action to call out to the HubSpot API
via the extension. You can select the steps or other variables to plug into the operation with a
dropdown menu – there’s no code and no unnecessary complexity.
Click Apply when you’re done. Your Step 2 should look like this:

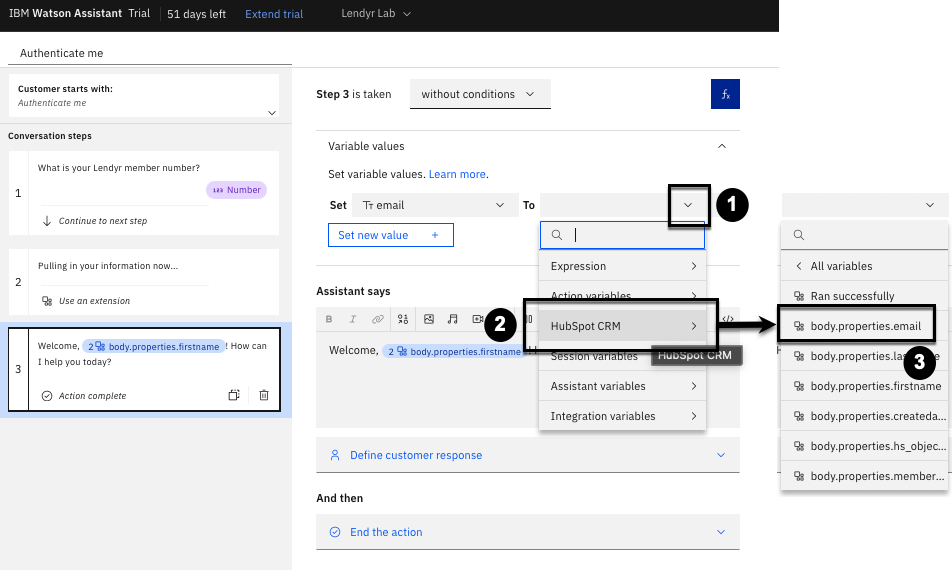
Now, create a new step. In this Step 3, since you used an extension in a previous step, you can
reference information that the extension has returned.
In Assistant says, type in “Welcome, ” (1) and then click the variables icon (2). Let’s
look at what variables are available to you (3):

The list of variables provides a selection of values that you can reference in your assistant now
that you’ve called the extension. Note that it includes Run successfully which indicates whether
the API call was successful, so that you can conditionally handle the case of unrecognized
customer IDs.
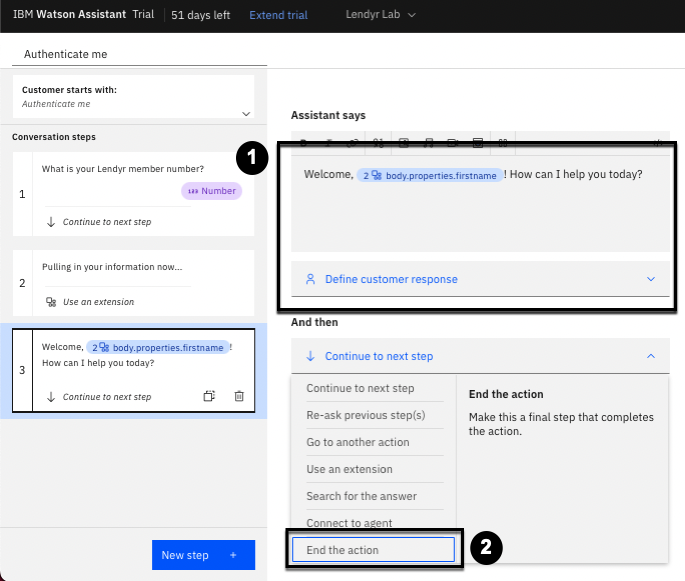
From this list, scroll down and click on body.properties.firstname. Then, as shown below (1),
type in an exclamation point, and a new sentence: “How can I help you today?” Lastly, change
And then to End the action (2):
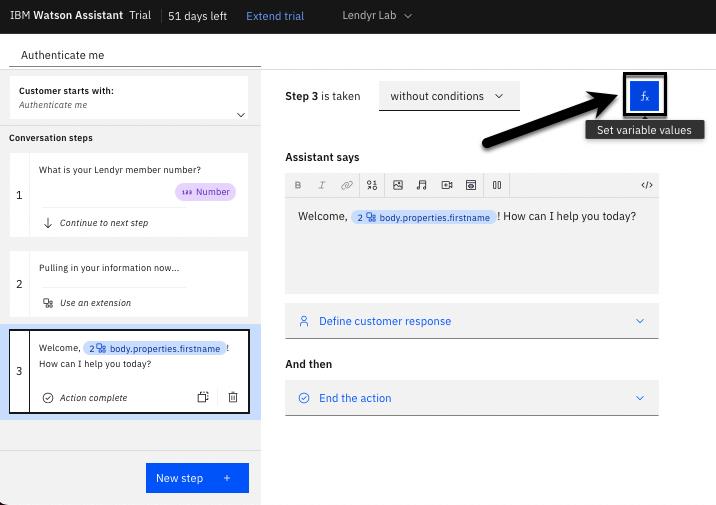
There’s one more thing you need to do. Right now, the information produced by the extension is
not stored by the assistant beyond this Action. In other words, while you can use the
body.properties.firstname variable in Step 3, you cannot use it in an another Action.
Let’s fix that. Click the fx icon in Step 3 to set variable values.
Note that the Variable values view is now shown (1). Click Set new value + (2) and scroll
down to the bottom to select + New session variable (3):

You will create several new session variables to store information from HubSpot. Session
variables are stored for the end user’s entire session – the entire time they interact with the
virtual assistant. This will allow you to use them across Actions.
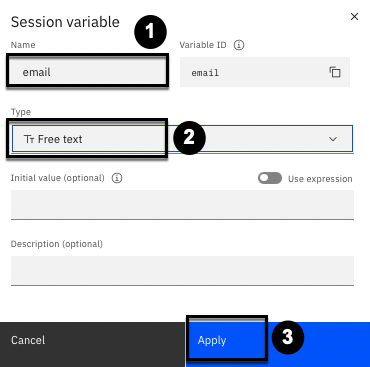
In the popup, set the Name to email (1), select Free text (2) as its type, and click Apply (3):
Back in the Step 3 view, set the email variable value to body.properties.email. Do this by
clicking on the dropdown (1), then selecting Hubspot CRM (2), and finally picking the
body.properties.email property (3):
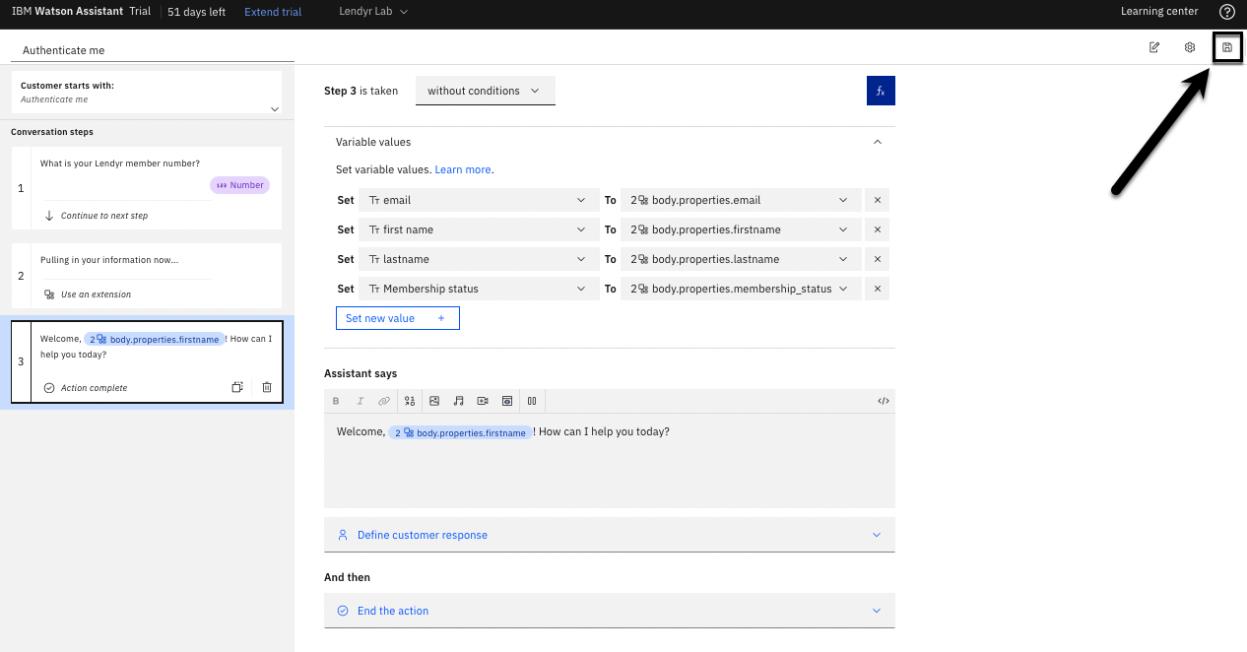
Now, repeat the above steps to create three more session variables named: first name, lastname,
and Membership status. (Not shown.) As you do, set each session variable to its corresponding
value from the custom extension. Your screen should look like the image below; don’t forget to
save the Action by clicking on the Save icon:
That’s it! You’ve successfully added an extension – a connection to an external service – into an
Action.
This may have felt quite time-consuming. You spent a fair bit of time setting up the custom
extension, then setting up HubSpot. But take a moment to imagine the two distinct roles of a
developer and a builder. The developer would have set up the custom extension and pulled the
authentication token from HubSpot. At that point, they would have messaged the builder and
said, “Hey, you’re good to go.” The builder would have opened the Actions page and gotten
straight to building. Each role specializes in what they’re best at: the developer doesn’t have to
write conversational flows, and the builder doesn’t have to write any code. That’s the power of
custom extensions!
See the custom extension to a CRM system in Action
Before you continue, remember that the “Lendyr member number” should be one of the Record
IDs in HubSpot, which are 1 and 51 (as shown below). Any other number will not work – you
will return to fix that problem later.
Now, within the Actions window (so that you can chat in “debug” mode), open up the Preview
panel. Once you start the chat, click the variable values icon (1):
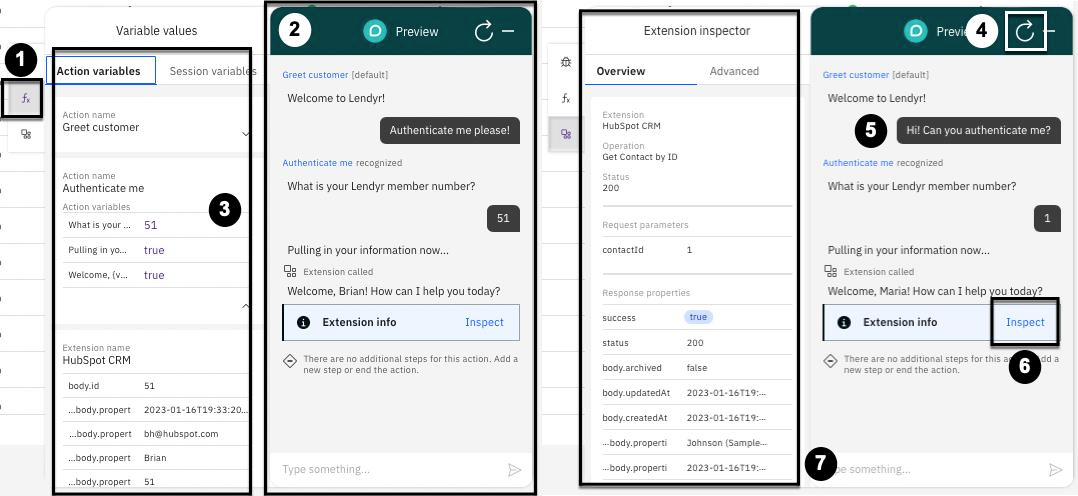
Then, have the chat shown above on the left (2) by saying “Authenticate me please!”, followed by
“51”. Note how the Action variables (3) populate and change as you converse.
Next, you will inspect the extension! Click the refresh icon (4) and enter the two customer
utterances “Hi! Can you authenticate me?” and “1” (5). The assistant now calls the extension; click
Impact (6) to show the Extension inspector (7). Note all of the properties of your HubSpot CRM
extension.
You may now close your HubSpot browser window.
Build a custom extension to a ticketing service
Excellent work. Now is a good time to take a ten-minute break. If you’re in a workshop, lean
over to your neighbor and ask how they’re doing. Once you’re ready, you’ll pick back up with a
new custom extension to a ticketing service.
Thus far, you’ve integrated Lendyr’s virtual assistant with Lendyr’s CRM system. This pulls
information in from an external service to personalize the end user experience. Our second
custom extension will push information out to an external service.
Imagine Lendyr uses Zendesk, a popular customer service software product, to manage customer
support tickets, like bug reports, complaints, or requests for assistance. Lendyr gets a fair bit of
traffic to its virtual assistant asking to create a ticket, but today it doesn’t have a connection
between its virtual assistant and Zendesk.
Here’s what you will do:
- Set up a free trial (no credit card required) of Zendesk
- Create a custom extension to Zendesk in your assistant
- Write the custom extension into an Action
- Preview the Action to see your extension in action (pun intended!)
Let’s begin!
Set up a free trial (no credit card required) of Zendesk
Visit https://www.zendesk.com/register/ to set up a free trial. Follow the prompts, and once you
verify your email, you should arrive at a screen like this one:
Note that your Zendesk account’s URL will have a unique code called a server domain, in the
following format: https://{server-domain}.zendesk.com. Using your unique server domain,
visit https://{server-domain}.zendesk.com/admin to go to your Admin center (1) page:
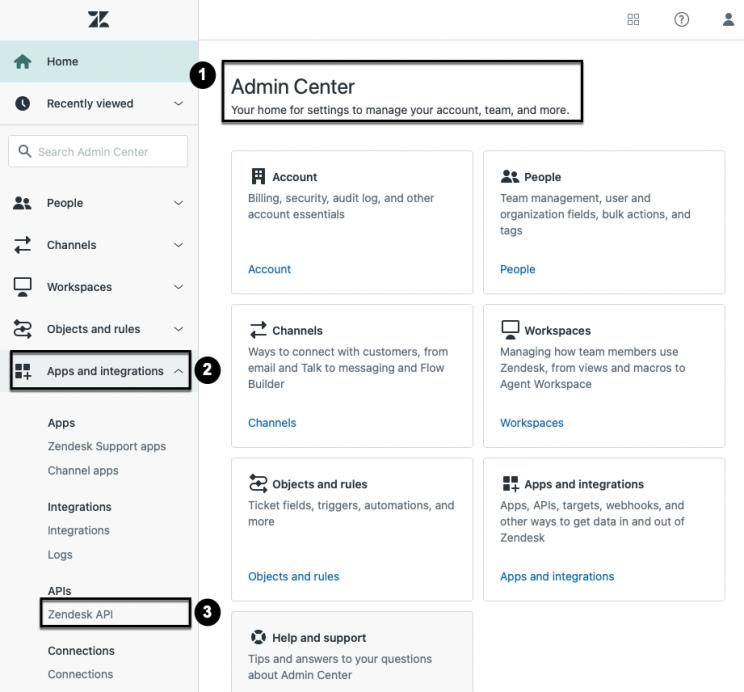
On the left-hand menu, go to Apps and integrations (2), then click Zendesk API (3).
On the next screen (not shown), agree to the Zendesk Terms of Service and Application
Developer and API License Agreement.
Next, as shown below, open the Settings tab (1), toggle Token access (2) on, and click
Add API Token (3). Copy (4) the API token and store it somewhere, and click Save (5):
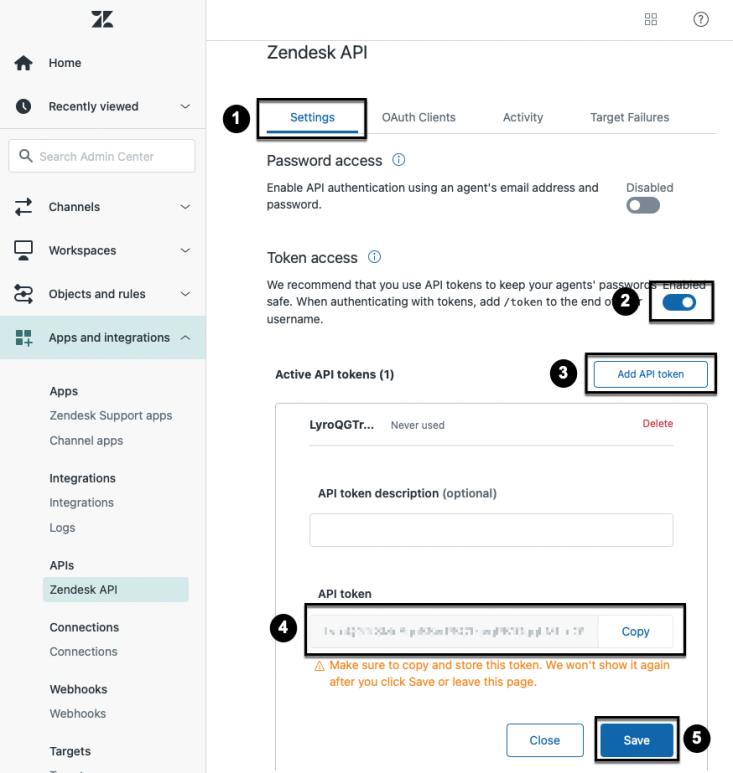
Important: Make sure to copy and store the API token. Zendesk will never show it to you again
once you click Save or leave the page.
Create a custom extension to Zendesk in your assistant
Navigate to this link, which stores the OpenAPI spec for the Zendesk API. Download the file by
right-clicking anywhere on the page and selecting “Save Page As…” or “Save as…” Save the
file to your device; it should appear on your device as a JSON file.
Note: If the JSON file does not save with a .json file extension, make sure you add it manually
by renaming the file. The final file name should be zendesk.openapi.json
In watsonx Assistant, go to the Integrations page (1), and click Build custom extension (2):

On the following screen, click Next to get past the Get started panel (not shown). This will take
you to the Basic information (1) panel, shown below. Name your custom extension
Zendesk Ticketing (2) and type in a description (3): “Allows end users to use the virtual assistant to
create tickets in Lendyr's ticketing service.” Click Next (4):

Drag and drop the OpenAPI spec (1), or click to upload. Click Next (2):

Review the extension and its operations. You’ll mainly use Create Ticket (1). Click Finish (2):

Back at the Integrations page (1), click Add + (2) on the Zendesk Ticketing card:

Click Add in the resulting pop-up (not shown). On the ensuing Getting started panel, click
Next:

On the following screen, you will fill out several fields:
- For Authentication type, choose Basic auth.
- For Username, type in your email address and /token. For example,
arvind.krishna@ibm.com/token. - For Password, paste in the API token you stored from the Zendesk API settings.
- For Servers, keep the selected option.
- For Server variables, type in your unique server domain - this is the first part of the URL
you see when you log into your Zendesk trial. For example, “ibm2023” as the first part in
https://ibm2023.zendesk.com. - Click Next:

On the next screen, you can review the Zendesk Ticketing integration (1), then click Finish (2).

On the final confirmation screen (not shown), simply click Close.
Write the custom extension into an Action
Now that the Zendesk Ticketing extension is set up, you will create an Action that uses it.
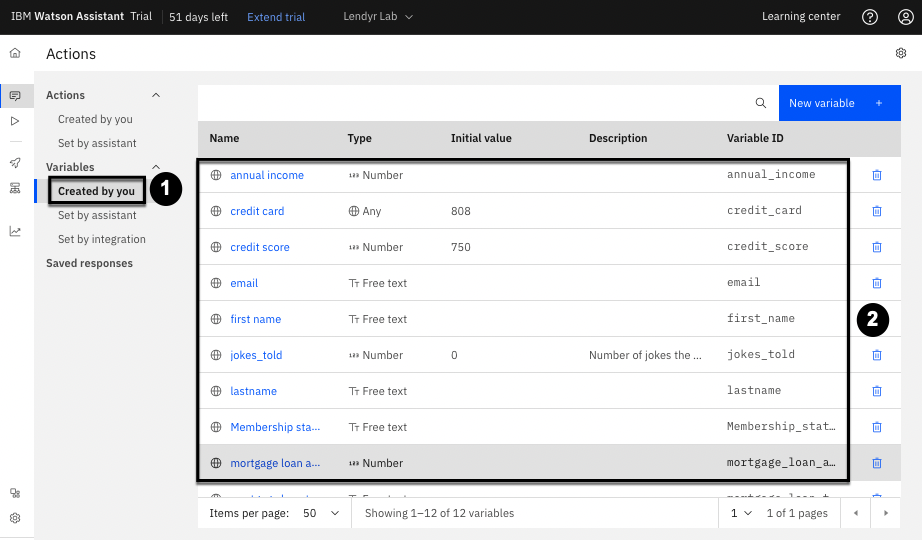
Return to the Actions page, shown below. Then, click Created by you (1) under the
Variables dropdown menu on the left. Note all the variables that Lendyr's Actions use to interact with end
users (2), including the ones you created earlier: email, firstname, lastname, and
Membership status. Some of them have types - like number or free text. Others can be configured to have an
initial value. You will leverage the fact that you might already know the end user's name, email
address, or membership status when you create the ticket:
Next, you will create another Action. On the above screen, click Created by you under the
Actions category, then click New action +, and Start from scratch. (This sequence of clicks is
not shown, but it's the same as with all the Actions you created earlier.)
What does your customer say to start this interaction? “I want to submit a support ticket.” In
Step 1, write Assistant says “Let's create a ticket for you! I will need to gather some
information to help you submit the ticket.” Your new Action should look like this:

Next, create step 2. In this step, set Assistant says (1) to “What is your email address?” Then,
Define customer response (2) as Regex (Regular expression):
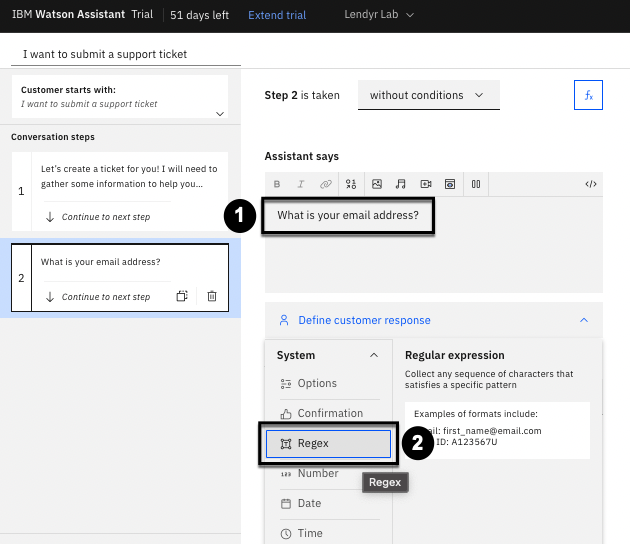
A Regular expression is a sequence of characters that satisfies a specific pattern. An example is
email; it contains a name, followed by “@,” which is then followed by a domain name.
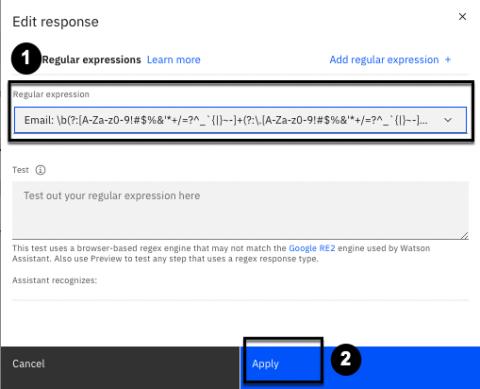
This opens a pop-up. Select Email (1) as the regular expression, then click Apply (2).
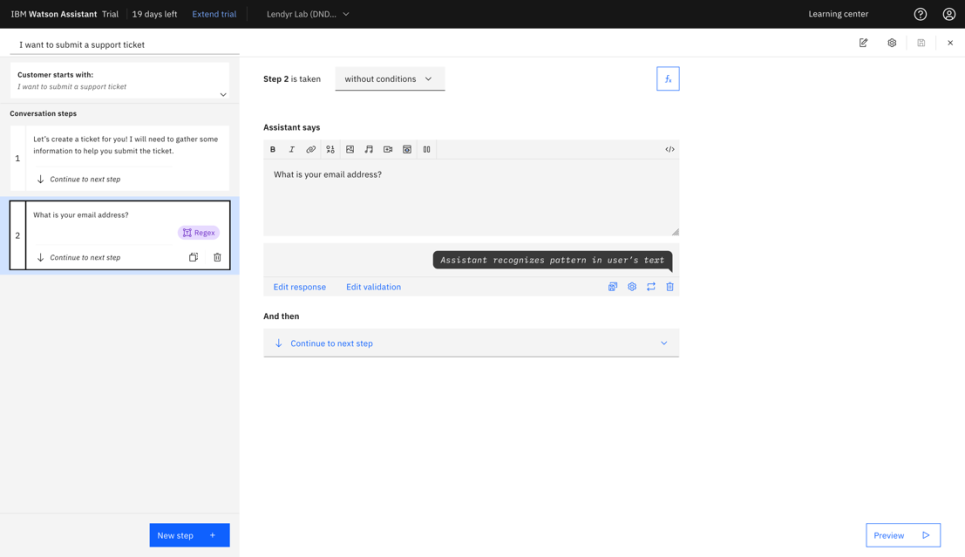
At this point, your Action should look like this:
Consider that you only want to ask the end user for their email address if you don't already know
it. Thus, as shown below, change Step 2 is taken without conditions to
Step 2 is taken with conditions (1). Then change the default condition to: email is not defined (2):
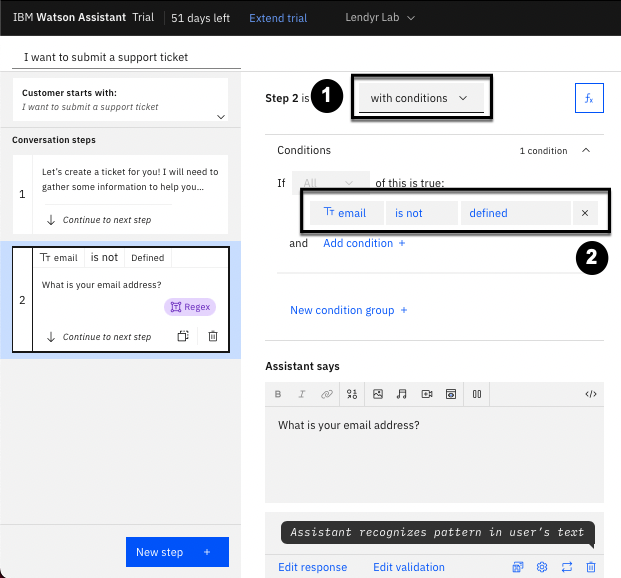
Now that you have set this condition, your virtual assistant will only ask the end user for their
email address if the virtual assistant does not already know it.
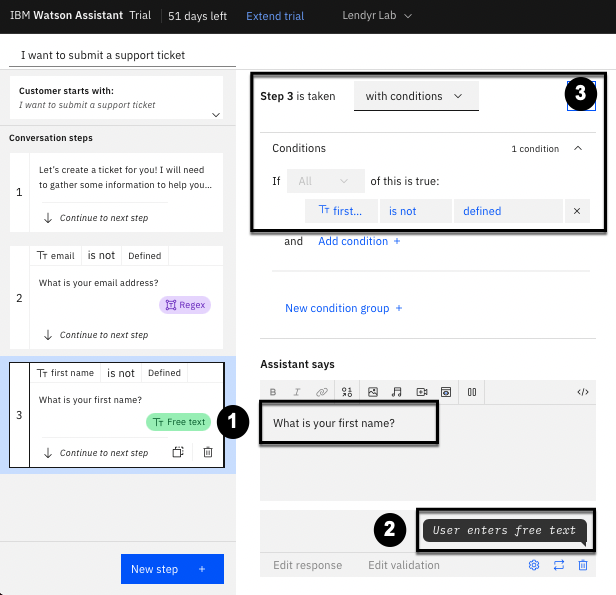
Add a new step - Step 3. As shown below, in Assistant says (1), write: “What is your first
name?” Set Define customer response to Free text (2). Again, you only want to ask the end
user for their name if you don't already know their first name. Change
Step 3 is taken without conditions (3) to Step 3 is taken with conditions. Then change the condition to:
firstname is not defined. Step 3 should look like this:
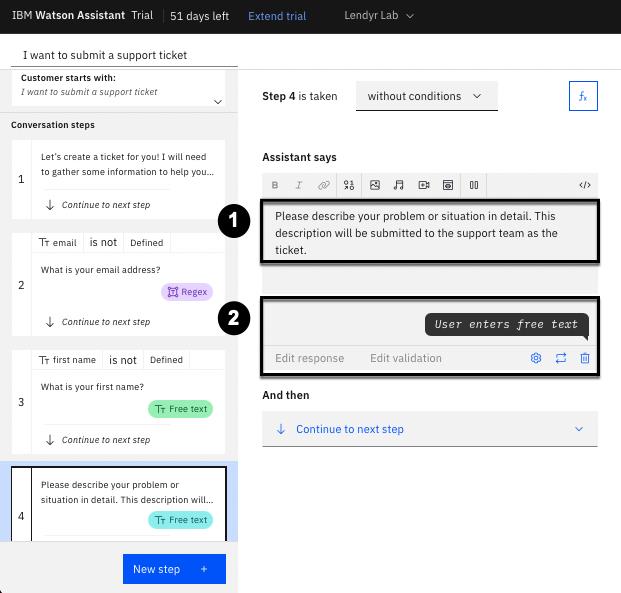
Next, add Step 4. In this step, set Assistant says: (1) to “Please describe your problem or
situation in detail. This description will be submitted to the support team as the ticket.” Then,
Define customer response (2) as “Free text:”
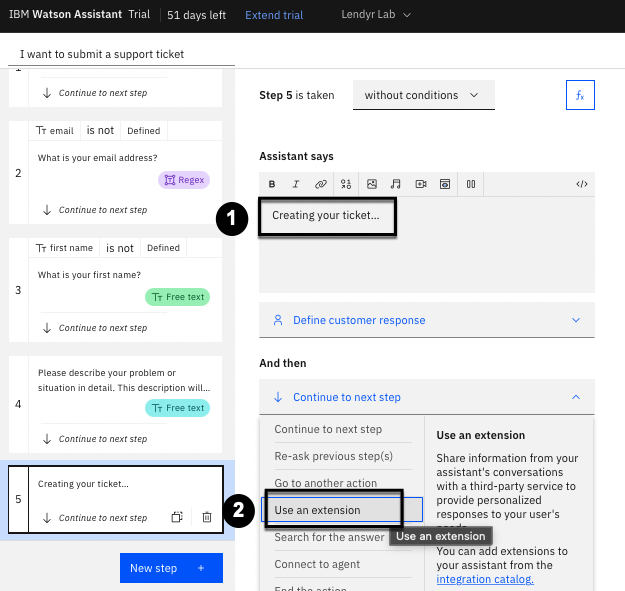
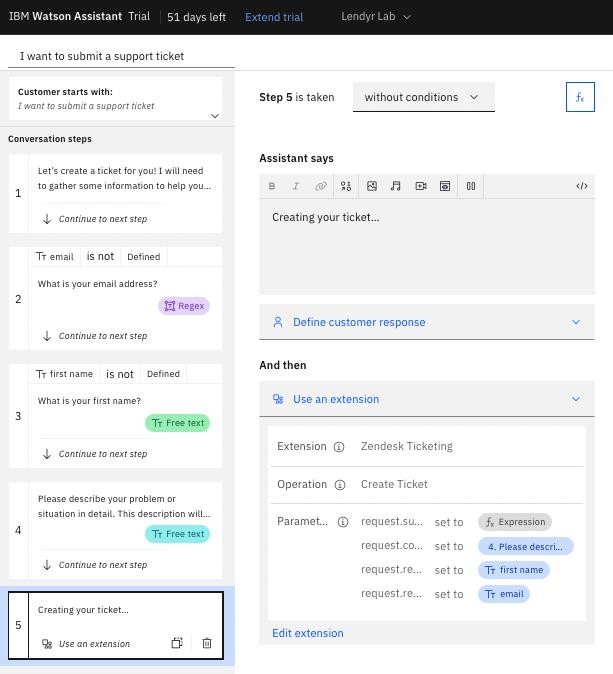
Create Step 5, and set Assistant says (1) to: “Creating your ticket…” Change And then (2)
from “Continue to next step” to “Use an extension:”
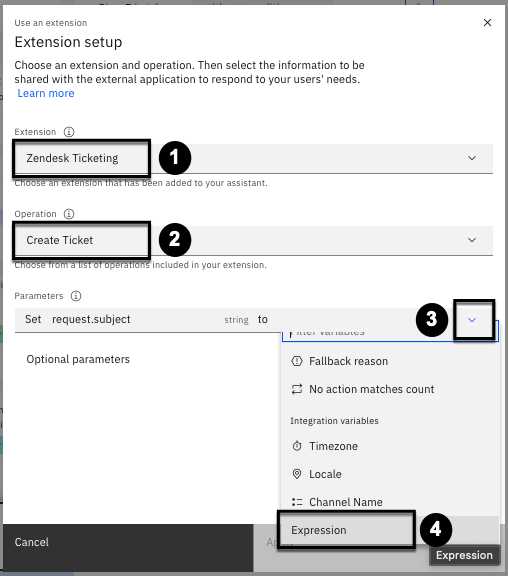
In the ensuing popup, select “Zendesk Ticketing” under Extension (1) and “Create Ticket” under
Operation (2). Open the dropdown (3) menu where you set request.subject to something, scroll
all the way down to the bottom, and select Expression (4):
Choosing Expression now lets you type in free text (1). Type in “Support ticket,” as shown in
the image below. Then, open the Optional parameters (2), and set request.comment.body to
the response to Step 4 (3). Set request.requester.name to the firstname (4) session variable.
Finally, set request.requester.email to the email (5) session variable, and click Apply (6):
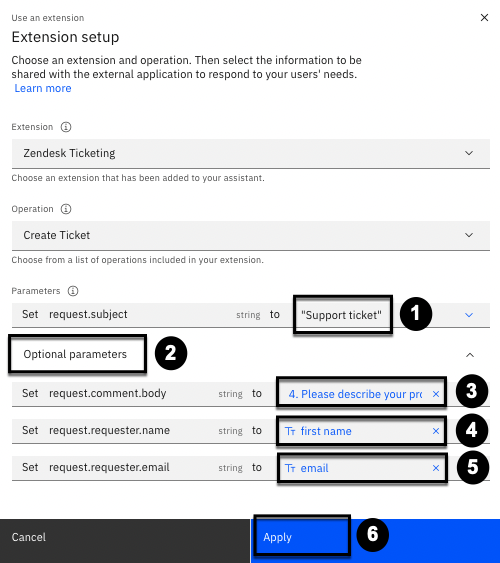
Note: Take care not to accidentally set request.requester.name to the response to Step 3, and
not to set request.requester.email to the response to Step 2.
Your Action should now look like this:
There is one more thing you need to do.
In Step 5, you pass the session variables firstname and email to the extension. These session
variables are where you stored the firstname and email information from HubSpot.
However, if the end user tries to submit a support ticket with this Action when the virtual assistant
has not pulled in their information from the HubSpot CRM system, then those session variables
will be blank (also known as “undefined” or “not defined”). And while steps two and three in this
Action ask for the email and firstname when those session variables are blank (or “undefined” /
“not defined”), you're not using that information when you call the extension.
We need to make sure your virtual assistant uses the responses to step two and three when the
email and firstname session variables are not defined. To do this, add Step 6, and
drag and drop the new step between steps three and four:

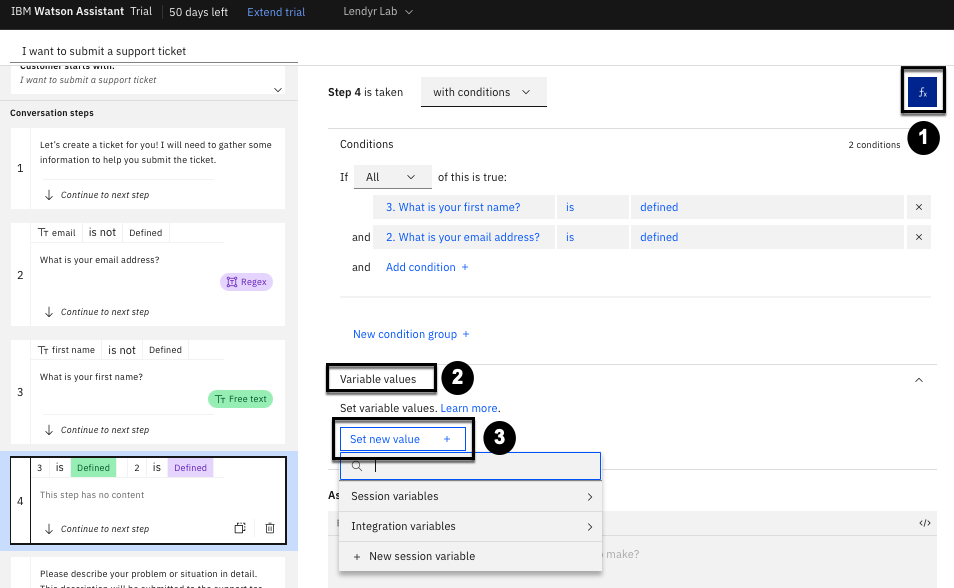
Step 6 now becomes Step 4. In it,
- Set a condition, which will check whether both first name and email are defined.
- Set the first condition to 3. What is your first name? is defined.
- Set the second condition to 2. What is your email address? is defined.

After you finish setting up the step condition, click fx (1) to open the Variable values (2) view,
and click Set new value + (3):
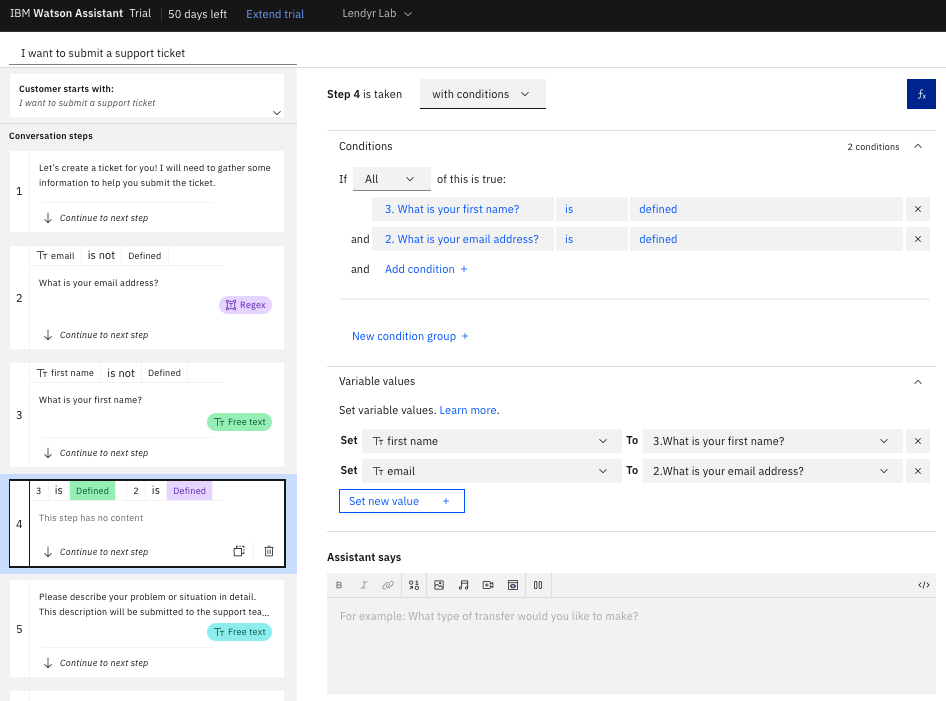
Set the Session variable firstname (1) to the response to Step 3 by following the sequence of
clicks (2) and (3) shown below:

Again using the sequence of clicks shown above, also set the Session variable email to the response
to Step 2. Your Step 4 should now look like this:
If you do not see “2. What is your email address” in the list of action variables, this may be a bug.
Take a moment to consider the behavior you set up in this Action
(I want to submit a support ticket). When the end user invokes this Action, if the email and firstname session variables are
not defined, the virtual assistant asks for this information in Step 2 and Step 3. In Step 4, if the
virtual assistant asked for, and received this information in Step 2 and Step 3, you store the
responses to Step 2 and Step 3 in their corresponding session variables.
Now, this information will always be in the session variables, so the extension will always have
the correct email and firstname to pass to Zendesk.
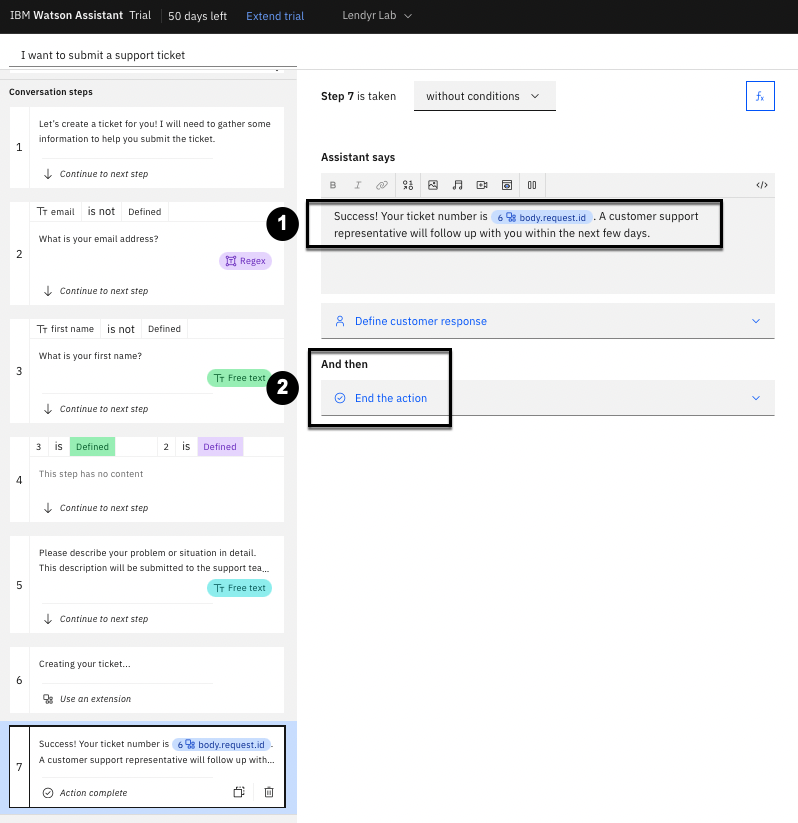
Finally, create a closing step. Position yourself on step 6 so that you add a step at the very end, and
create step 7. As shown below, write (1) “Success! Your ticket number is ”. Then, type $ or click
the insert a variable icon and scroll down to select the variable for body.request.id (2) returned
by the Zendesk Ticketing extension in Step 6 when it created the new ticket:

Finish the Assistant says (1) section with “. A customer support representative will follow up
with you within the next few days.” Change And then (2) to “End the action.” Your Step 7
should look like this:
Fantastic work! Our action is ready to go. Remember to save it.
Preview the action to see your extension in action
Try out a conversation where you don't pull in information about yourself via HubSpot, like
shown below. Remember to view it with the Action variables visible like you did earlier, so you
can watch them populate in real time. Enter the following utterances:
- Say “I want to submit a support ticket”
- Enter your email address (or any email address)
- Enter your name (or any first name)
- Say “I want to see how this extension works”
(the screenshot below captures the whose single conversation)

Now, go and see the ticket you created in your instance of Zendesk! To do so, navigate your
browser to https://{server-domain}.zendesk.com/agent/dashboard (1), and view the ticket
with subject 'Support ticket' (2):

Your ticket should have an ID of #2. Ticket ID #1 is a sample ticket created by Zendesk for you.
Note: Zendesk also sends two emails, one to the submitter of the ticket, and one to the Zendesk
administrator. Depending on what emails you supplied, you may see both of these in your Inbox.
Now, try out a conversation where you first pull in information via HubSpot and then create a
support ticket via Zendesk. (Remember to first hit Refresh to restart the chat session.) In this
way, you will be taking advantage of both the HubSpot and Zendesk extensions:
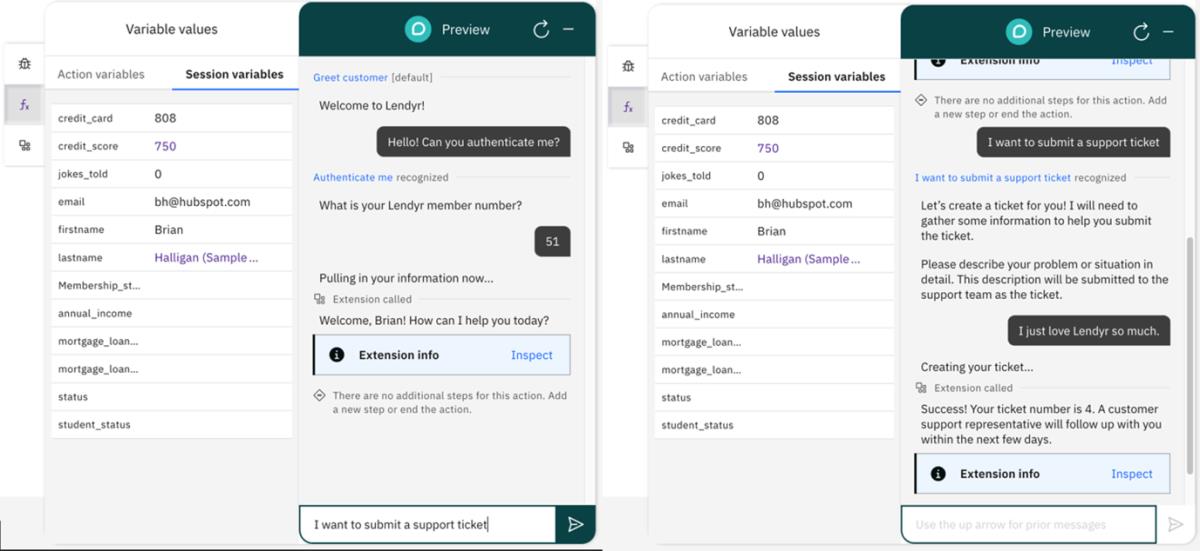
Notice how this time the assistant didn't ask for your first name or email address, since it already
retrieved them from the HubSpot CRM system.
Go back to your Zendesk dashboard and see the ticket you just created. (Note that you may need
to refresh the page.) Once finished, you may now close your Zendesk browser window.
Debug a custom extension
You've now successfully built and previewed two custom extensions. Did you notice any gaps in
the actions, where things could go wrong if the end user provides a certain response?
There are a few gaps in the Actions you built above.
- In the Authenticate me Action, you did not prepare an alternative response if you cannot
find the end user in the HubSpot CRM system. - In the Authenticate me and I want to submit a support ticket Actions, you did not prepare
alternative responses if the extension fails to produce a valid response from the external
service. For example, this might happen if your authentication tokens expired. - The I want to submit a support ticket Action does not ask the end user to confirm their
name and email before submitting the support ticket, so the end user does not have an
opportunity to update their name and email before submitting the ticket.
When something goes wrong with an extension, watsonx Assistant makes it easy to find the root
of the problem using the Extension inspector - something this lab briefly touched upon earlier.
The Extension inspector lets you test a custom extension, see the request it sends out and
responses it passes back to your Action, and debug in the Preview panel of the Actions page.
First, let's inspect a custom extension that works properly. Run through the following
conversation with your assistant in the Preview panel of the Actions page:
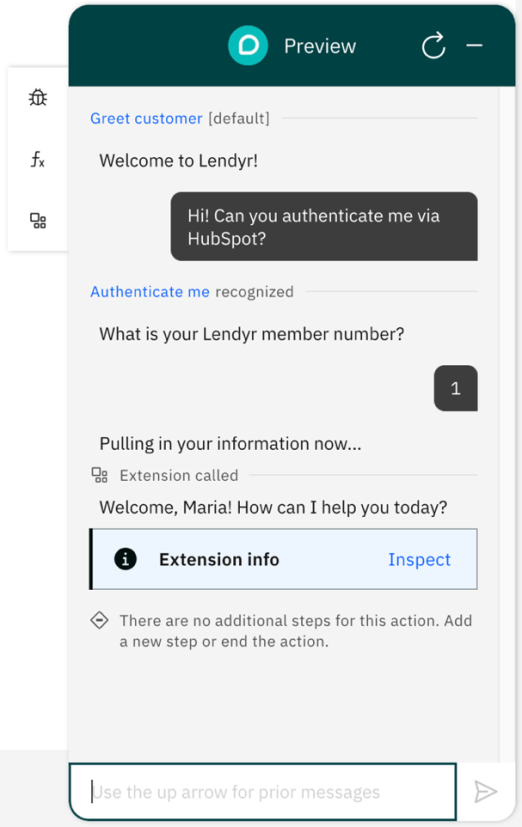
This extension works properly: it uses the member number provided by the end user to pull the
end user's information from the HubSpot CRM system. Click Inspect (1) to open the
Extension inspector and see its details:
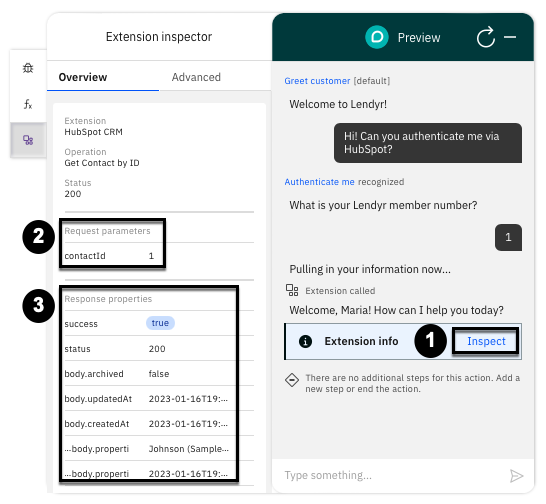
As can be seen above, the Extension inspector pane shows the request parameters sent to (2)
and response properties received from (3) the HubSpot API via the custom extension. While you
only store and use a handful of these response properties in your Action – including email,
firstname, lastname, and membership_status - there are many more properties passed along that
provide useful context.
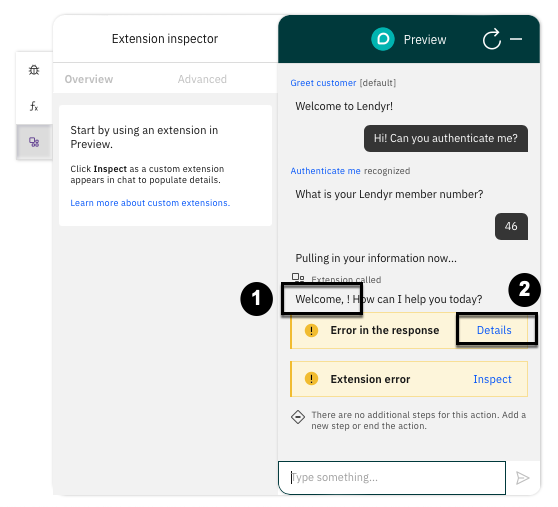
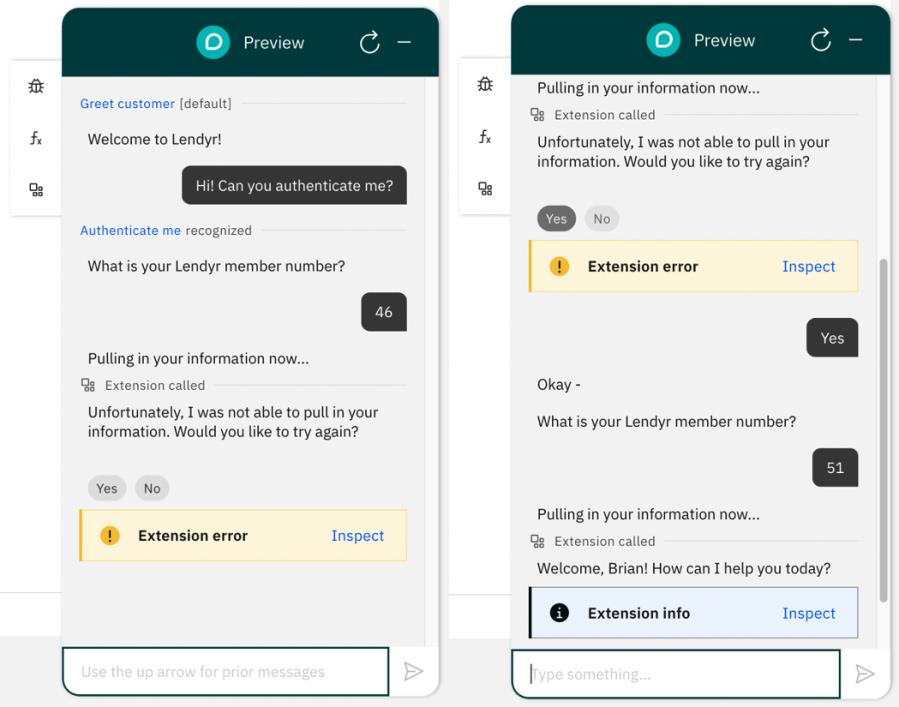
In this conversation, something went awry. While there are two error messages that make it clear
something went wrong, you can also see that the virtual assistant said “Welcome, !” (1) The
name that would normally come from the HubSpot CRM system is missing, which suggests
something went wrong. Click Details (2) next to “Error in the response,” to reveal a popup of
runtime errors affecting the Action.
On the ensuing popup, expand the first error:
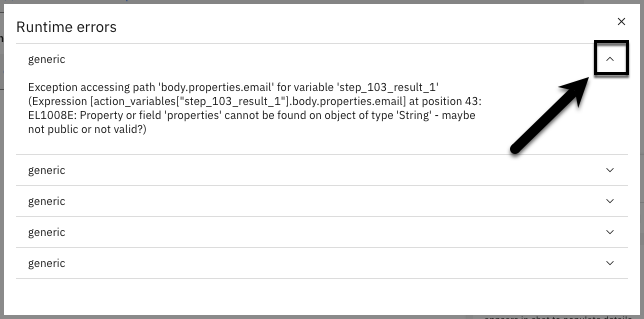
Depending on your ability to parse technical jargon, you may or may not be able to understand
these error messages. That's okay - watsonx Assistant's Extension inspector will lay it all out in
easy-to-understand terms.
Close the runtime errors pop-up. Now click Inspect (1) next to “Extension error.” What do you
see? It looks like the body of the response is completely blank (2) – and the success response
property is false (3). This means that HubSpot was unable to find a contact with ID 46. You may
recall from earlier that your HubSpot CRM system has no Contact with an ID of 46.

You can also open the Advanced tab of the Extension inspector (not shown) to see the request
and response for this extension in raw form.
You could fix this end user's problem by adding a Contact record to HubSpot with ID 46. But
that's not a scalable solution for others entering a non-existent member number.
Let's fix this problem in the virtual assistant instead.
- Click Authenticate me recognized in the Preview panel to open the Action.
- Click on step 3.
- Add a condition to step three, so select with conditions.
- Step 3 should execute when the extension runs successfully, so select If Ran successfully.
- Your final condition should state 2 Ran successfully == true.

Now you will only greet the end user by name if the extension succeeds in getting their name and
other information from HubSpot. Let's also add a step that will be taken when the extension fails
to find the end user's information:
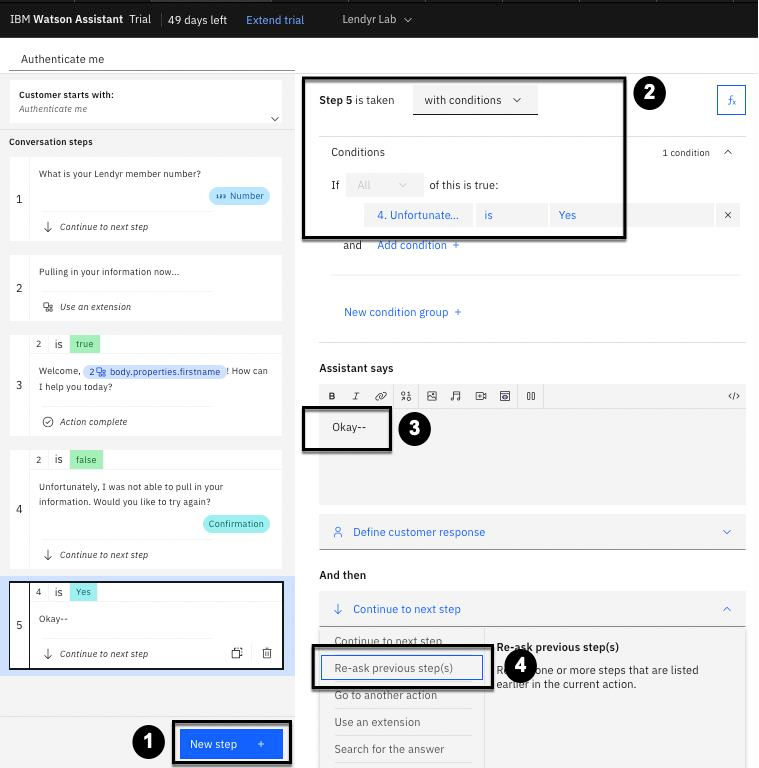
- Create a new step 4.
- Include the condition that 2 Ran successfully == false.
- Set Assistant says to “Unfortunately, I was not able to pull in your information. Would you
like to try again?” - Define customer response as Confirmation, which allows the end user to select yes or no:

Next, add a step for when the user selects “yes” in the previous step, so that they can try entering
their Lendyr member number again:
- Create a new step 5.
- Add the condition that 4. Unfortunately, I was … is Yes.
- Change Assistant says to “Okay –”
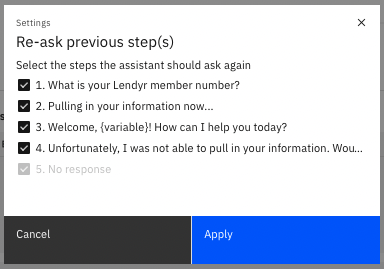
- Change And then to Re-ask previous step(s).
Select all the checkboxes, so that your assistant will re-ask all action steps, then click Apply:
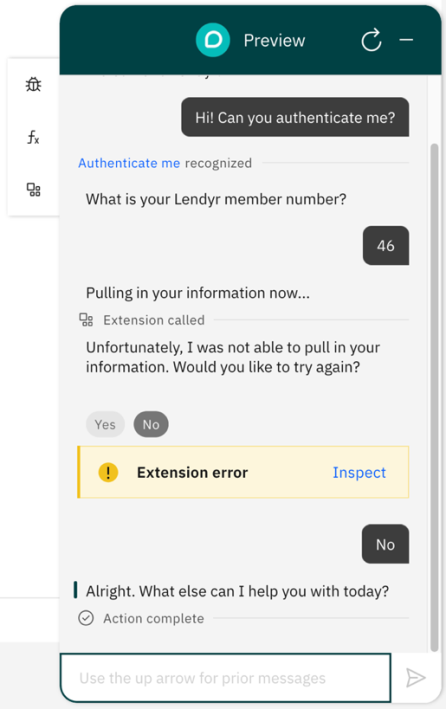
Finally, add step 6 for when the users selects “no” in step 4:
- Click **New step + **.
- Add the condition that 4. Unfortunately, I was … is No.
- Change Assistant says to “Alright. What else can I help you with today?”
- Change And then to End the action.
Your Action should now look like this:

Nicely done! Save your Action, open the Preview panel, refresh the Preview panel, and try out
this conversation again. In this scenario, the end user chooses to try again:\
Hit refresh again and try this. In this scenario, the end user chooses not to try again.
Congratulations! You now know how to use the Extension inspector to test, understand, and
debug your extensions and the Actions that use them.
Closing thoughts
What's the value of custom extensions?
Custom extensions eliminate the need for a developer to create a proxy or a layer of middleware
between their virtual assistant and other APIs. Developers can connect the virtual assistant
directly to an API via an extension.
Builders can then use those extensions in Actions to pull in new information or push out
information the assistant has gathered, all without writing any code. They can also test and debug
their extensions independently in watsonx Assistant without the need to access other APIs.
What does this mean for a product manager overseeing a virtual assistant project? Their
developers don't need to spend any time building out a custom services orchestration engine
(SOE) to connect the virtual assistant to external services - they can connect the virtual assistant
directly via custom extensions, and they can easily update and maintain their extensions over
time. Their builders can then use, test, and debug extensions in the build experience without the
assistance of a developer. The builders are no longer blocked by the availability of a developer to
write integrations into conversational flows, and they can staff their team with non-technical
builders precisely because they don't need to write any code to build complex, integrated, realworld conversational flows.
In short, extensions combine the power of integrating with an API with ease of use for
developers and builders alike - driving down time to value and total cost of ownership.
What about webhooks?
If you are a more technical person, you might know that a development team generally has two
options to connect their application to the external world: webhooks and
calling an external API. Custom extensions allow builders and developers to call external APIs in watsonx Assistant.
What about webhooks?
Developers typically set up webhooks in watsonx Assistant when they control both Watson
Assistant and the API or external service they want to connect it to. The advanced and expert
series of this lab will discuss using webhooks with watsonx Assistant.