Integrating watsonx Assistant with watsonx.ai foundation models
The extensibility of the new watsonx Assistant provides a simple way to perform an integration between a dialog flow and generative AI inferencing services in watsonx.ai. This integration brings generative AI features directly into watsonx Assistant. This hands-on exercise will show how to create the integration and use it in a simple use case. It is outside the scope of this guide to provide an introduction to all watsonx Assistant features. For that, check out the Documentation or the VEST watsonx Assistant Labs
Prerequisites
- watsonx Assistant instance on IBM Cloud - this can be any service plan, including
lite - Access to a watsonx.ai project
Getting Started
Obtain the OpenAPI definition of the watsonx.ai generation endpoint
Before you can add the integration for watsonx.ai to a watsonx Assistant virtual assistant, you need to download the OpenAPI definition for the watsonx.ai foundation model inferencing service. An example definition file is available in the assistant toolkit GitHub repository. For this lab, you will use a version modified with the addition of support for the decode_method parameter of the api. Download this version of the watsonx-openapi.json file to your workstation.
Add an empty virtual assistant to the watsonx Assistant instance
For initial experimentation with the integration, use a new virtual assistant. If you have a newly created watsonx Assistant service instance created, it will not have any assistants defined. Create one using the Create Assistant wizard using a name of Watsonx integration and then selecting web as the deployment location. The values you provide in the other parts of the wizard will not matter very much. For a slightly opinionated step-by-step example of how to get a web assistant created, see the VEST watsonx Assistant 101 lab up to the point where you see the home page for the assistant. If you have other assistants defined already in your instance, add one following the documentation
Creating a watsonx.ai API key
Depending on the environment you are using or if you are working within a workshop setting an API key may already be
provided for you to use; ask your instructor or review your environment information to determine if an API key is provided.Otherwise feel free to follow the directions below to create an API key within your own IBM Cloud account.
If you have previously created an API key for calling watsonx.ai from a notebook or just the REST endpoint with curl you may skip these steps and reuse that API key. Otherwise, continue on.
-
Log in to watsonx.ai and make sure that the same account as the watson machine learning instance for your watsonx.ai project is selected.
-
To generate an API key from your IBM Cloud user account, go to Manage access and users - API Keys and click on Create. In the pop-up, provide a name like
watsonx-apikeyand a short description, then click Create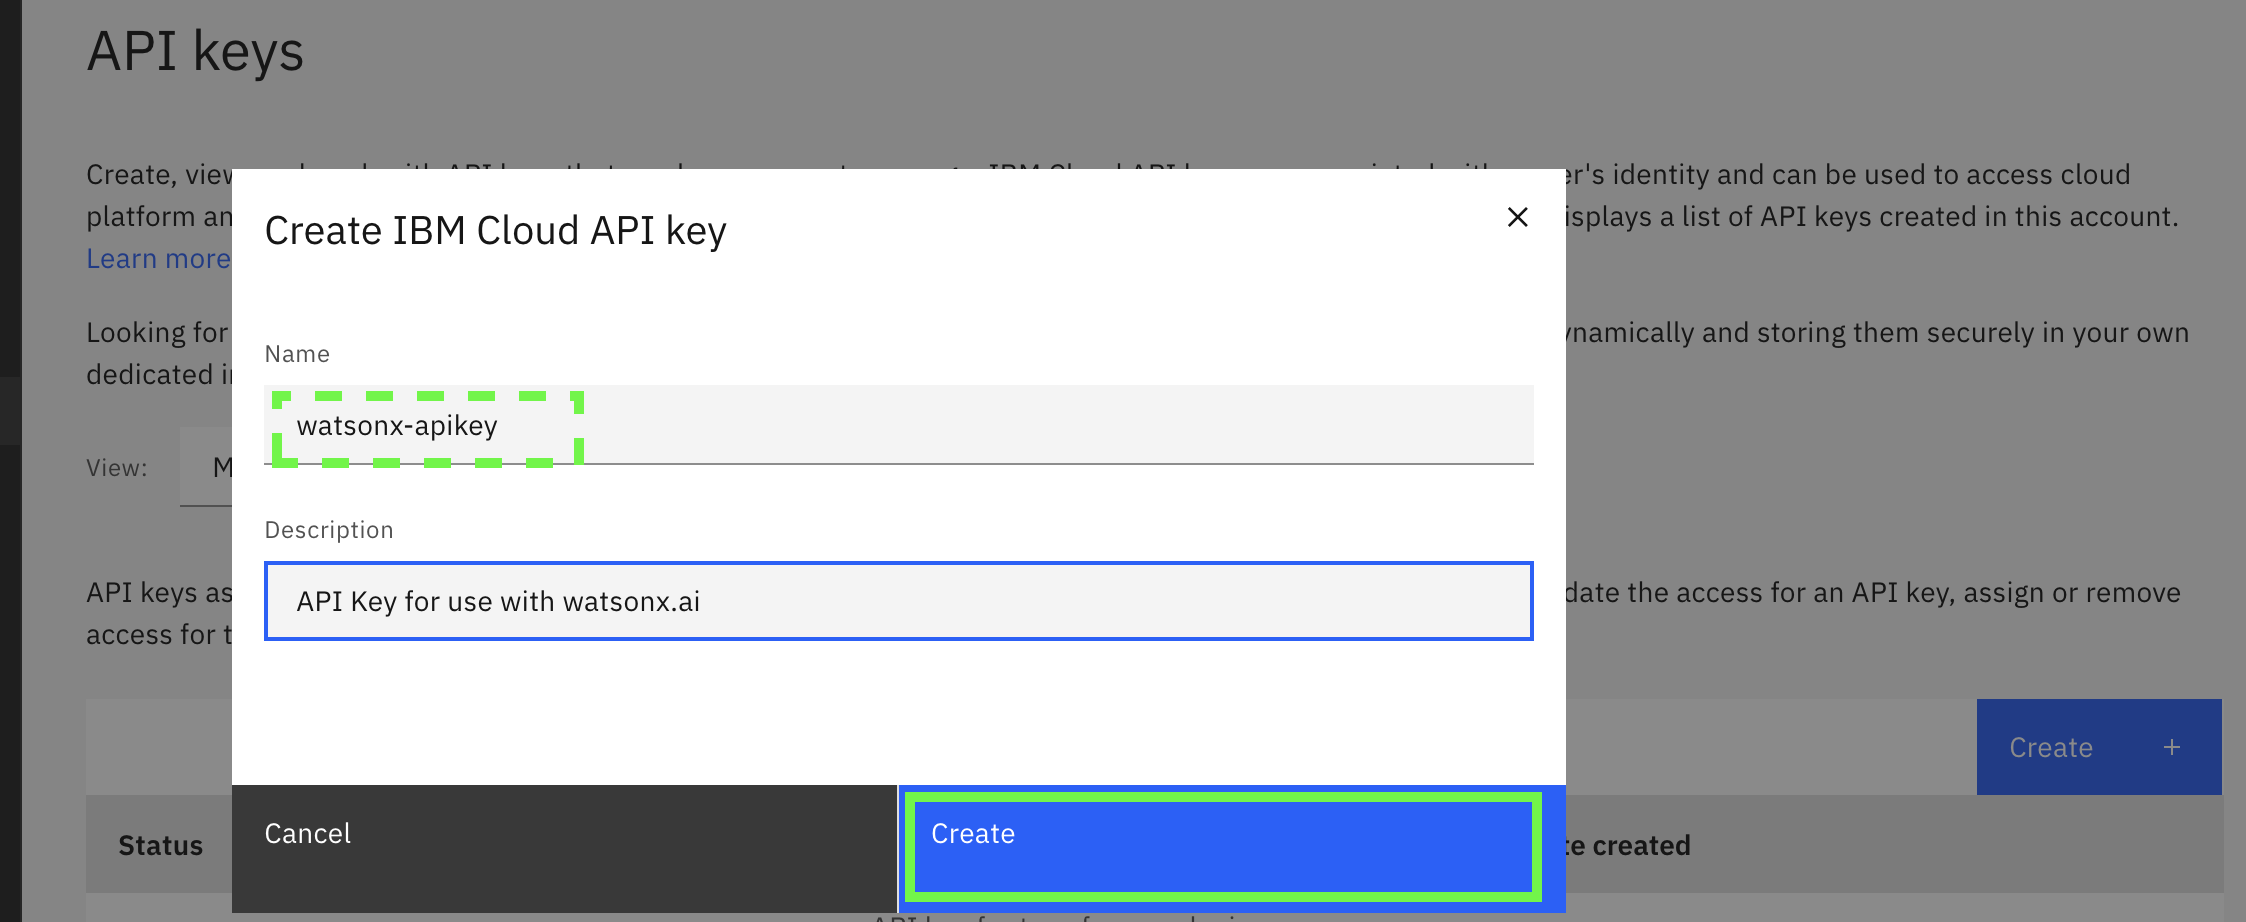
-
Immediately make a copy of the API key and store it in a secure vault (like 1Password, etc.) as there will be no way to retrieve it again.
Getting your watsonx.ai project id
-
In the watsonx.ai page, select the left 4-bar pull down menu, expand Projects and then click on View all projects.
-
From the list, select the project that your are using for the integration.
-
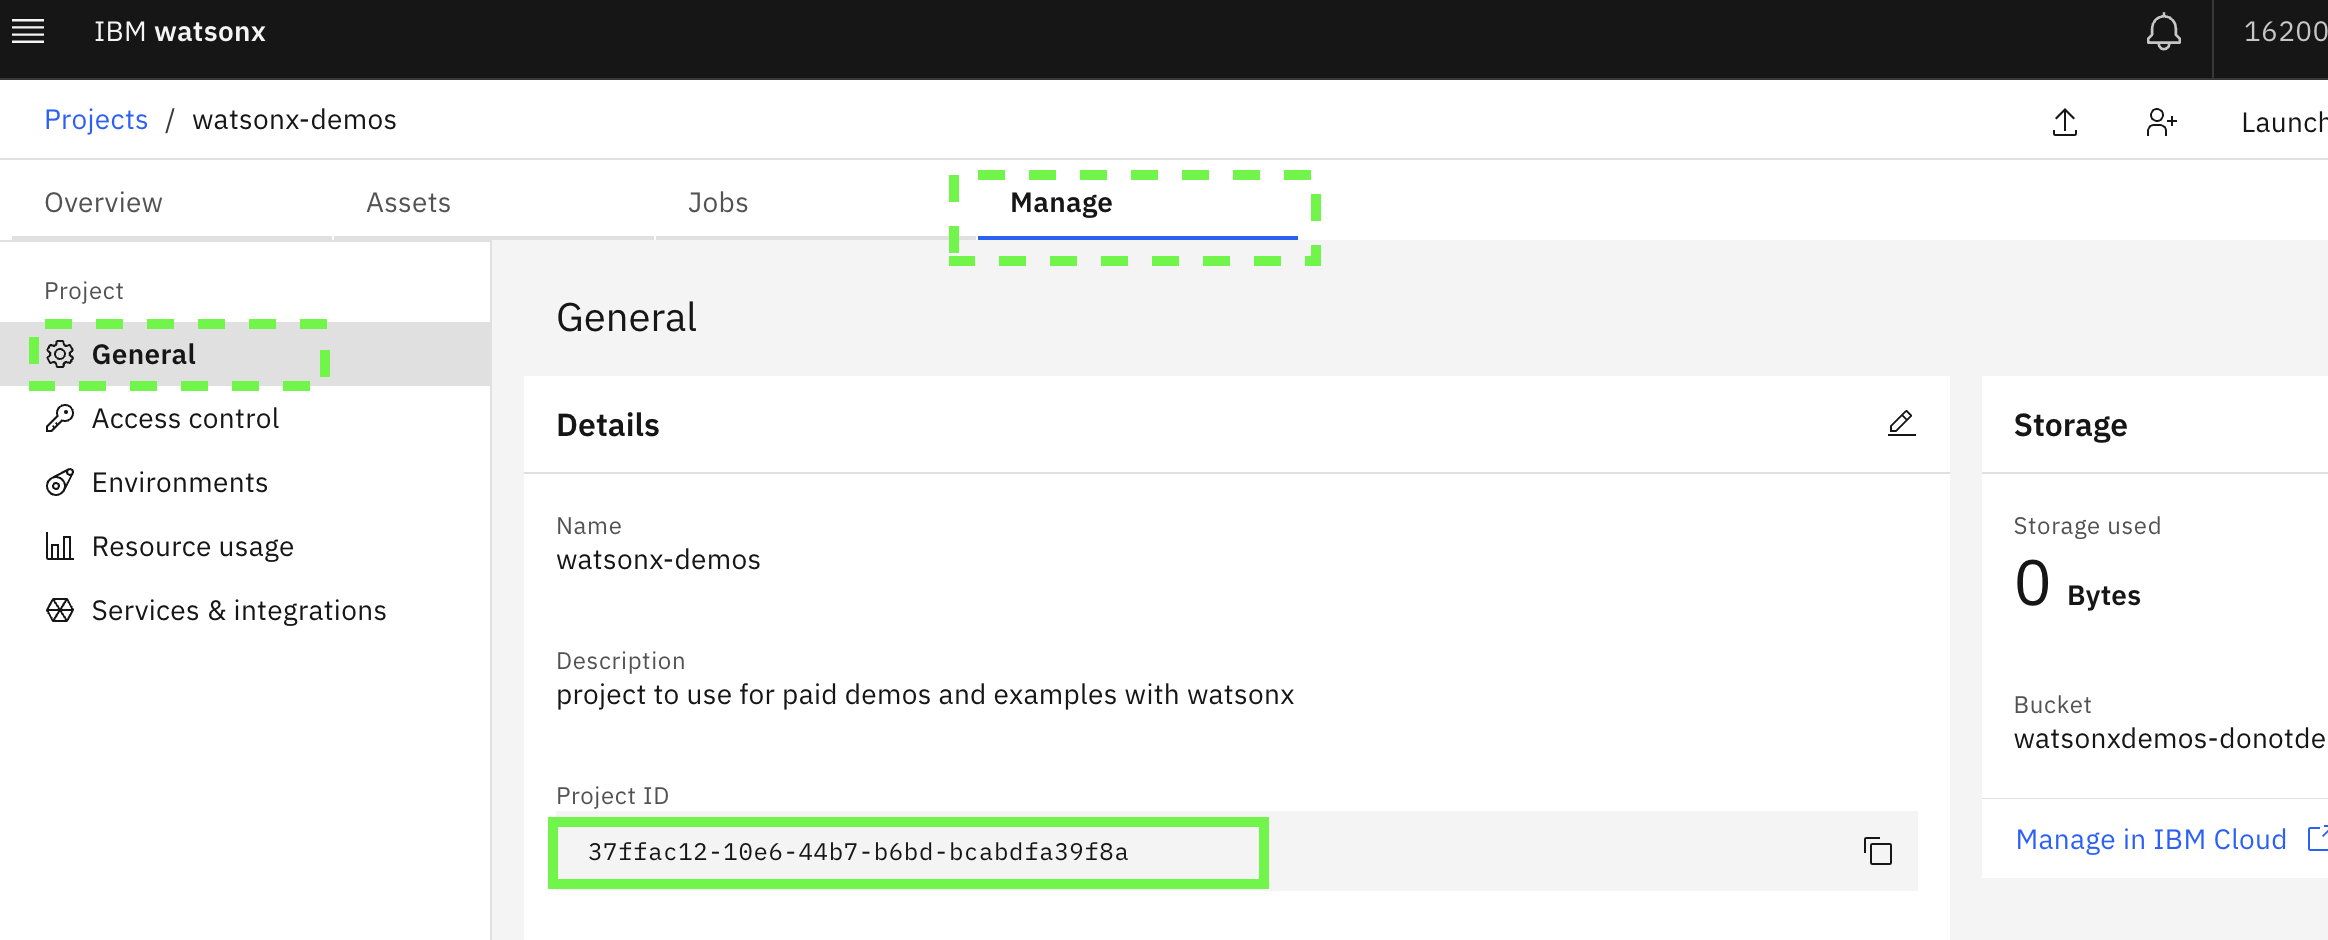
Click on the Manage tab and check that General is selected. Copy the Project ID to a location where you can access it later. This is not sensitive like the API key so it can be in notepad or something equivalent.
Adding the custom extension for watsonx.ai to the Integrations catalog
-
Return to your browser tab with the assistant you created. In the assistant left navigation panel, go down to the lower section and click on Integrations
-
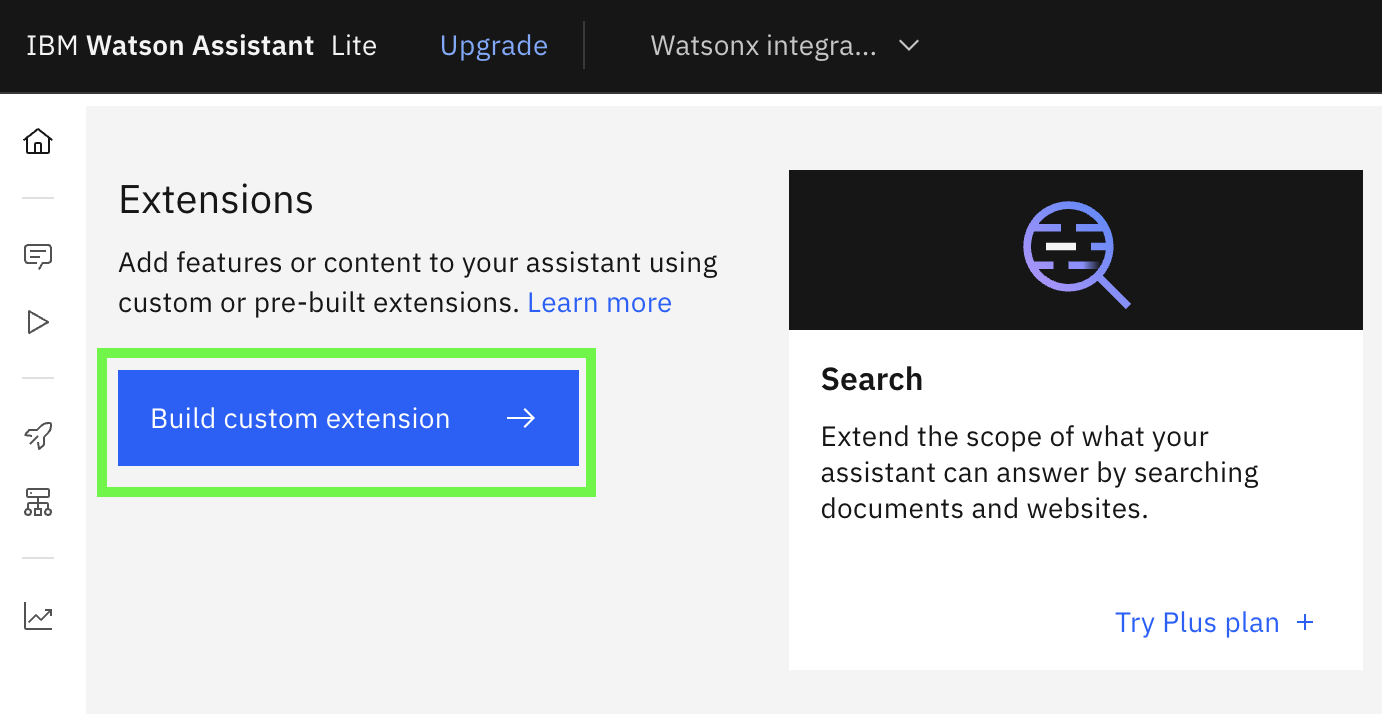
Scroll down to the Extensions section and click on the Build custom extension button:
-
Review the getting started guide and click on Next
-
On the basic information tab, name the extension
watsonxand provide an optional description. Click Next -
Either drag and drop or use the file browser to select the
watsonx-openapi.jsonfile and then click Next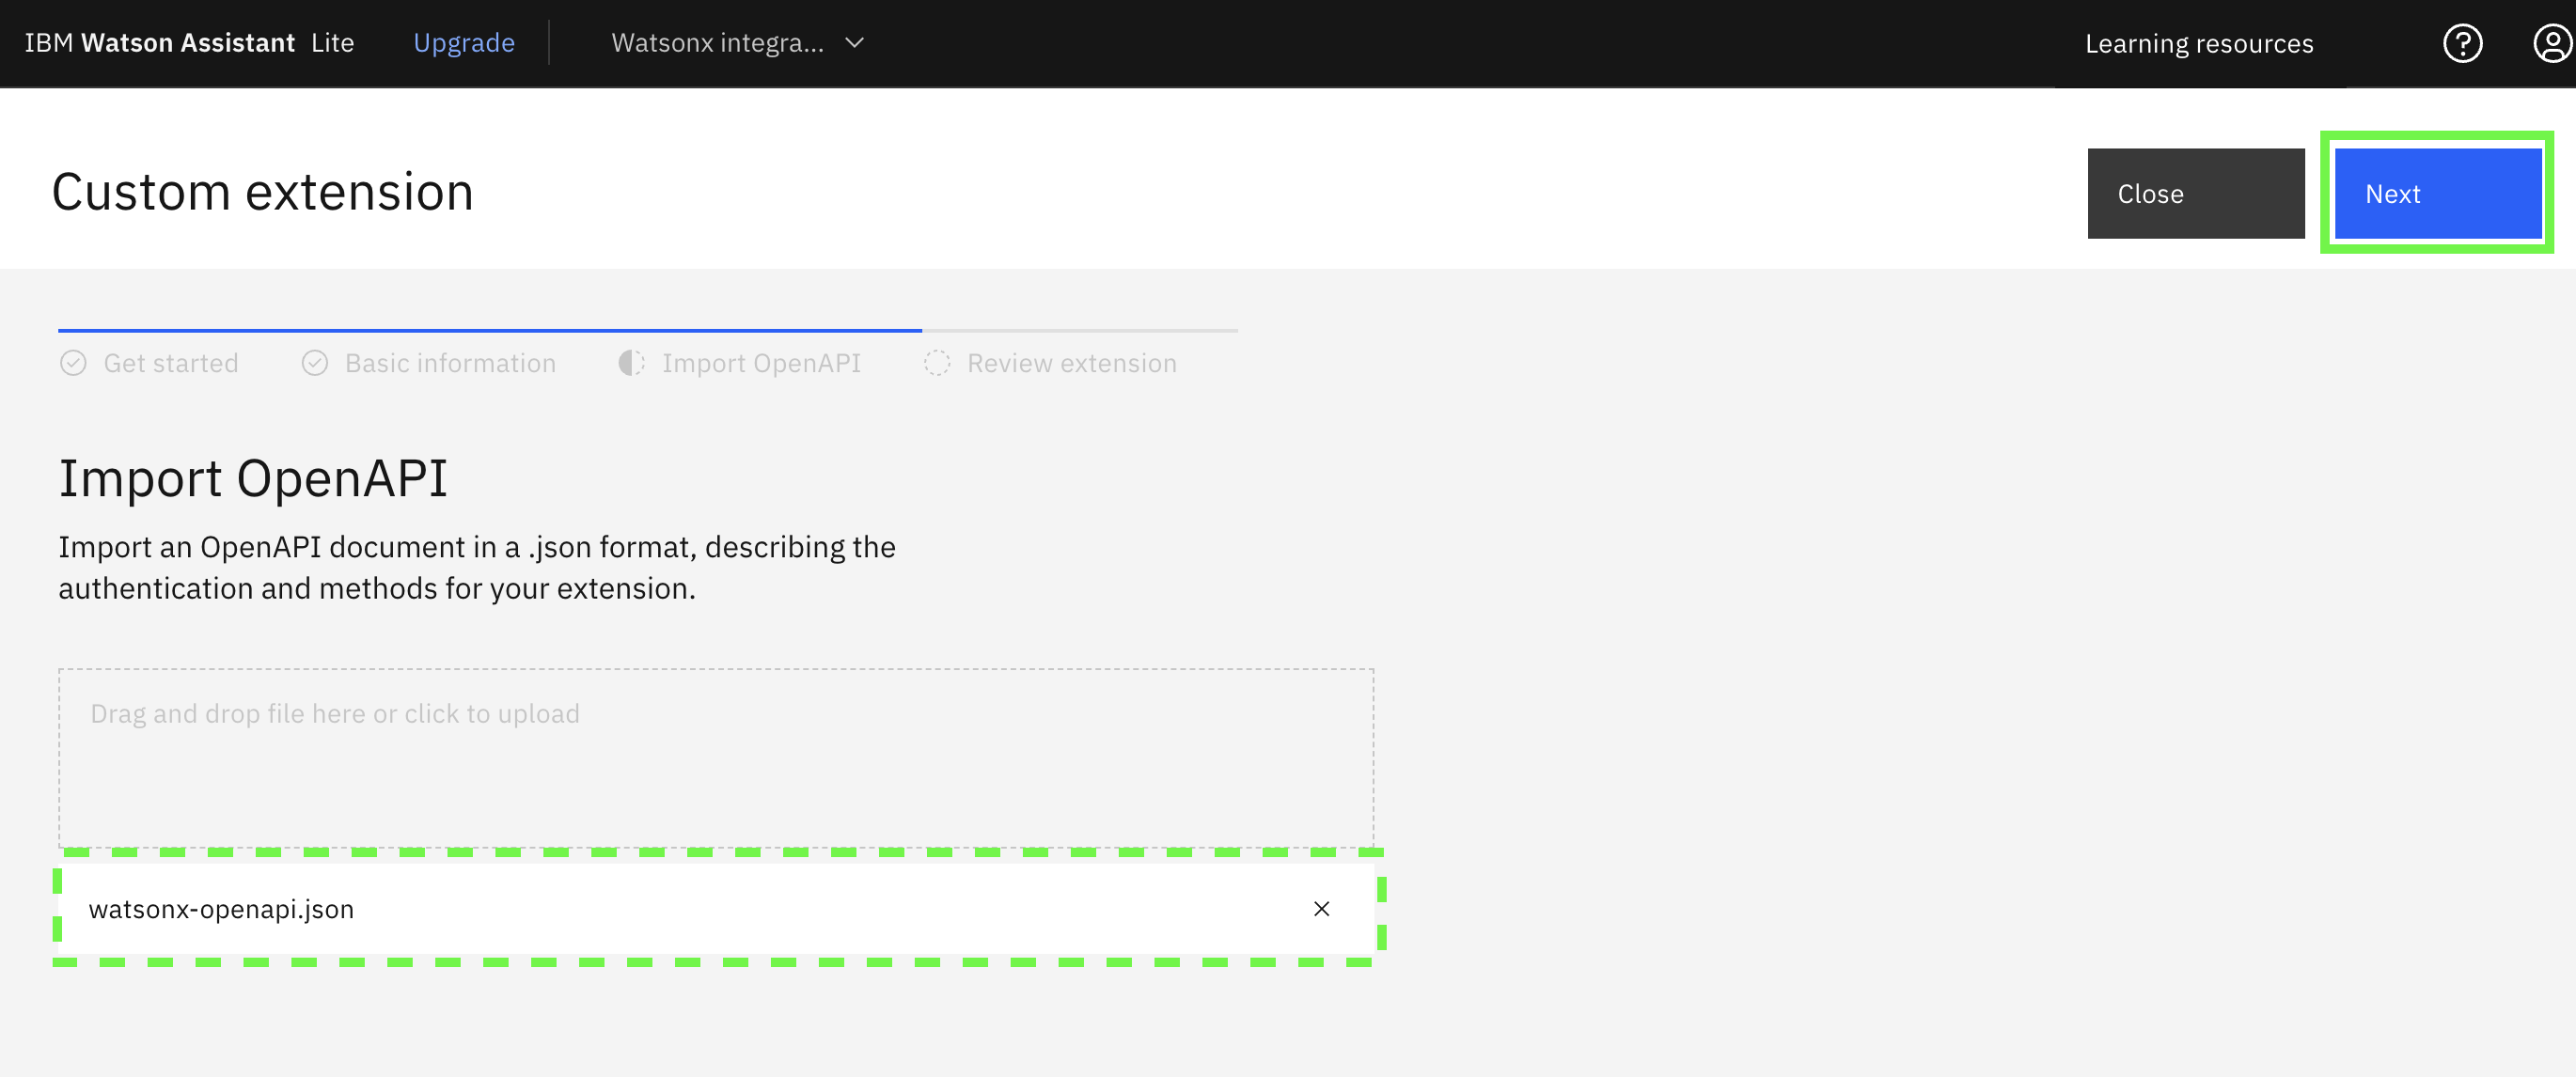
-
Review the information displayed and click on Finish, now the integration catalog shows the integration
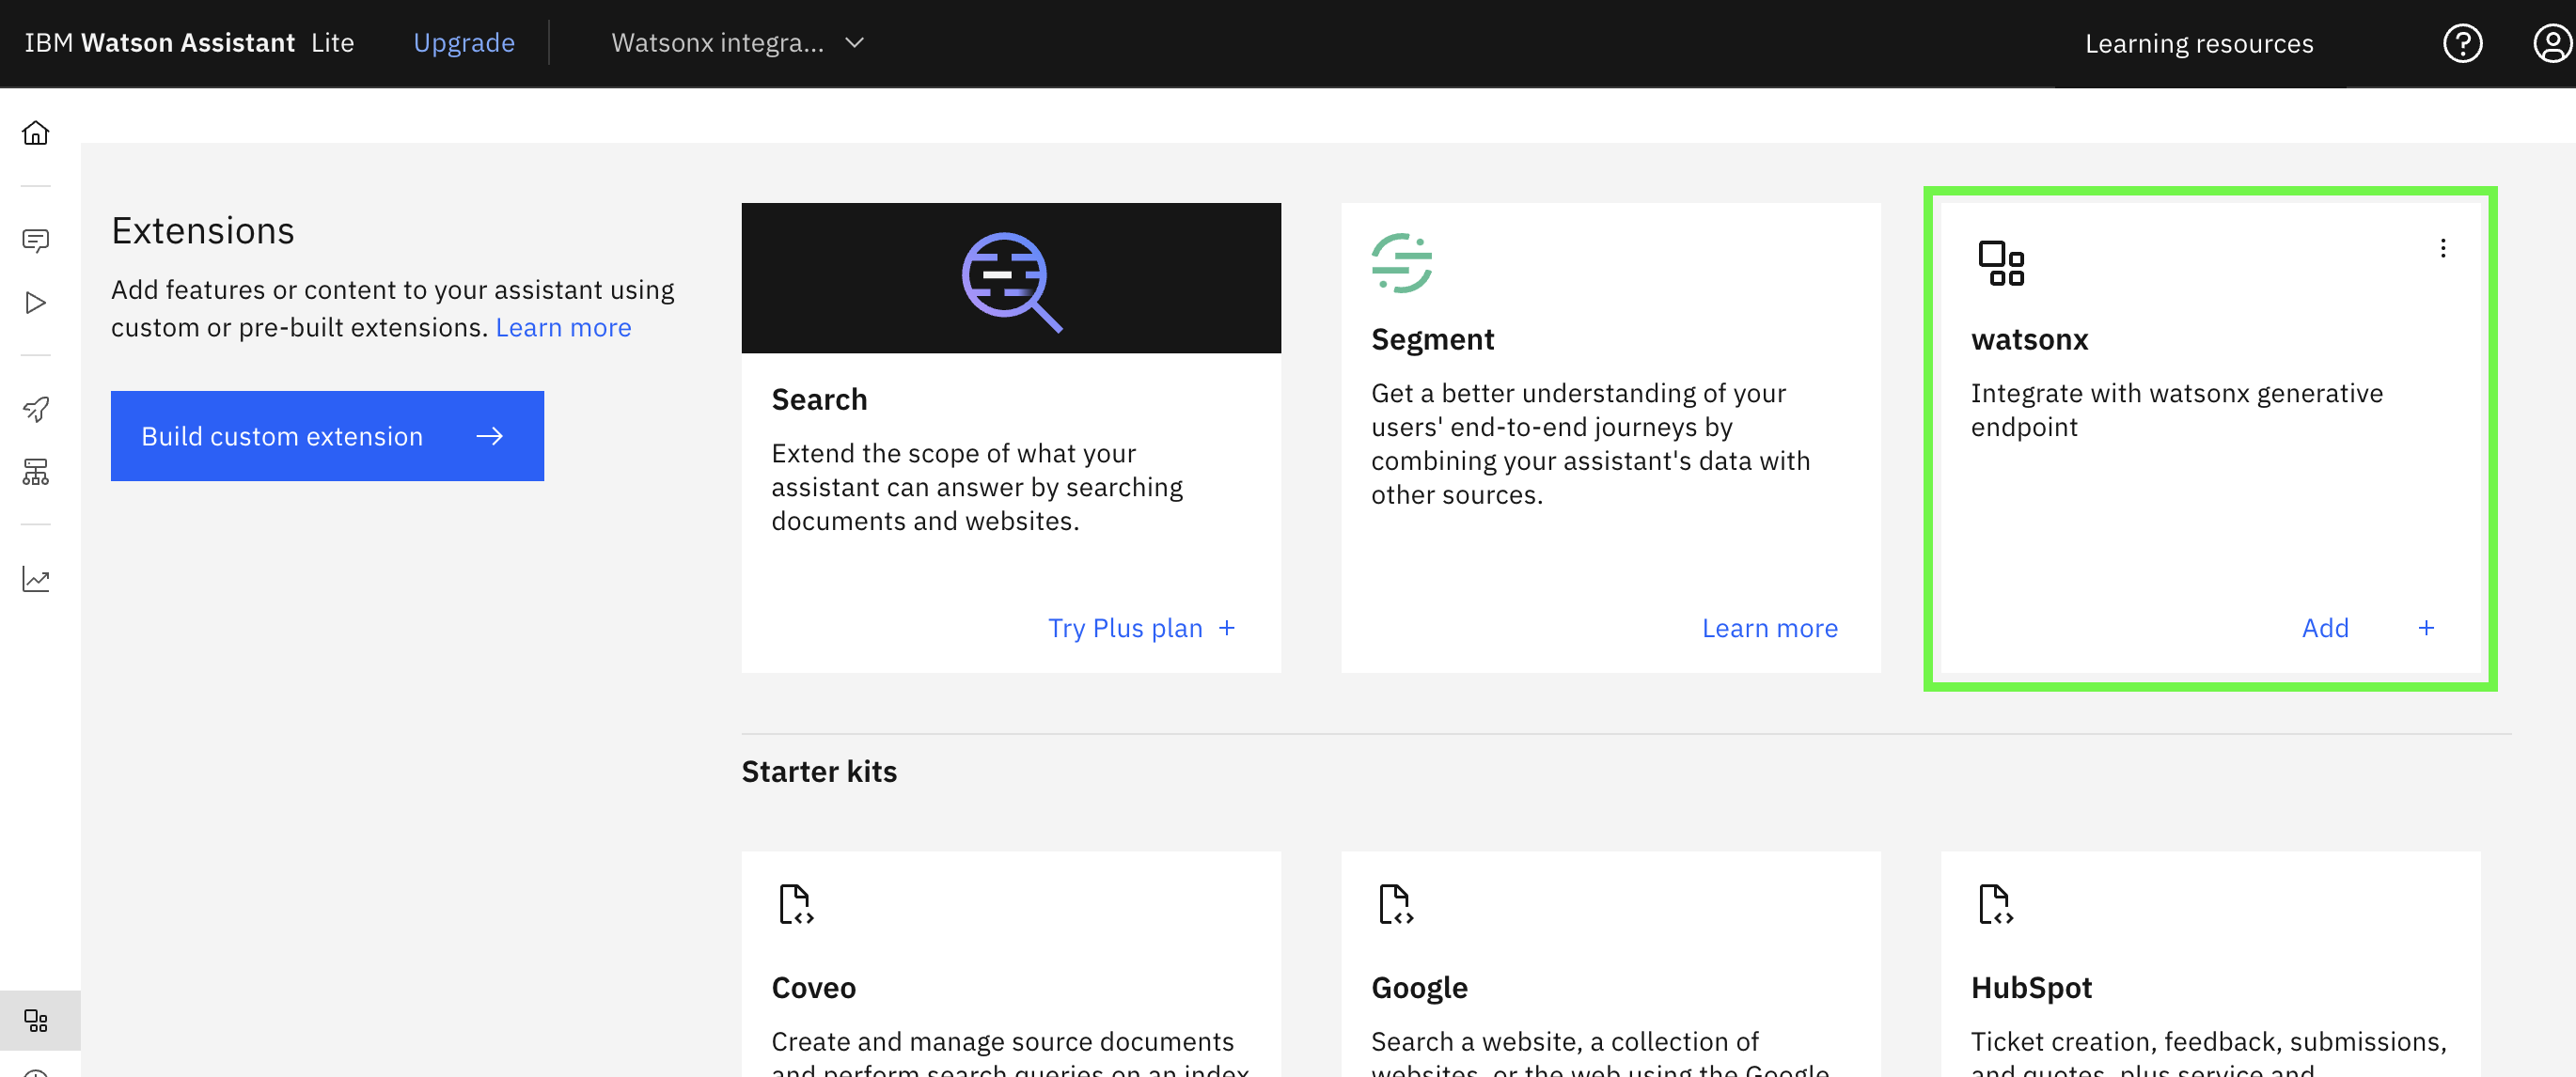
-
Click on Add in the lower right corner of the new integration tile, confirm Add when prompted
-
Review the Get started information and click on Next
-
In the Authentication panel, select
Oauth 2.0, enter in the API key that you created earlier, keep the remaining default values and then click Next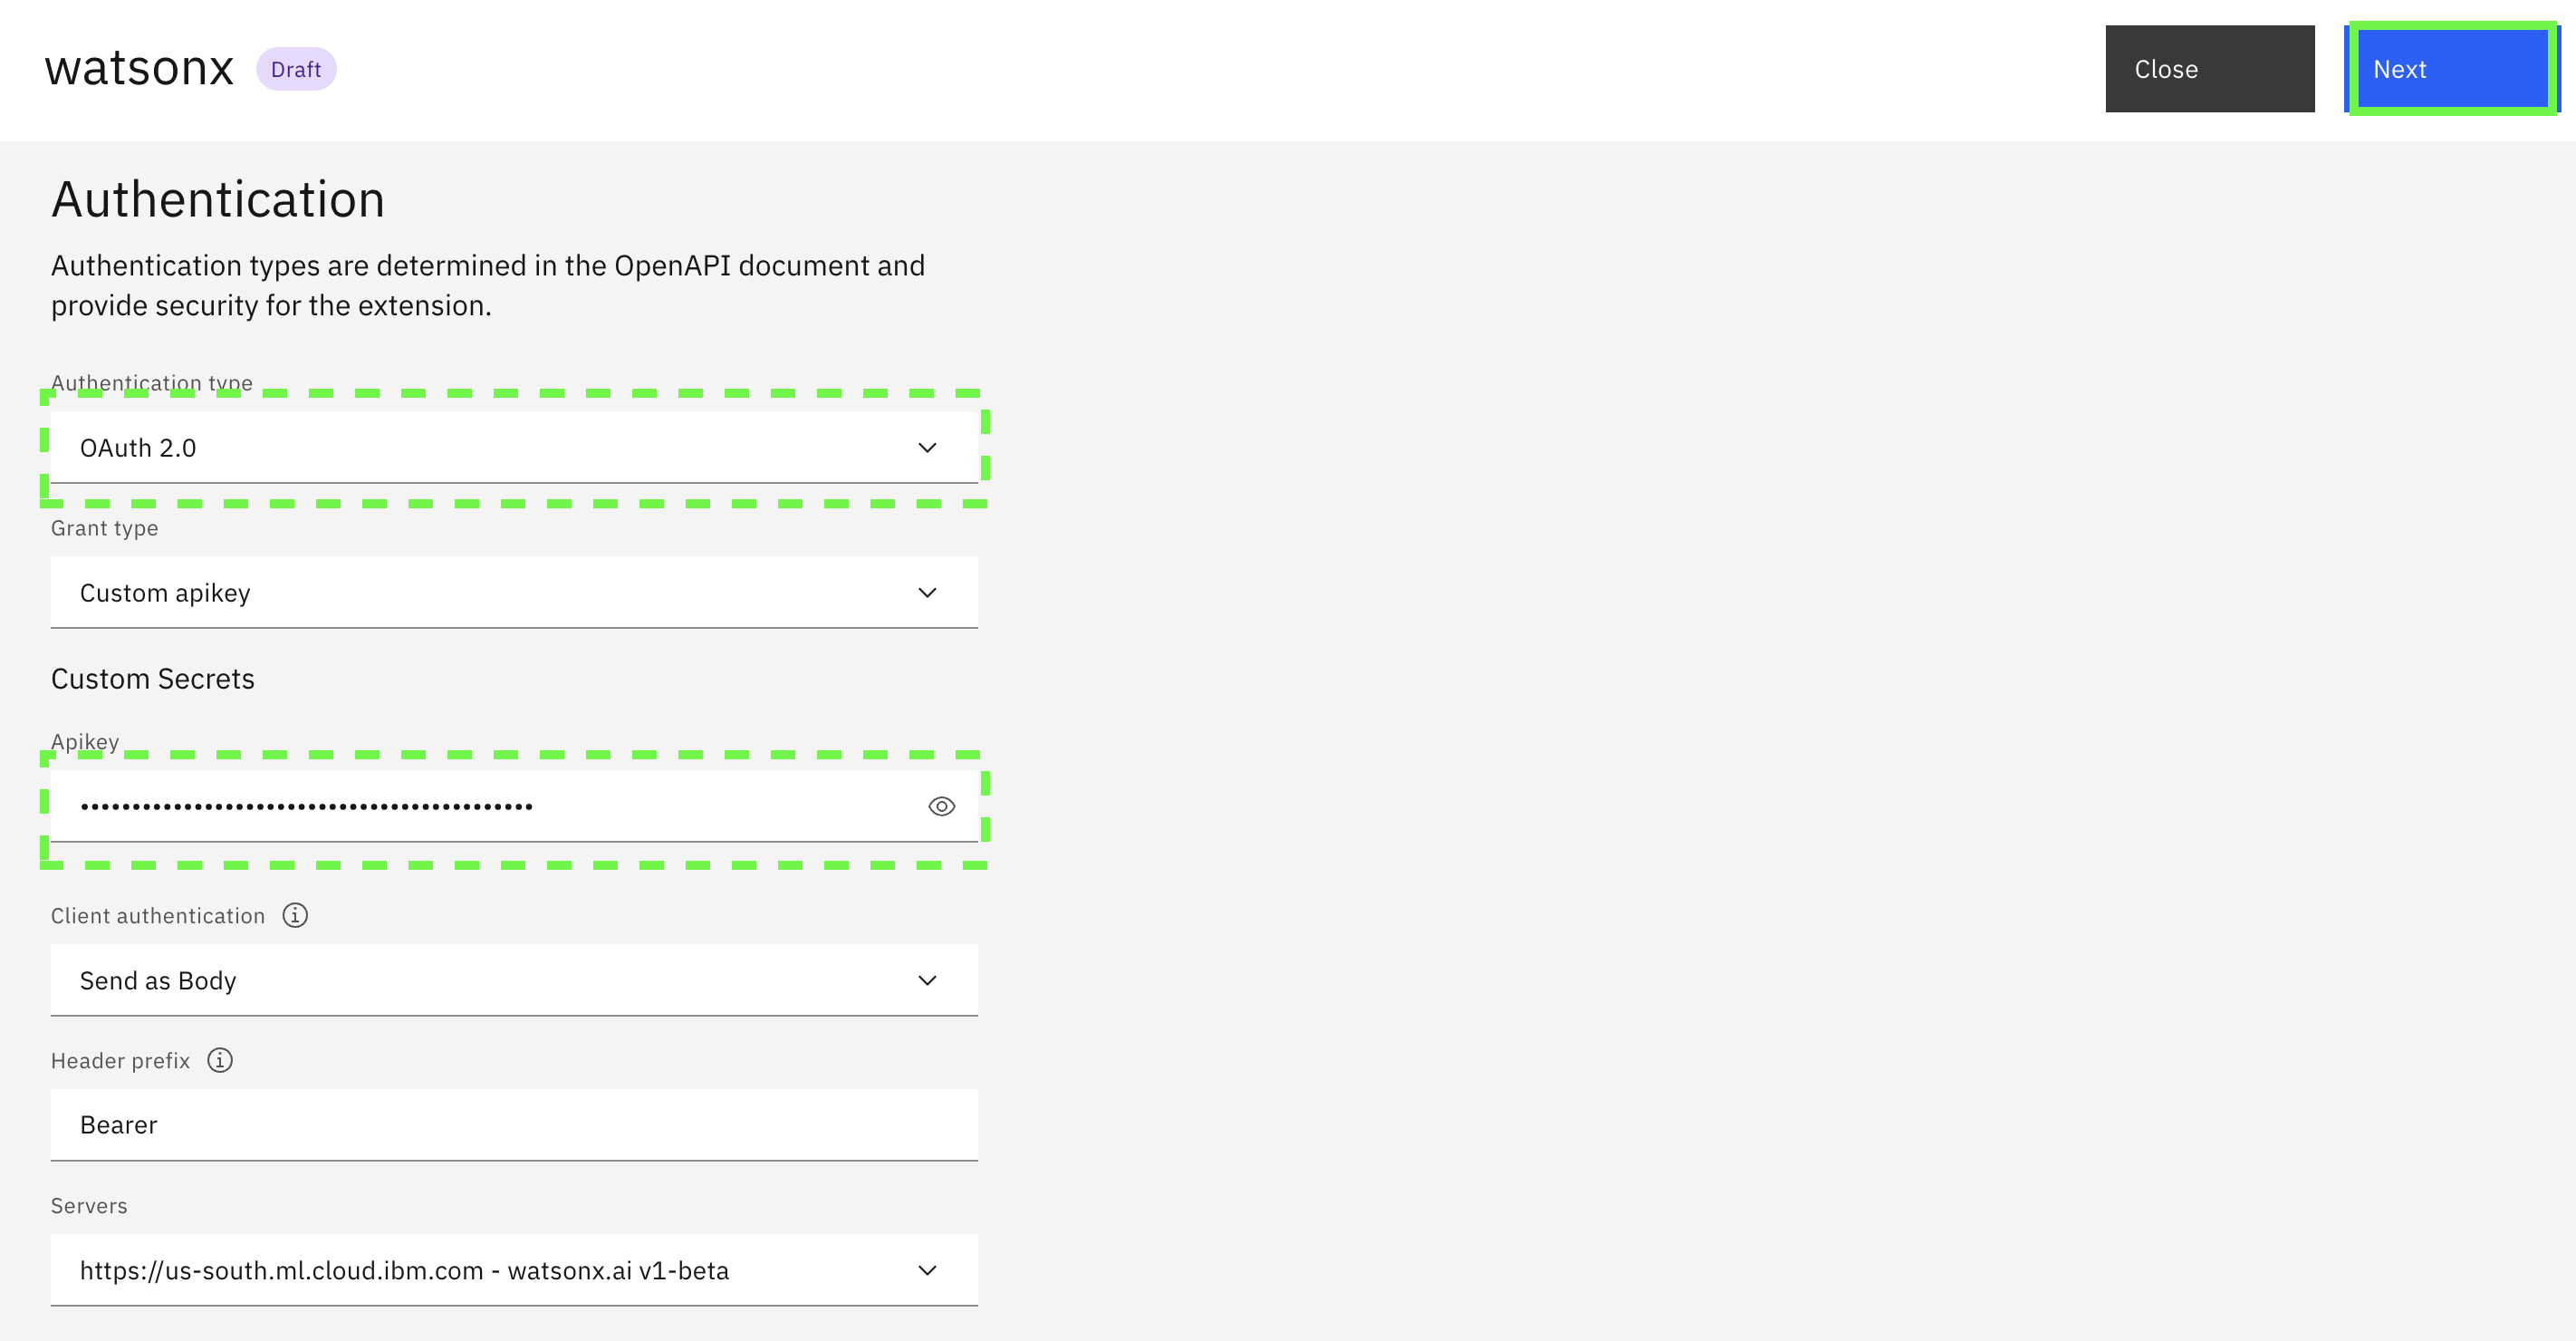
-
On the last page review the
POSTrequest parameters and response values. The assistant can set parameters in the request before calling the extension and will parse the response to show the user the output. Click on Finish, then click on Close if you are not returned to the Extensions section of the Integrations panel.
Congratulations, you now have a way to make a functional integration from an Action in assistant with watsonx generative AI endpoint.
Create your action
Now it is time to create your action and have it use the integration to watsonx. To get started, you will create an action that uses generative ai to draft a marketing message from your prompt.
-
In the browser tab with watsonx Assistant and click on Actions in the upper left.
-
In the main panel, click on Create action
-
Select Start from Scratch
-
For what the customer says enter
Marketing Messageand click on Save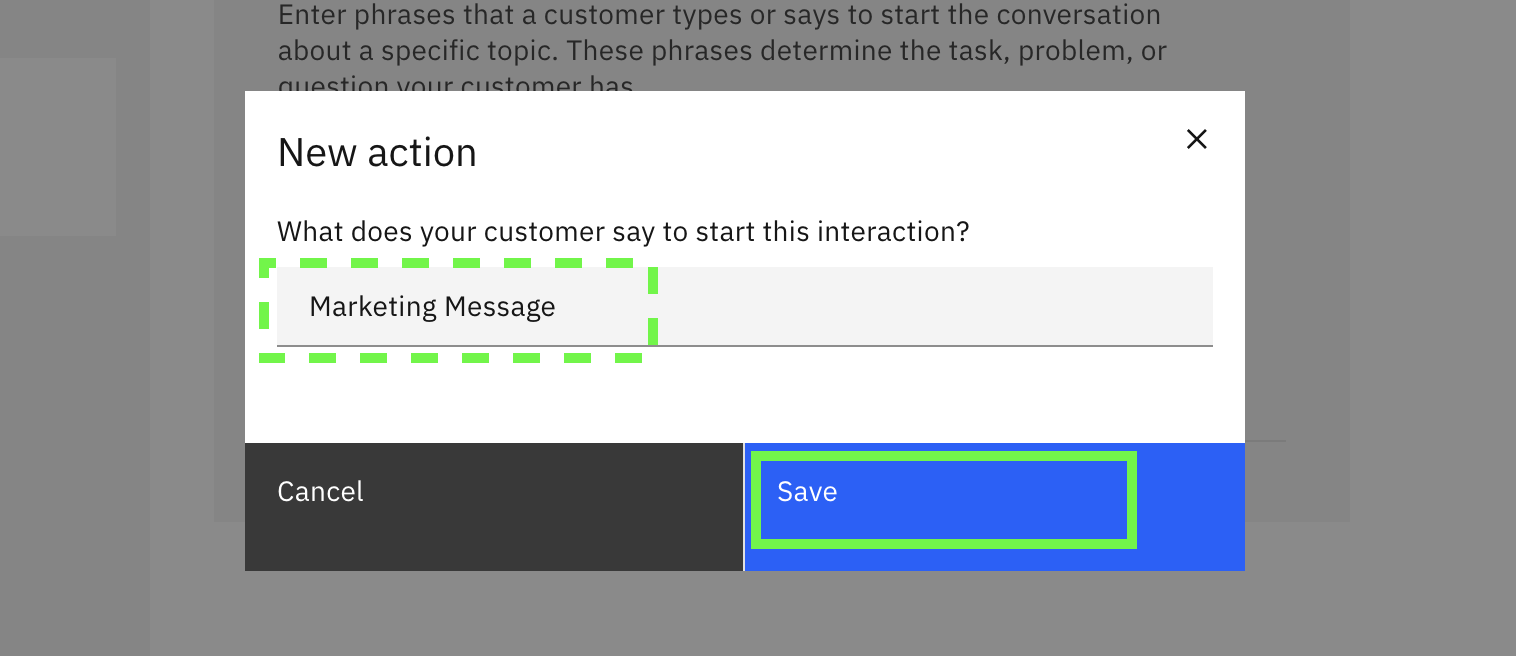
-
Click on the pencil icon to set a step title. Use
Prompt for a promptas the title. -
For what the assistant says, you can either make it a short message or be more prescriptive. Note - humans, like generative AI models can often do better when requests are specific. For example:
Please provide a prompt for the model to use to create the marketing message. Type as much as you like and include lists of details for me to use with the model.text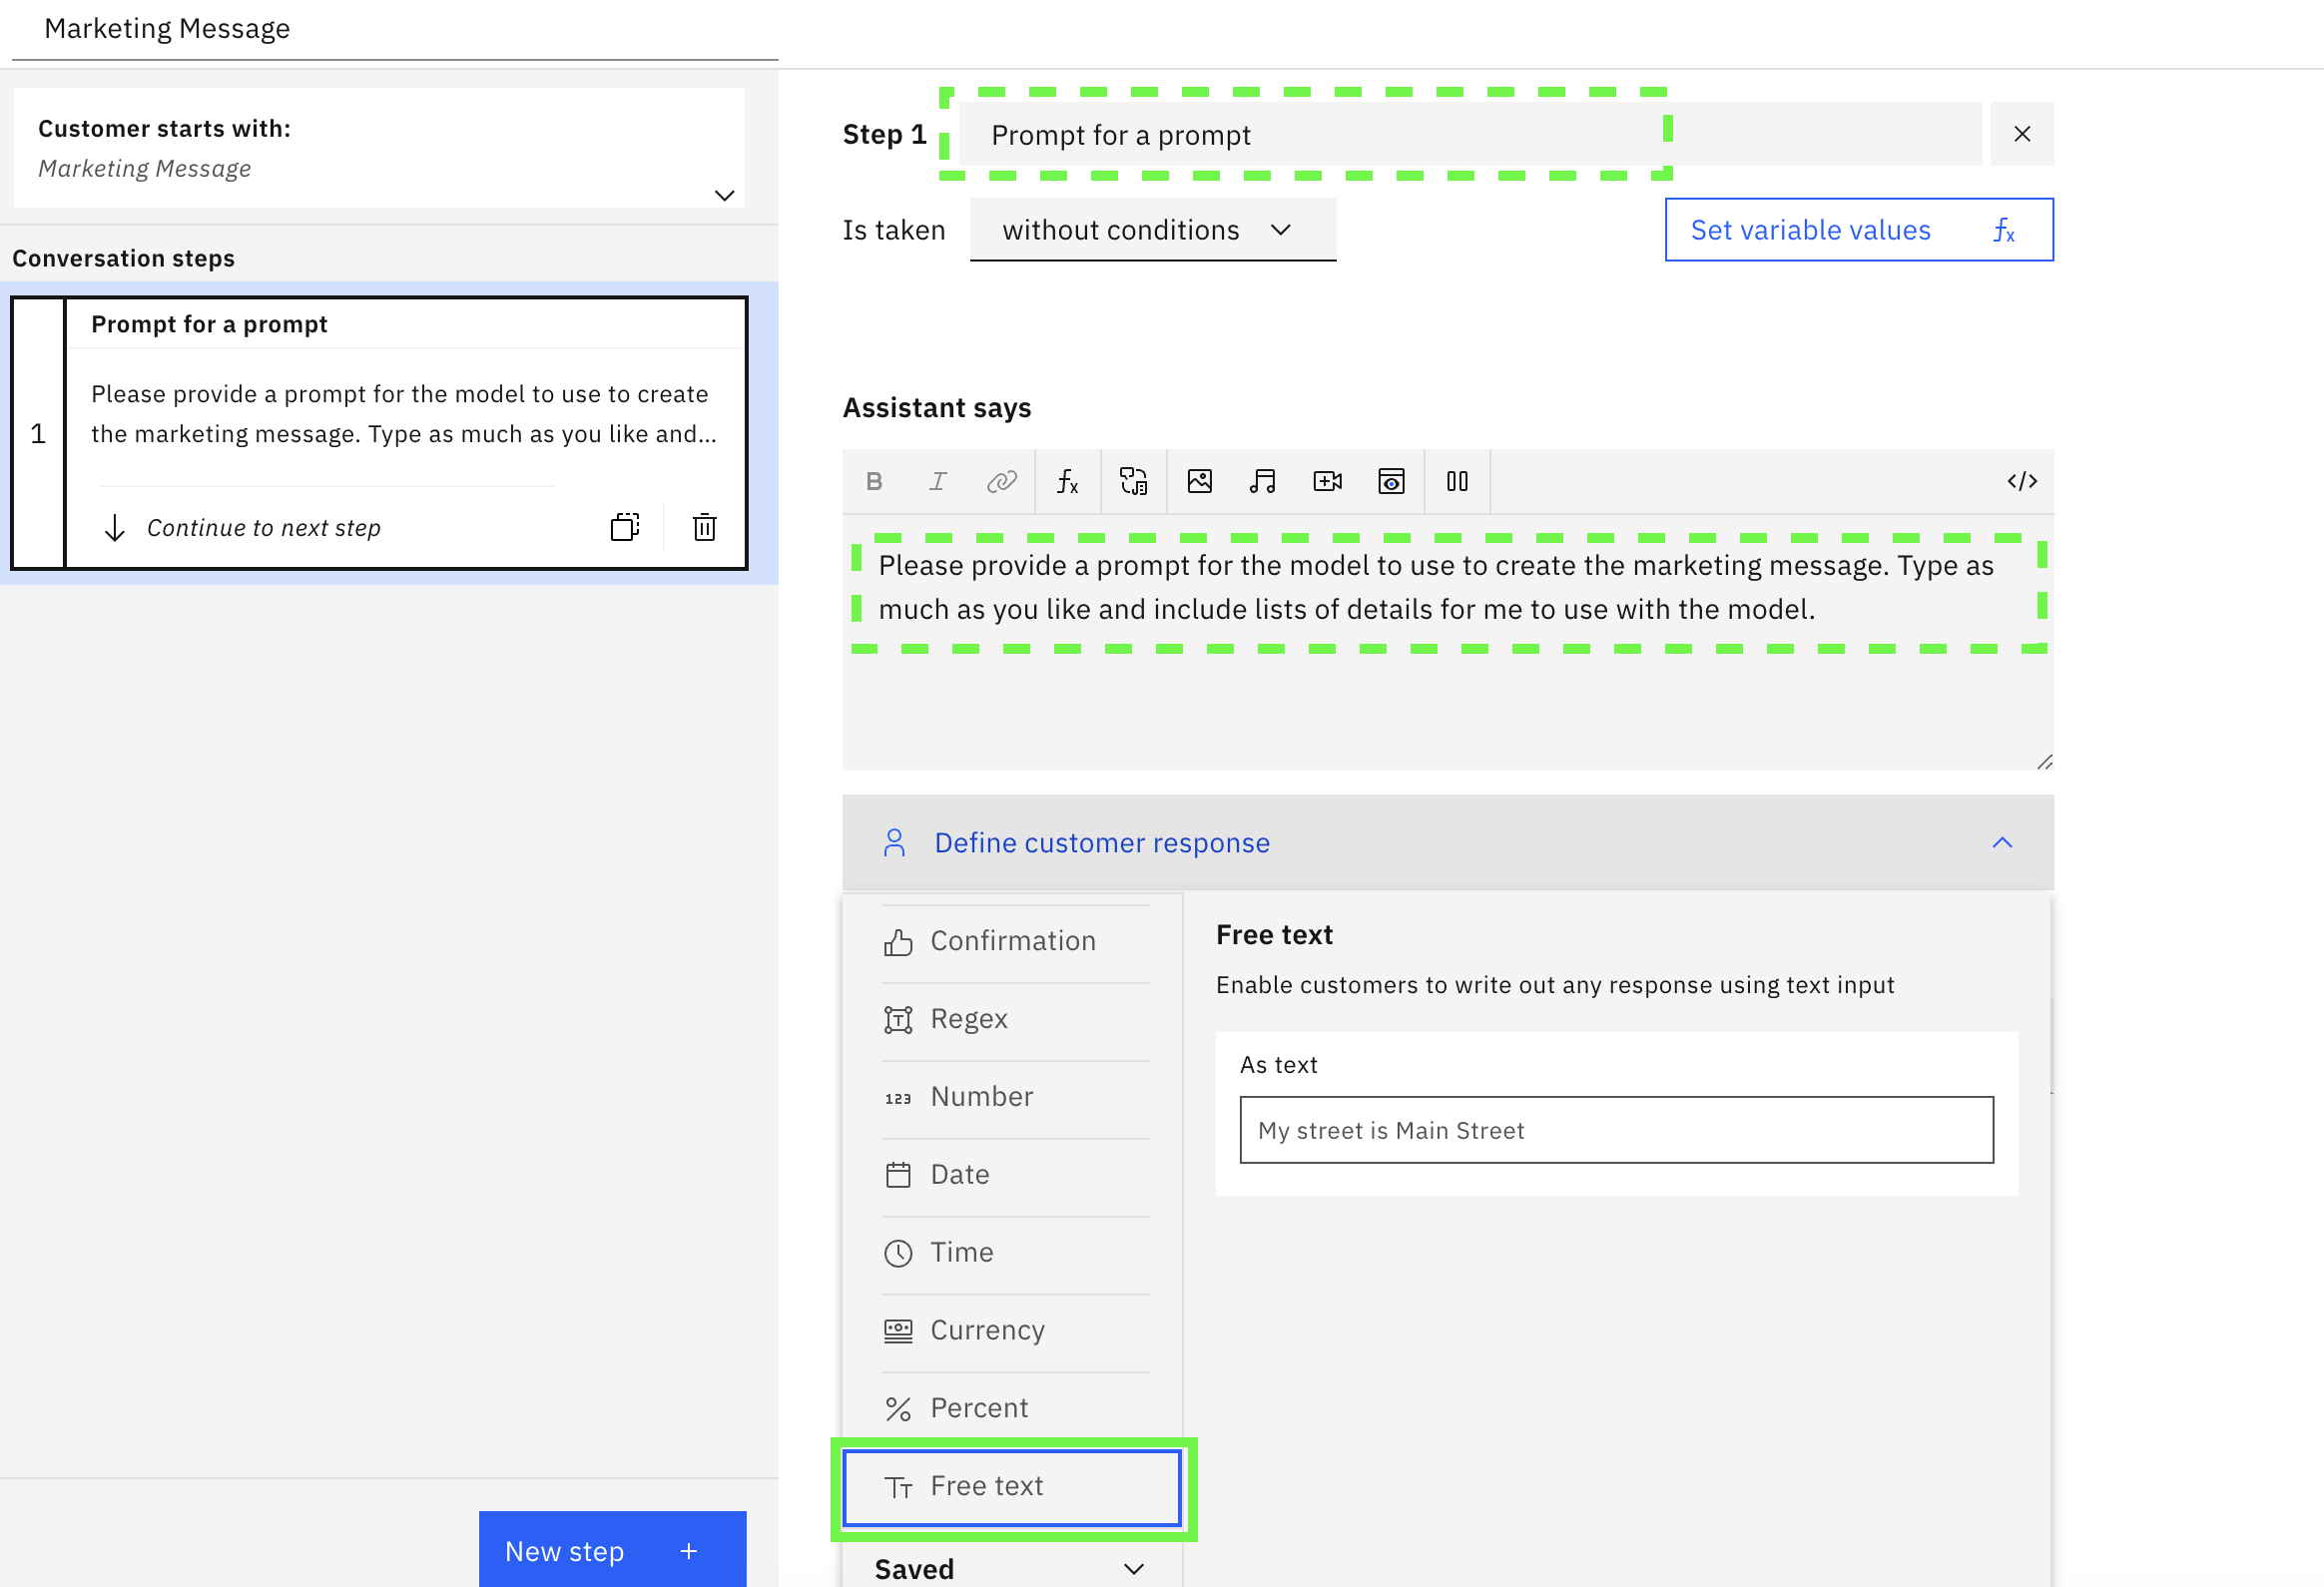
Expand
Define cutsomer responseand specify that the assistant will expect a response from the user as Free Text input. When you click on Free Text, the UI will showUser enters free textbelow theAssistant sayspanel. When this is shown, click on New Step to configure the next part of the Action. -
Name the next step
Call watsonx.ai endpointby clicking on the pencil (edit) icon. In the And then section, select Use an extension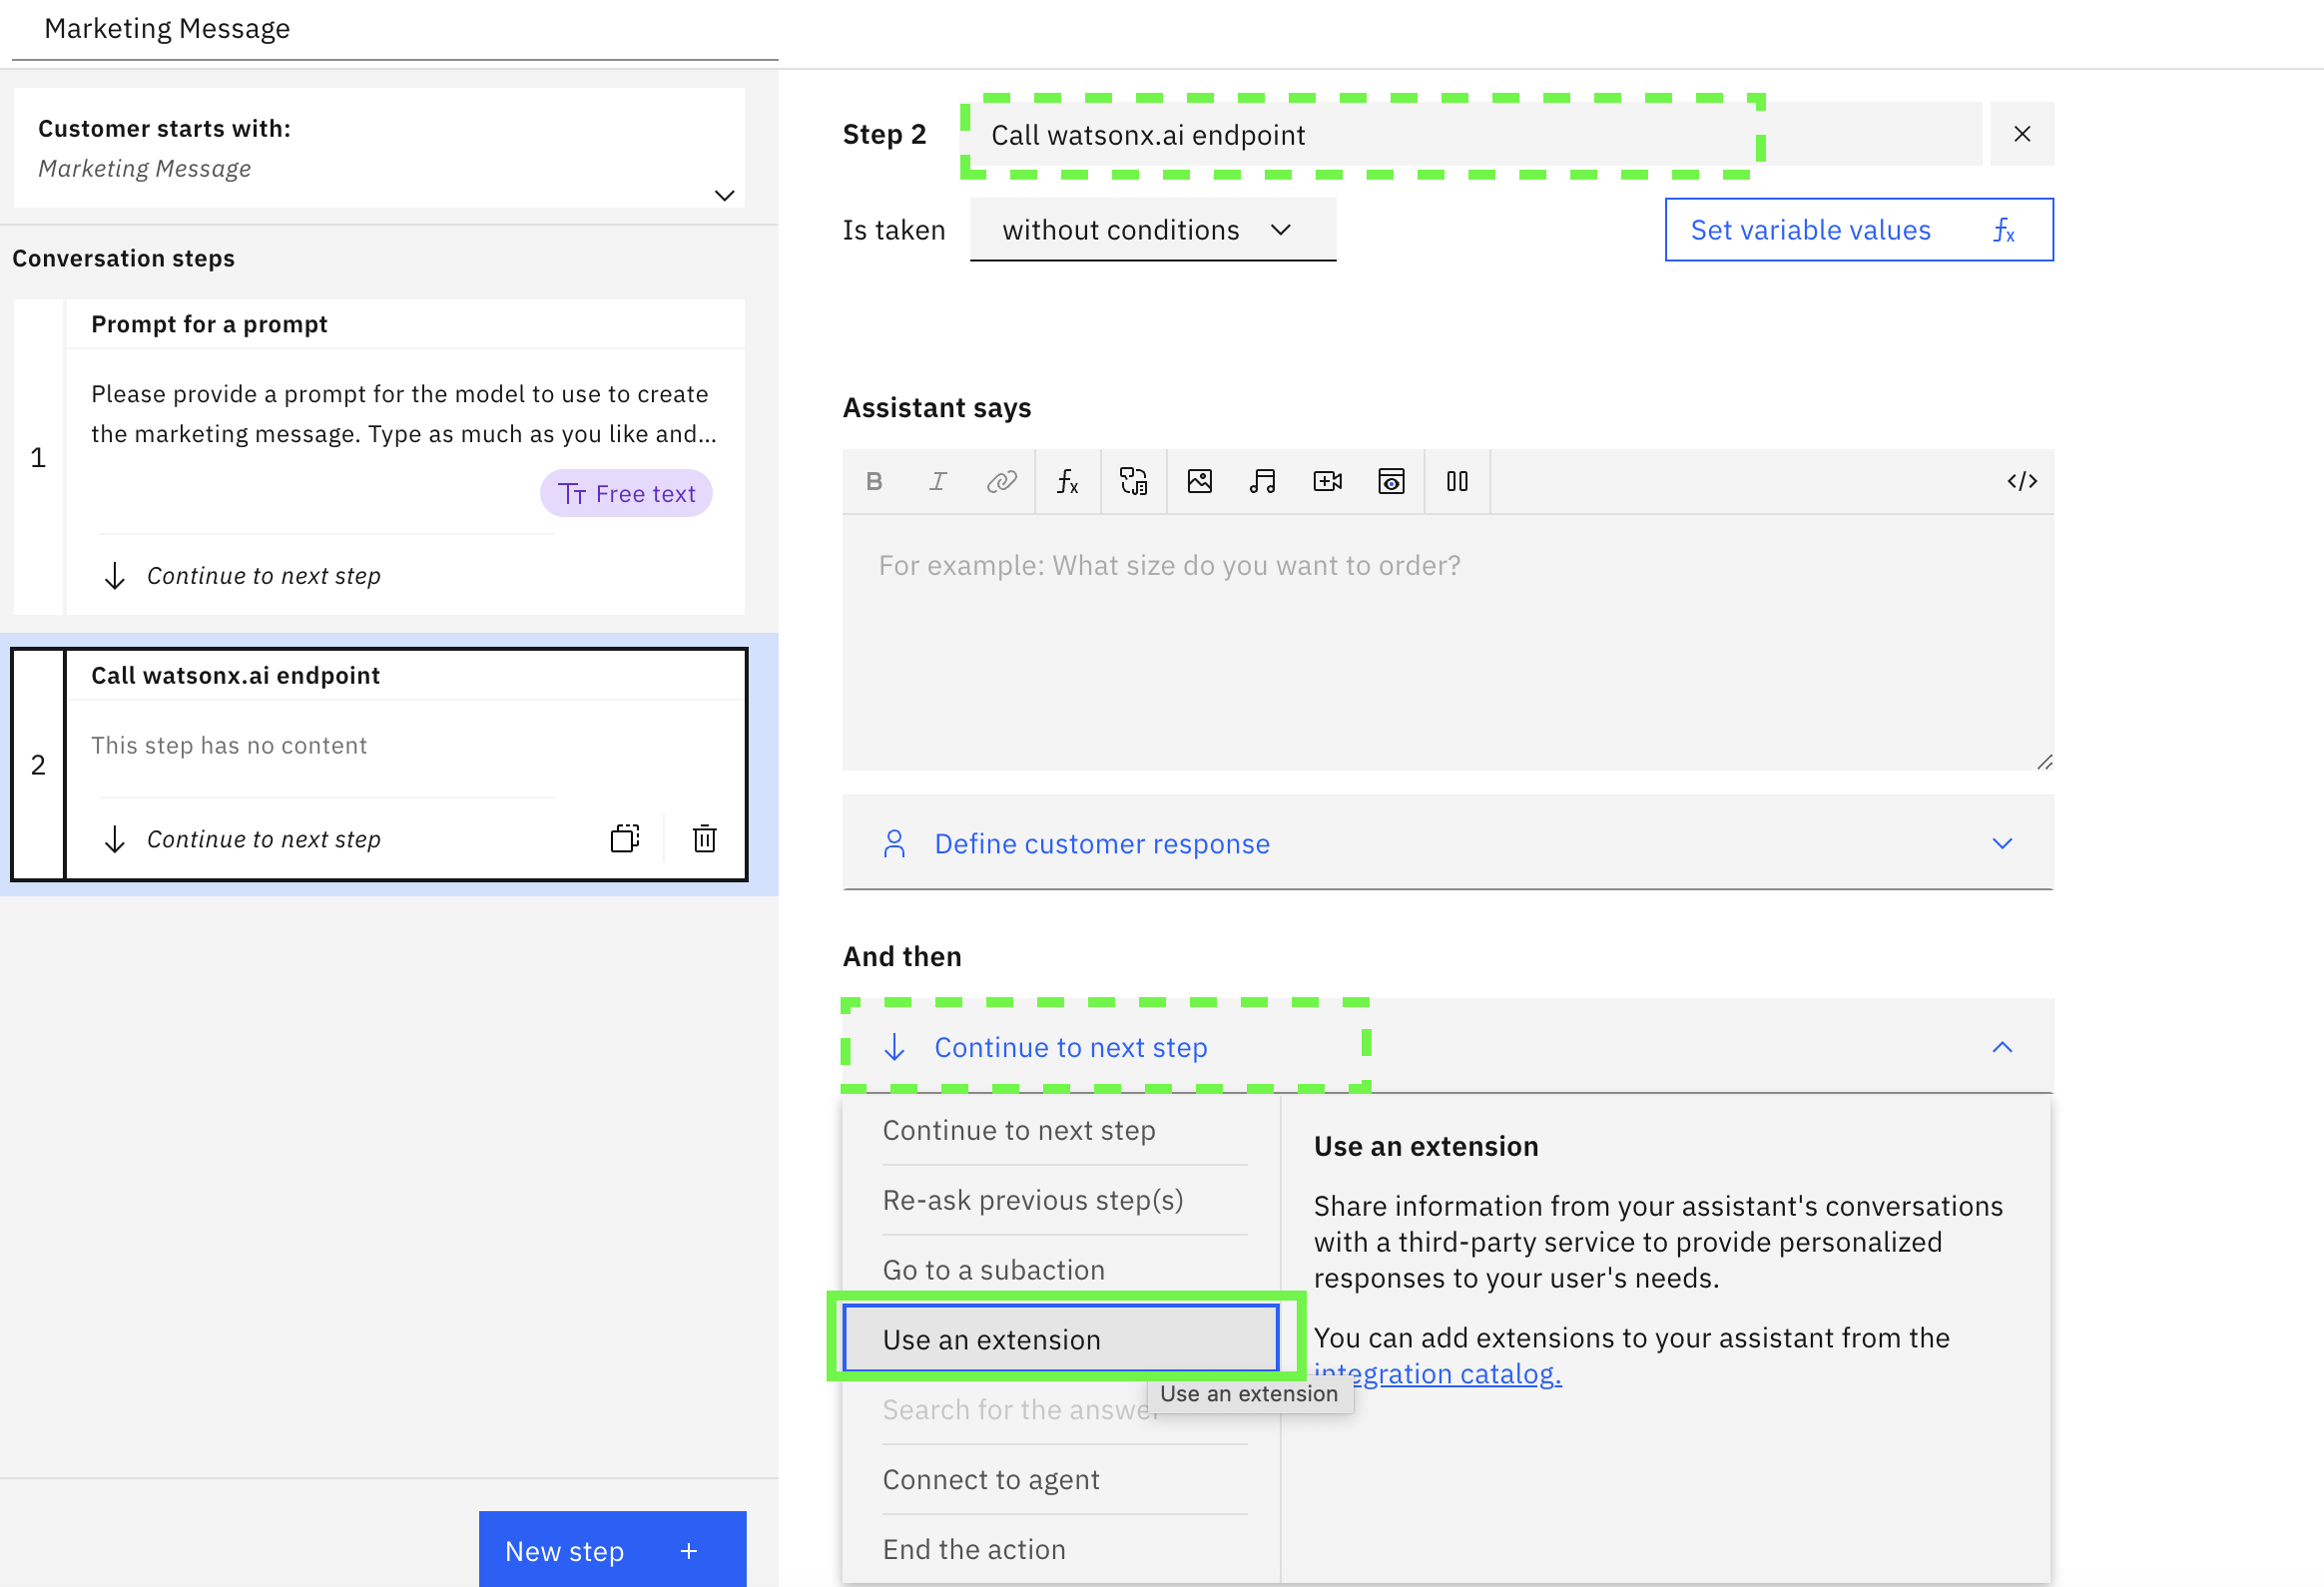
-
For the extension to use, select
watsonx. Then select theGenerationoperation to show the parameters that can be sent to watsonx.ai on every invocation. For version, chooseEnter textand then provide2023-05-29, For input, chooseAction Step Variablesand then choose1. Prompt for a prompt, continuing in the same way, set the model_id togoogle/flan-t5-xxland the project_id to your watsonx.ai project id saved before. Don't apply yet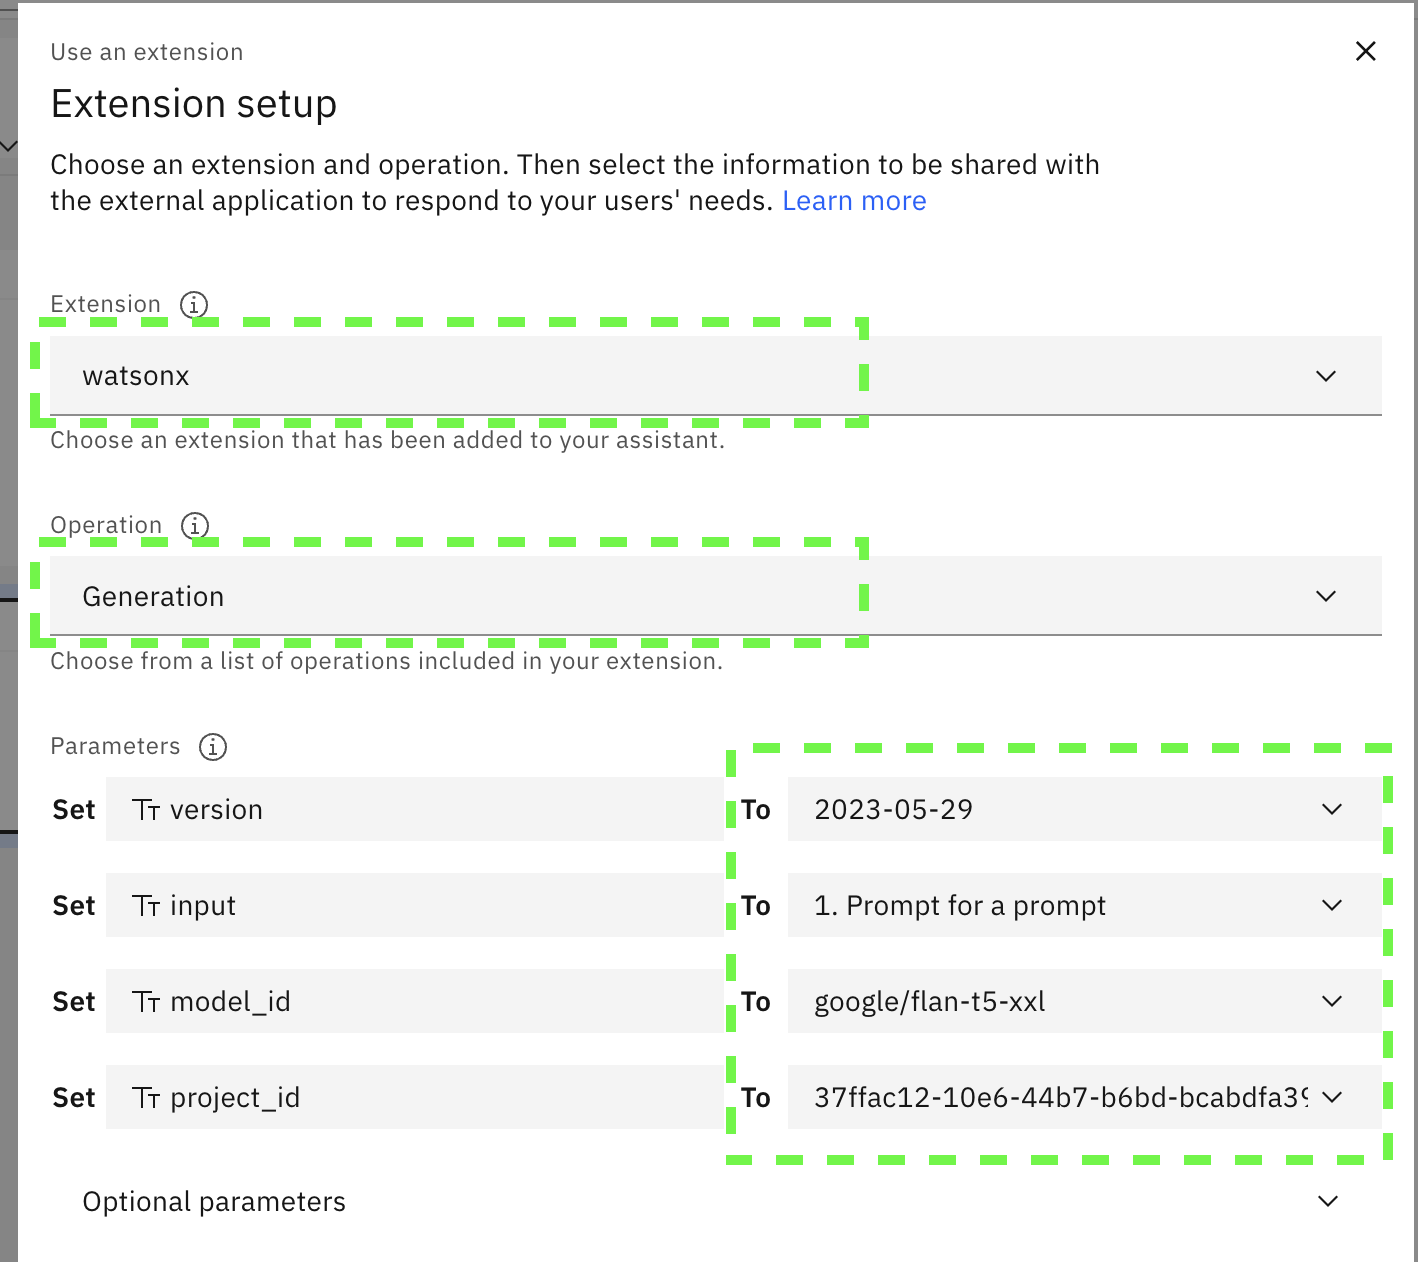
-
Expand the optional parameters. For this text generation scenario, use temperature
0.7, set max_net tokens to200, set min_new_tokens to50and set repetition penalty to2, set decoding_method tosample. Then click on Apply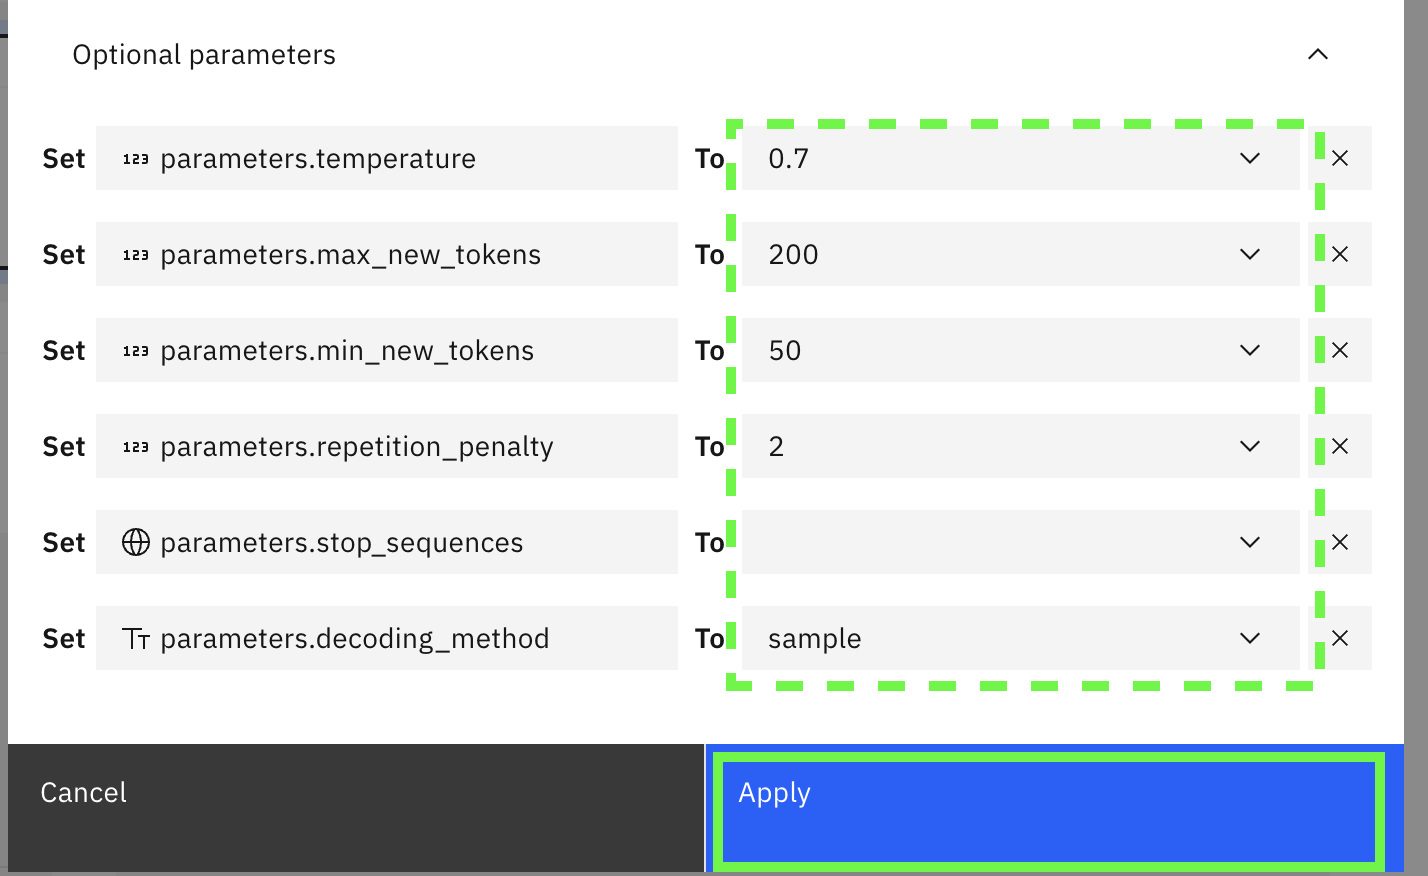
-
Click on New Step
-
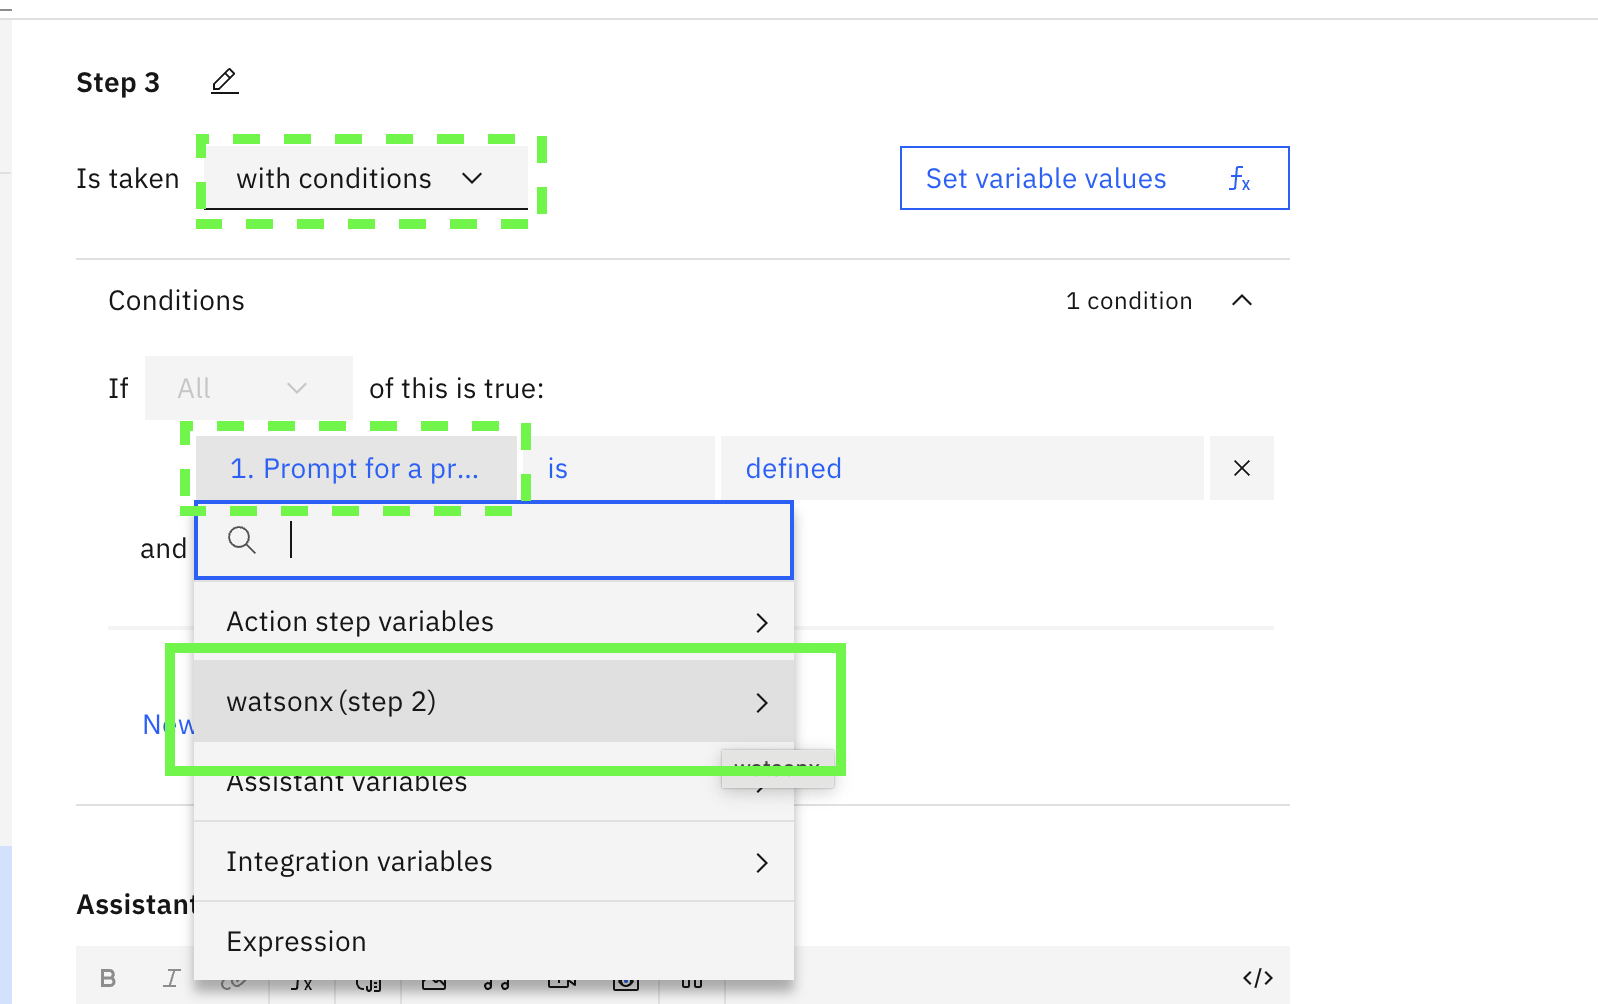
In this step, select with conditions . In the condition, click on the first item and select watsonx (step 2)
-
Select Ran successfully
-
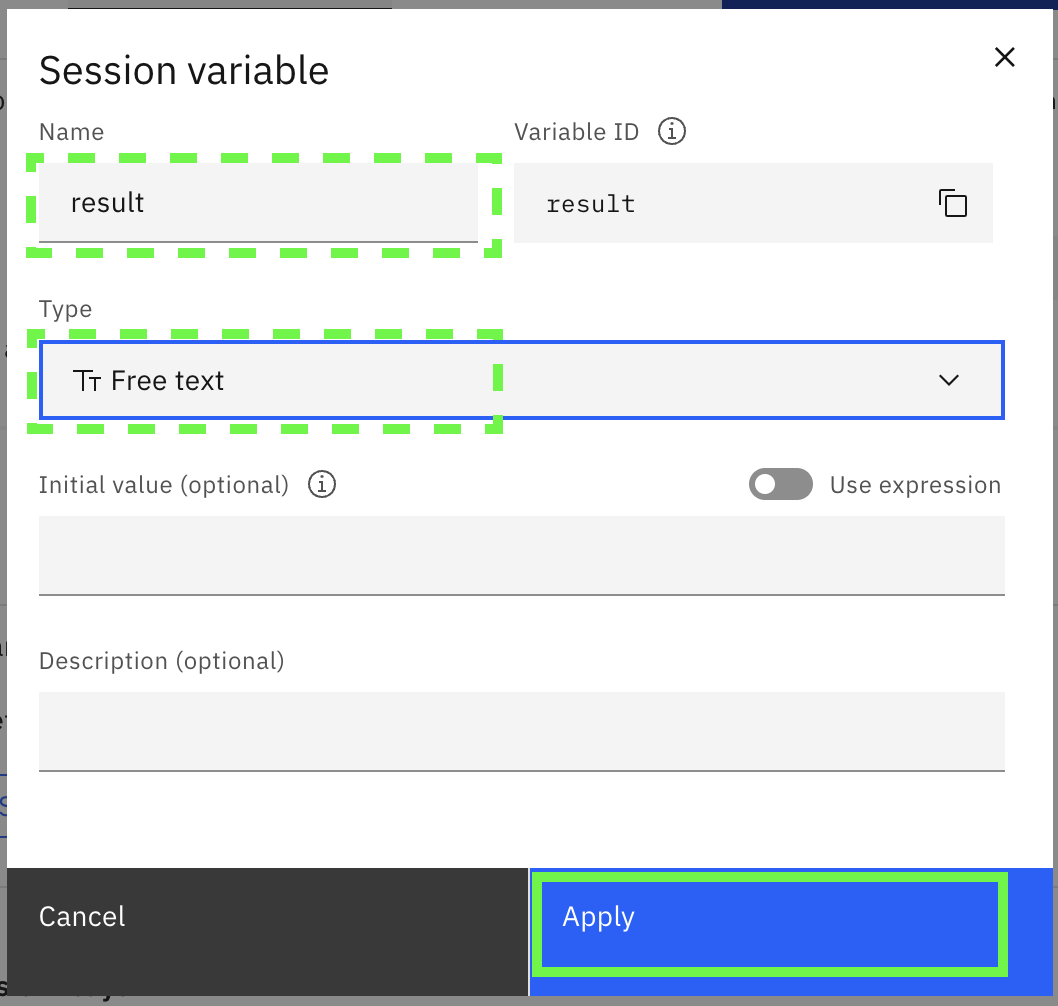
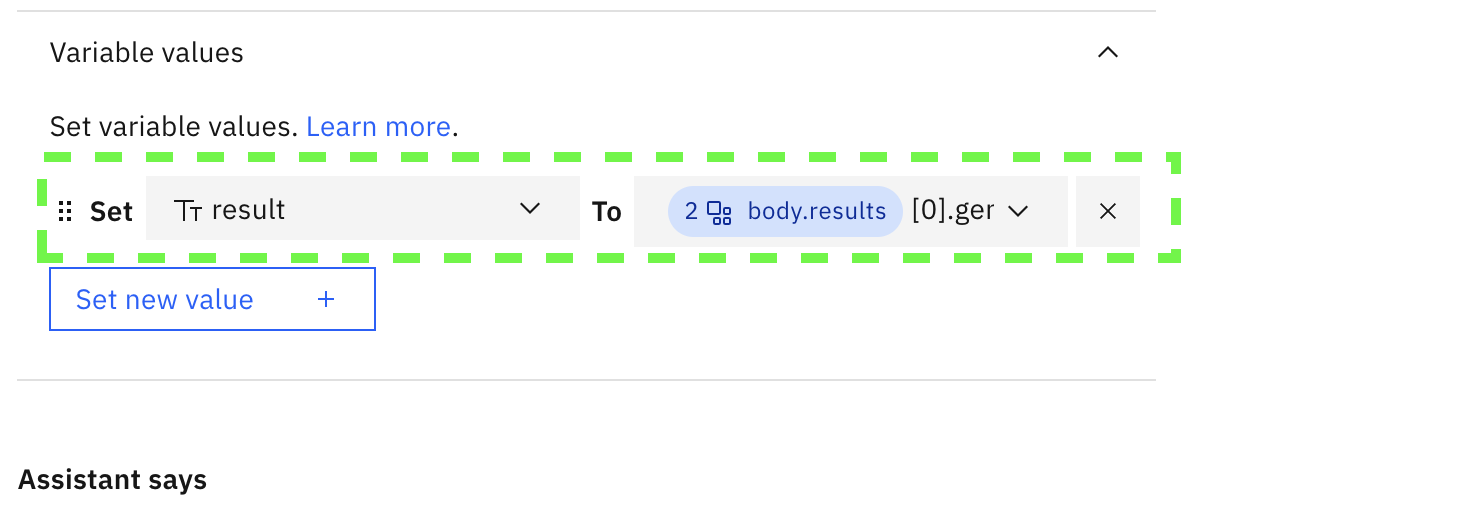
Click on Set variable values , then click on Set new value, then click on New session variable
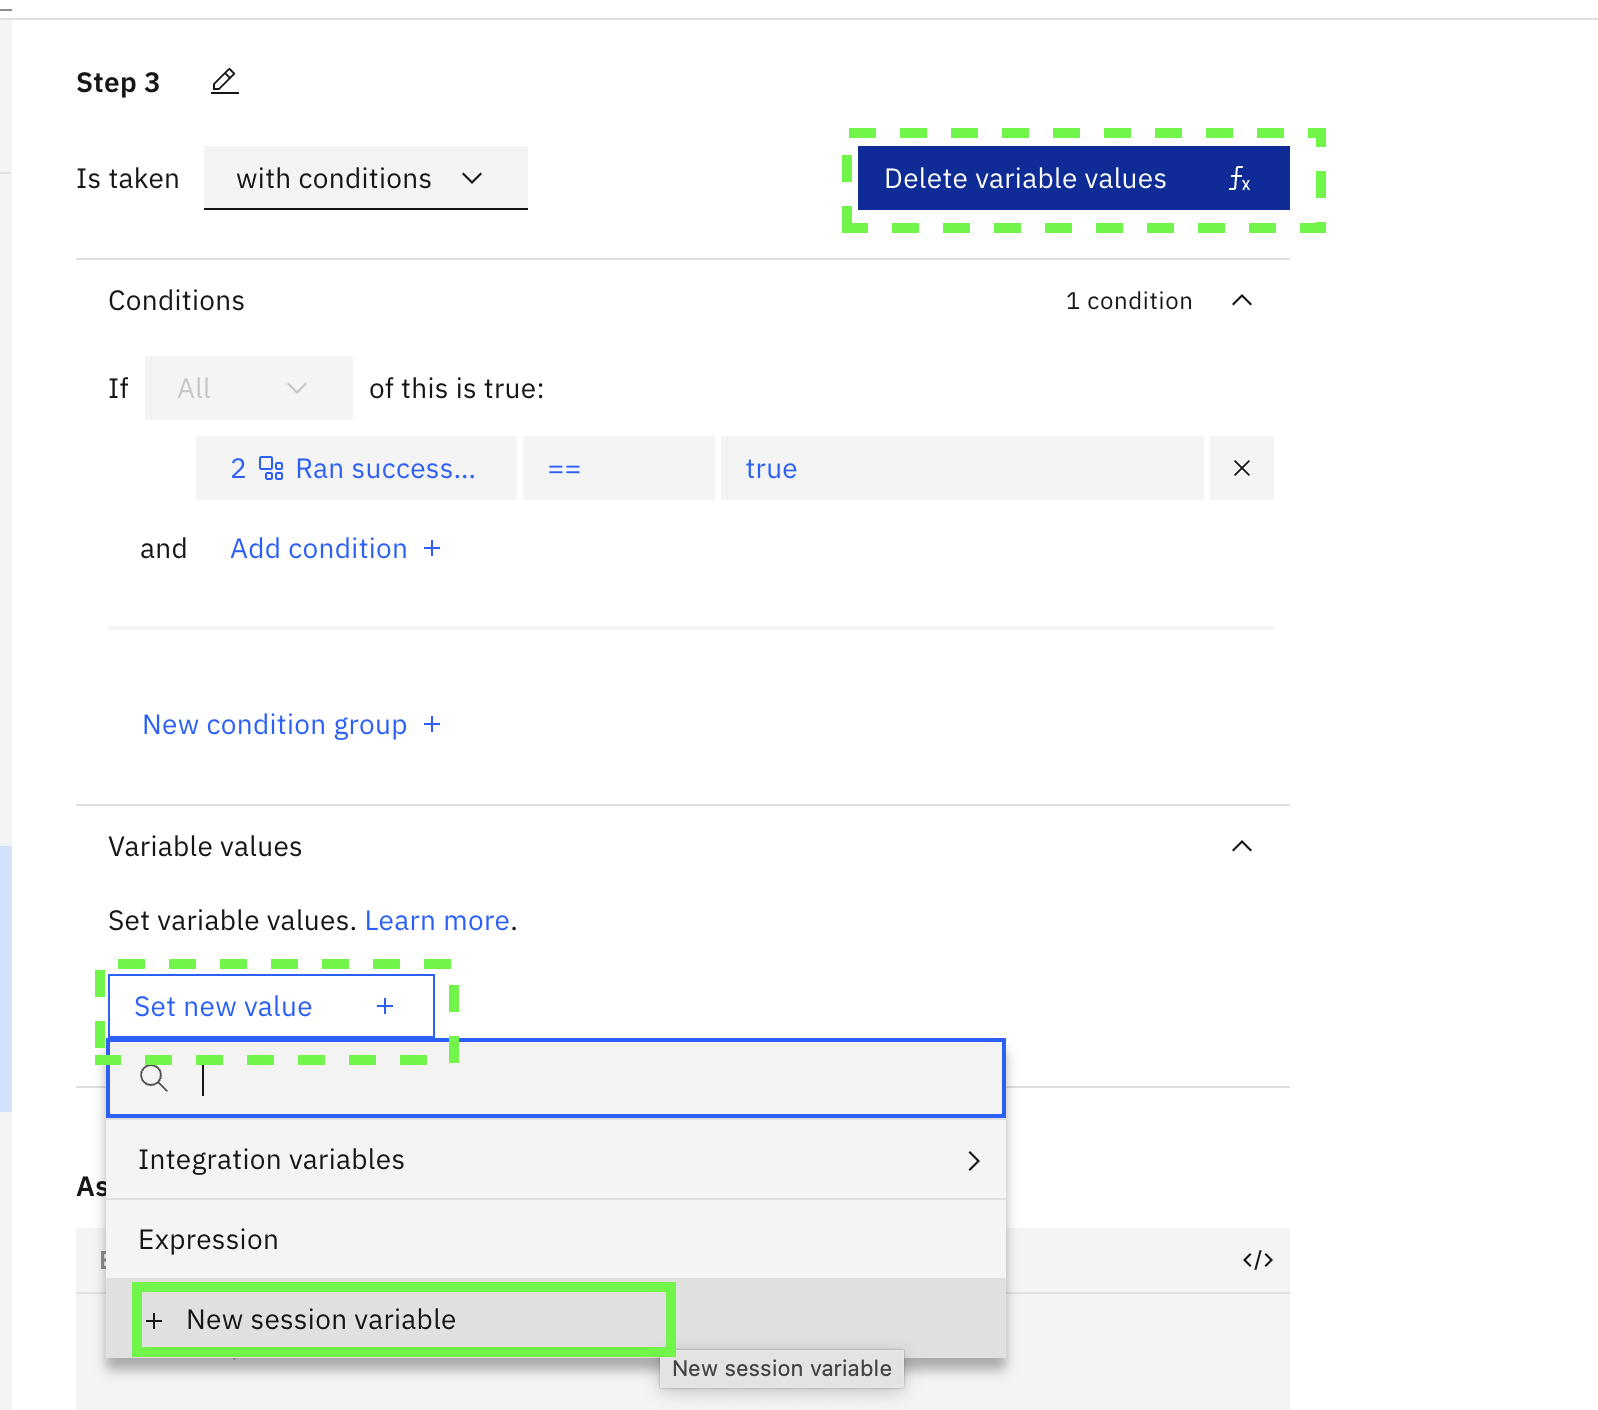
- Call the variable
resultand selectfree textand then click on Apply
- For the variable assignment To, select Expression and type
$after this is pasted a pulldown will appear. Selectwatsonx (step 2)
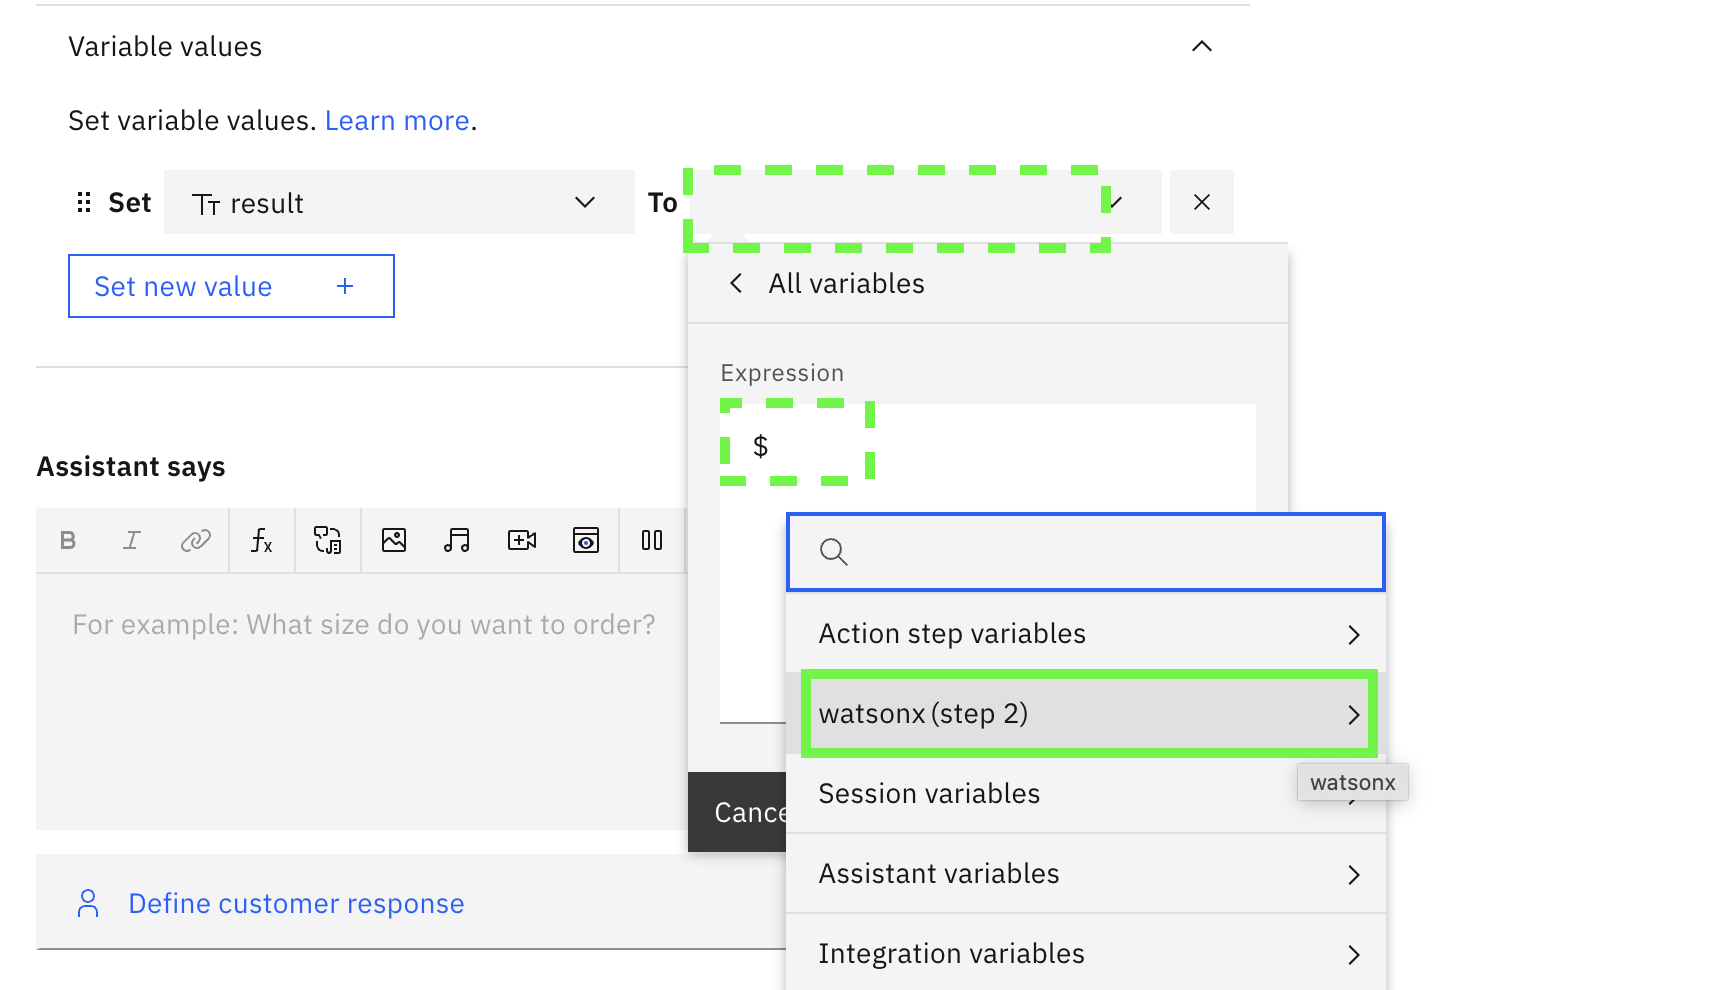
Select body.results, the box will fill in with the assignment for the result variable. Now add the text [0].generated_text to the end of the expression:
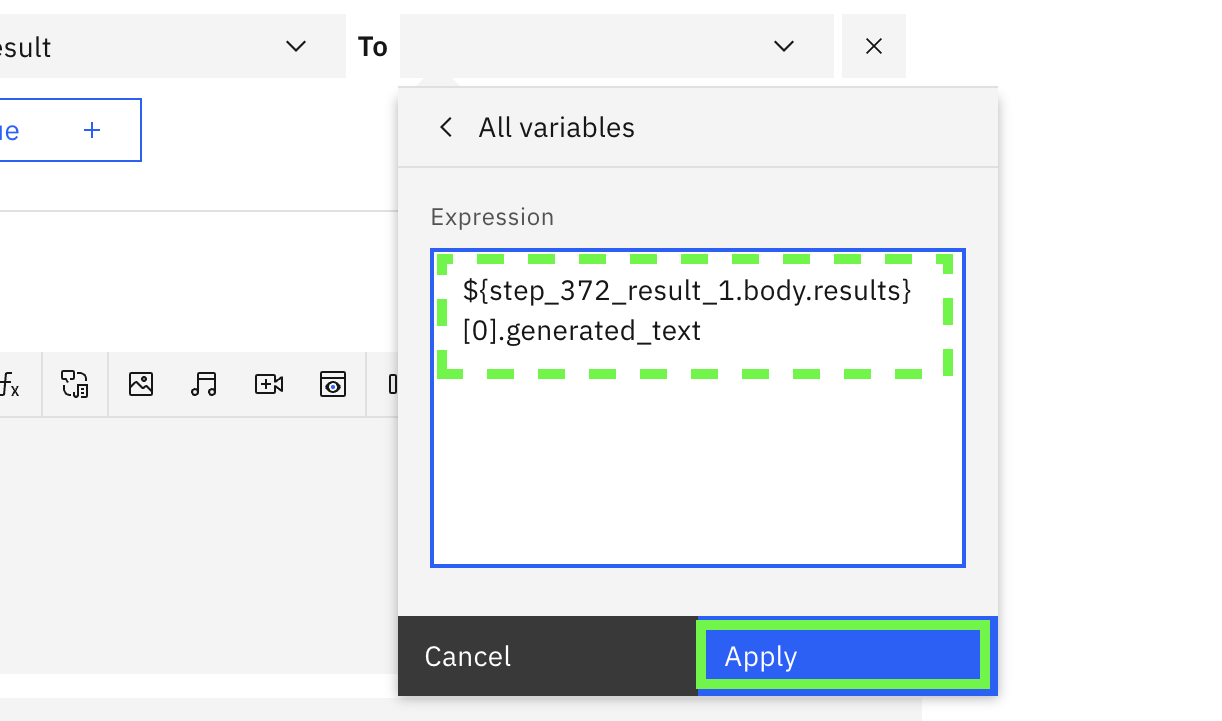
click Apply
- The full expression for the variable should be shown as:
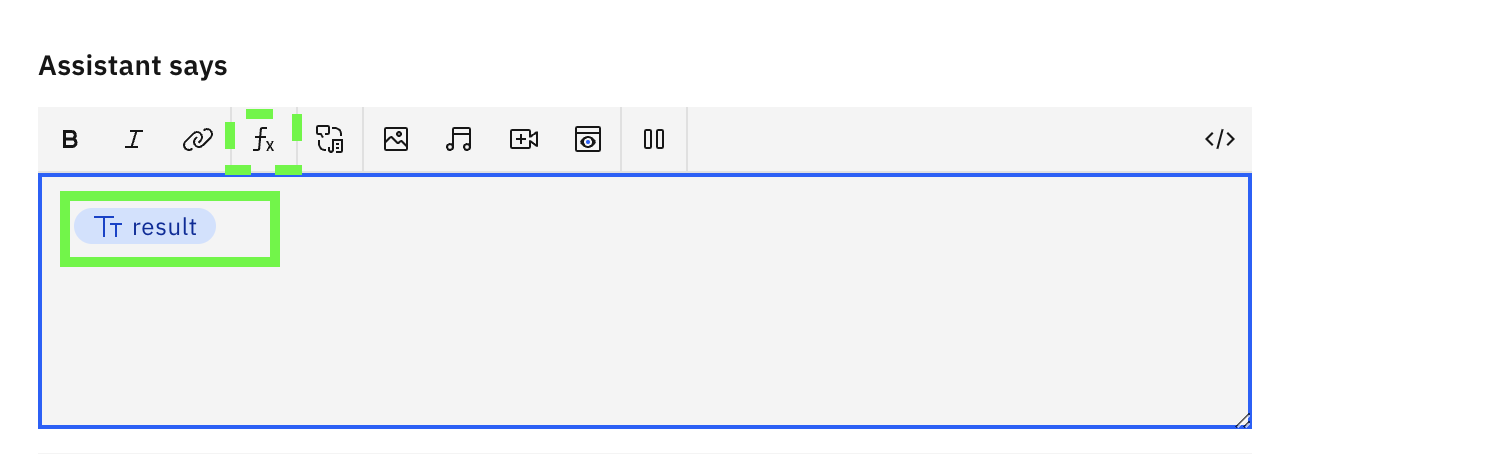
- In the Assistant says panel, select function and then type in
${result}, or you can select Session variables and thenresult
The assistant should be ready, time to test it out.
Testing the action
-
Click on the Preview button.
-
After the greeting, type
I need to create a marketing message, and send to the chatbot. -
The chatbot will reply with the prompt for the prompt.
-
Enter the following text into the chatbot
Generate a 5 sentence marketing message for a company with the given characteristics. Details Characteristics: Company - Golden Bank Offer includes - no fees, 2% interest rate, no minimum balance Tone - informative Response requested - click the link End date - July 15 Emailtext -
Send to the chatbot - if all worked, you will get a response back from the model with the message.
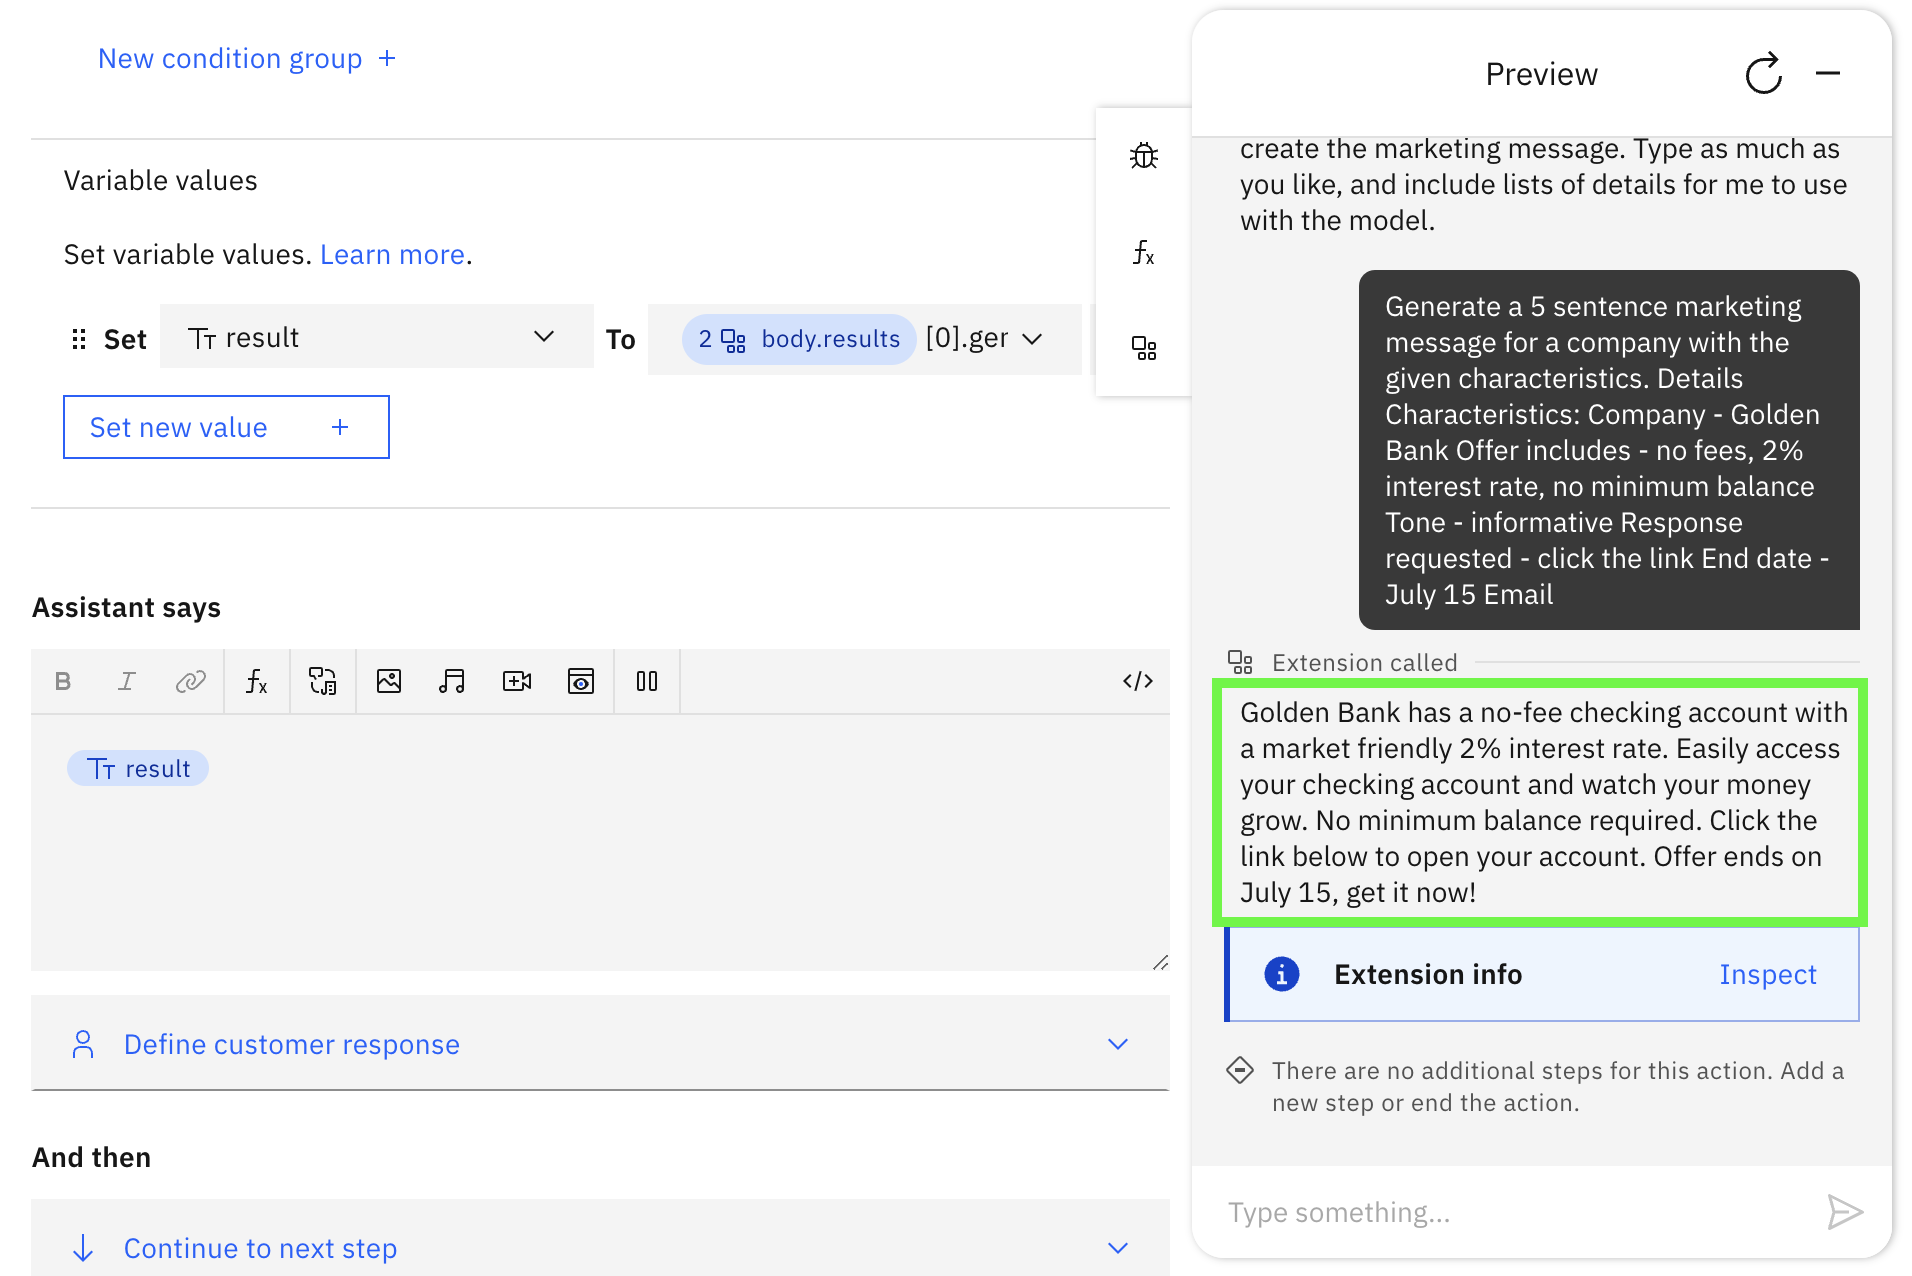
You will most likely see something different because we are using a
sample(vs.greedy) decoding approach. Don't like the response, re-run the assistant to get another message. Note - with these parameters, the assistant may create information like years for the date (because only July 15th is specified) or phone numbers. In a real use case, a human would use this generated message as a starting point, making edits as necessary and then approving the final version.
Next Steps
Note that the provided watsonx-openapi.json does not include definitions for all parameters and is meant to be a starting point for further expansion. One good task is to edit the file to add an additional optional parameter for the random_seed (check out the API documentation for details) and then try the assistant with the seed 111 to get a result that matches the Prompt Lab marketing message example.
Experiment in prompt lab for other scenarios using different prompts and parameters - then create new actions and adjust parameters for the new use case. Since all of the prompt is required for input in the current design, zero or one-shot (like the one in this lab) will work the best. However, with a bit more effort, it should be possible to define an assistant variable with more examples and then use an expression to build the prompt for the integration. Try it out!