watsonx.governance L4 Environment Setup
Environment Setup
Provision a watsonx.governance Environment from TechZone
-
Open the watsonx.governance Level 4 PoX image in IBM Technology Zone. Sign in with your IBMid and accept any terms and conditions you are presented with.
-
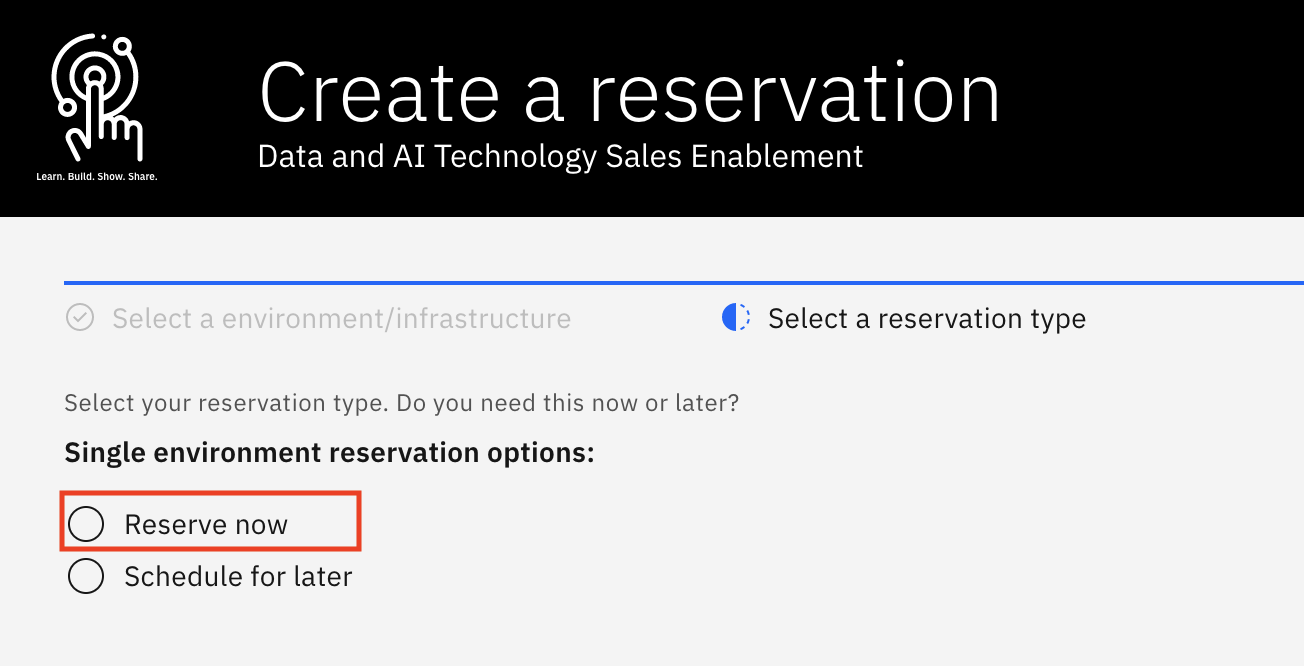
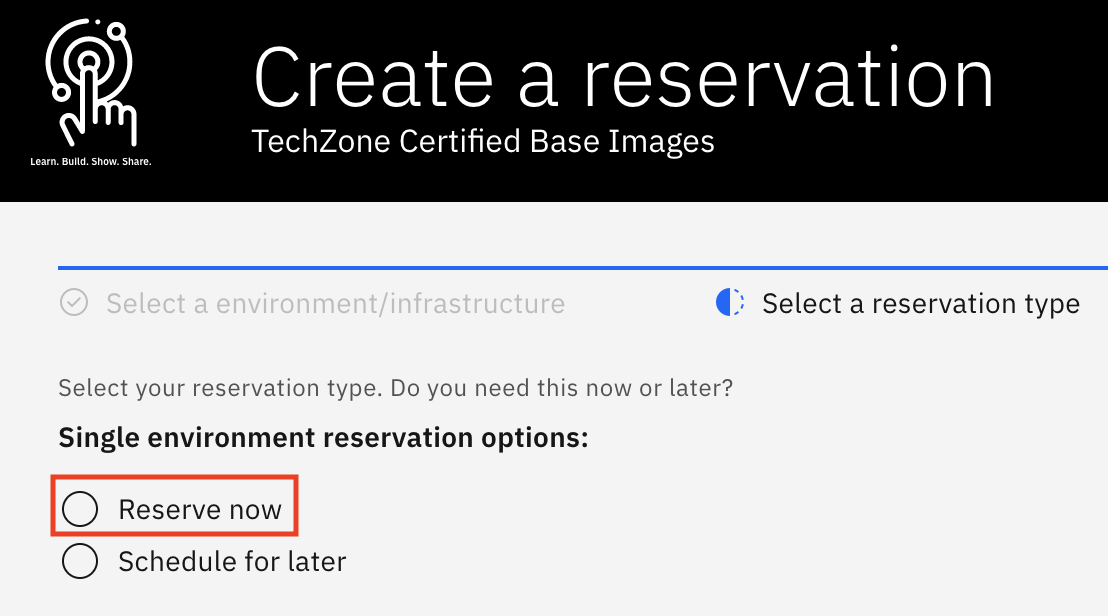
For the reservation type, select the Reserve now radio button.
-
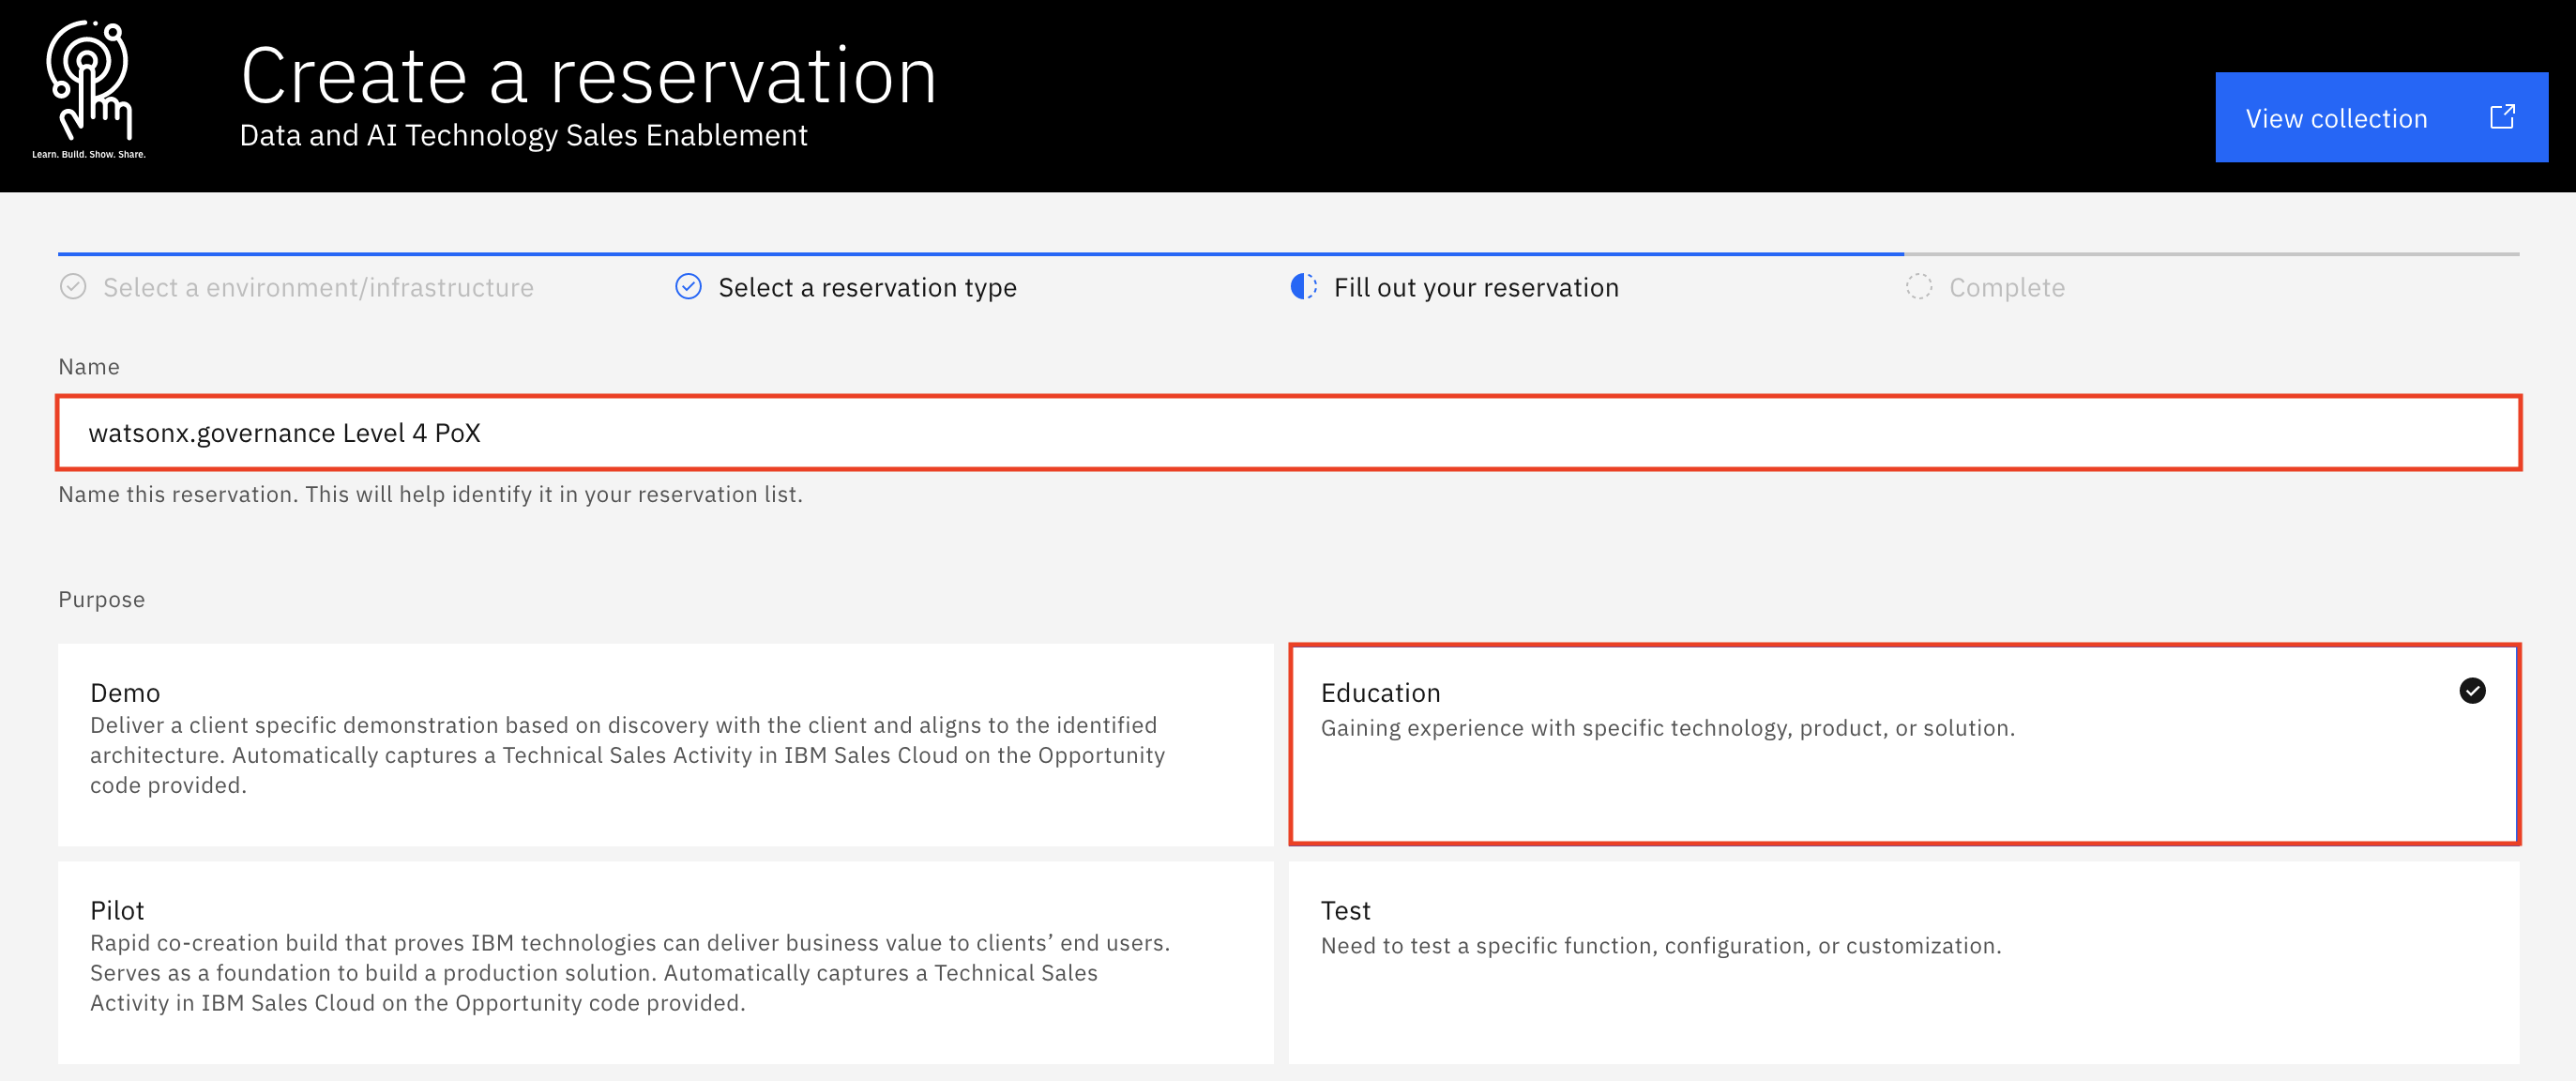
Accept the default for the reservation Name, or provide a name of your choosing. For the Purpose of the reservation, select Education.
-
Fill in the Purpose description box with the reason you are making the reservation (ex.
Workshop lab on watsonx.governance Technical Sales Advanced Badge organized by IBM Resell Lab). Then, scroll further down and select your Preferred geography based on your location (ex. any - AMERICAS - any region - any datacenter). Keep the reservation's End date and time (by default it’s two days (48 hours) from now; it can’t exceed two days initially, but you can extend the reservation by two days, up to two times, before it expires).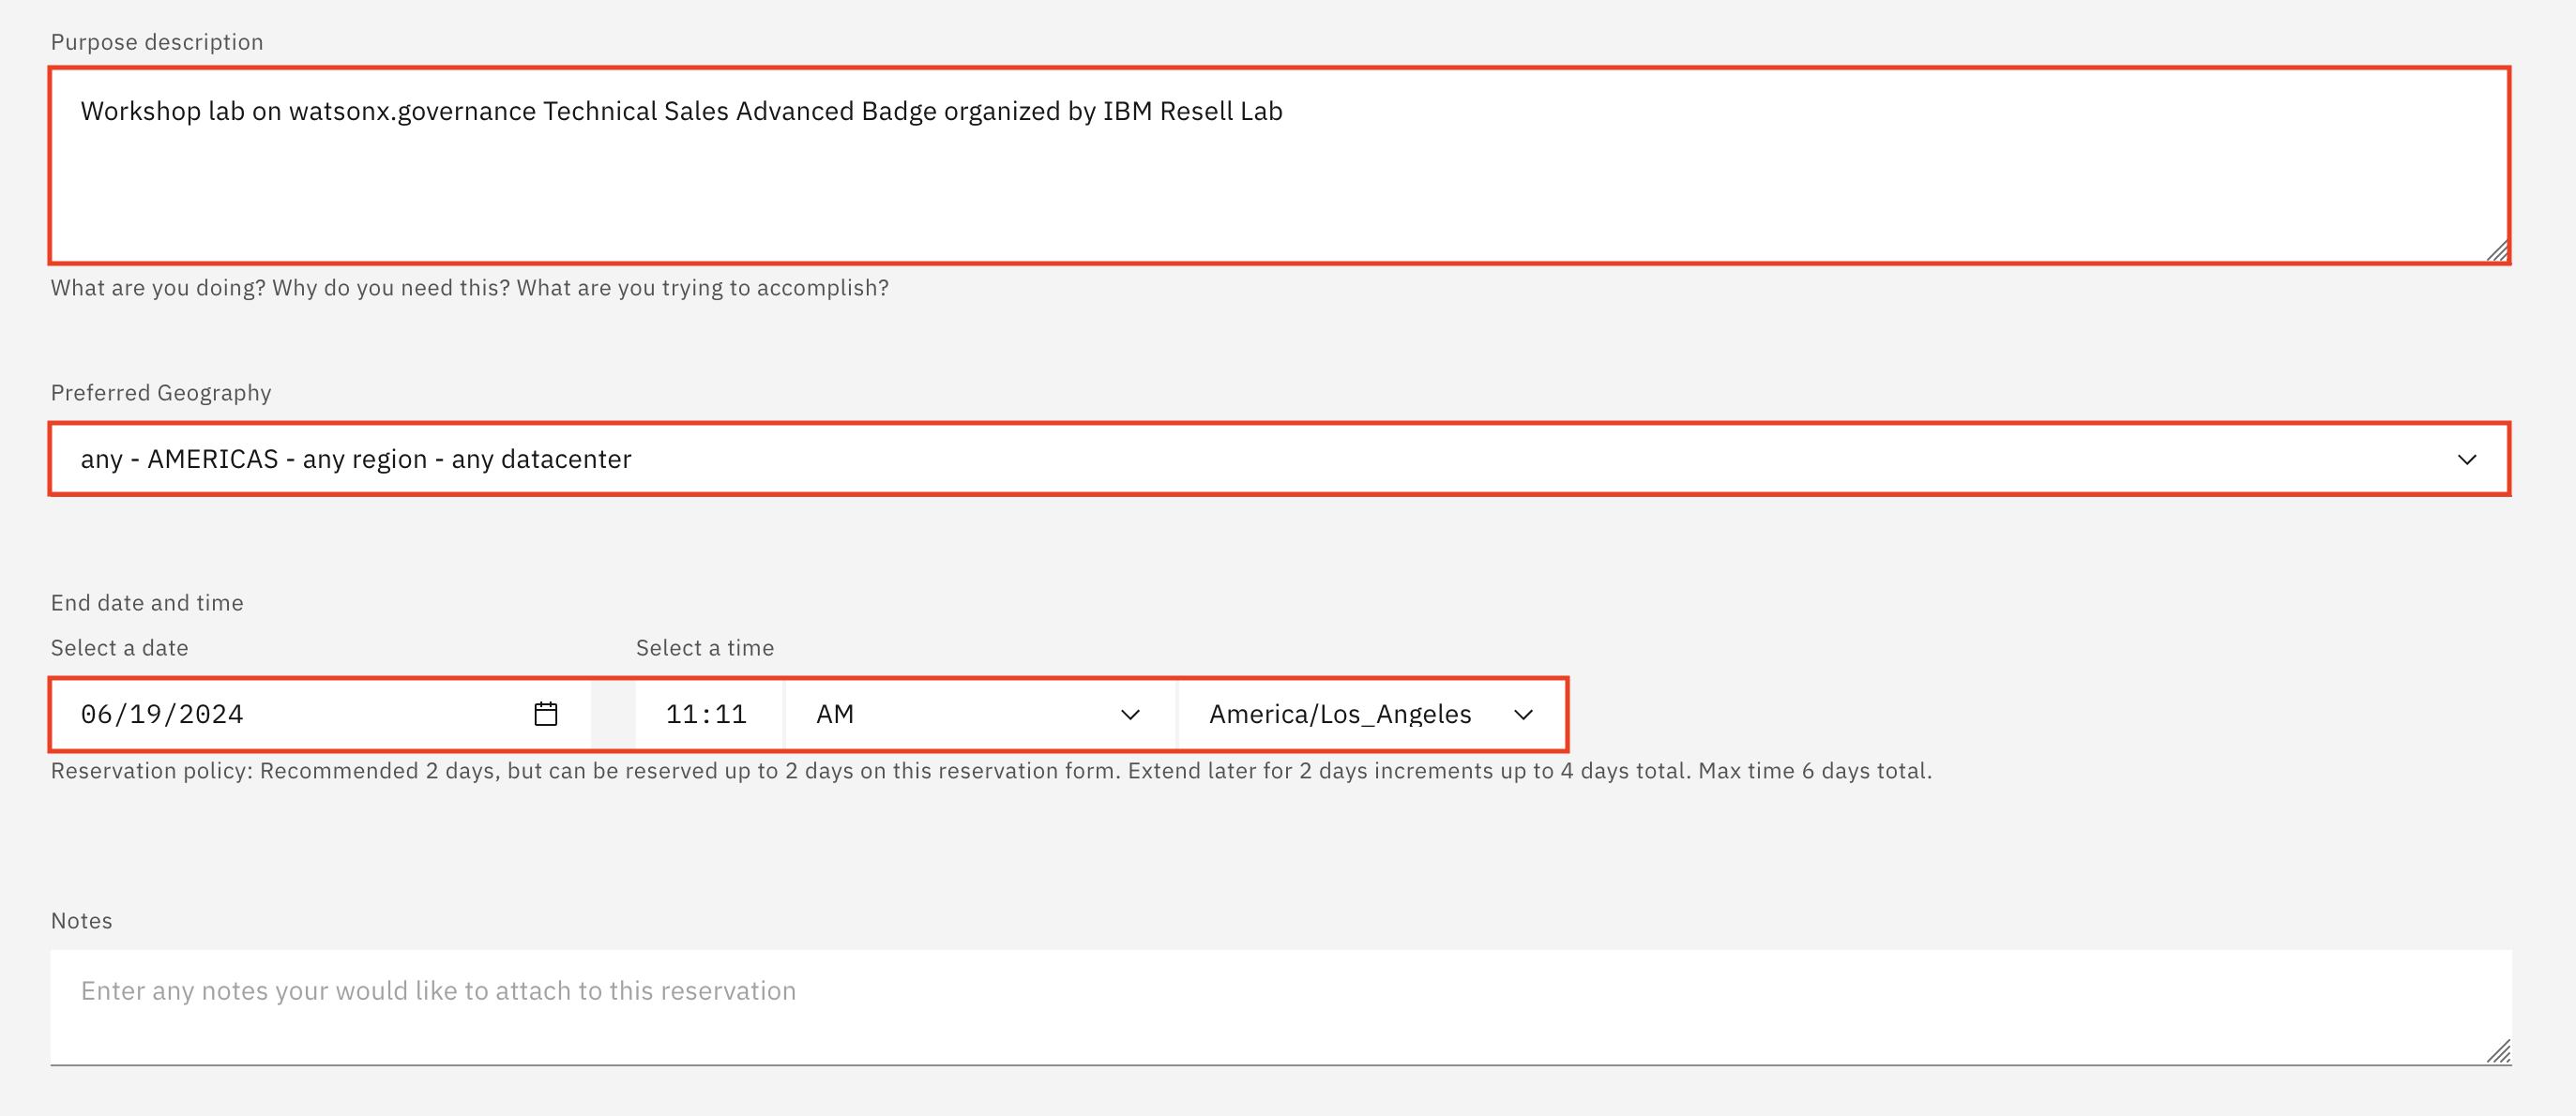
-
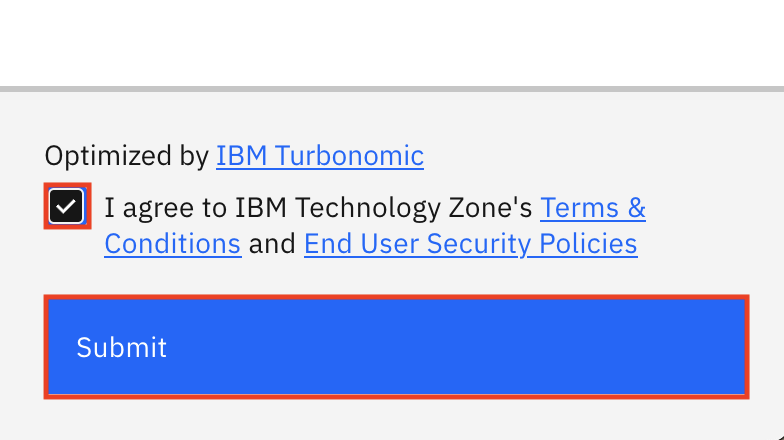
On the right-side panel, follow the links to read the Terms & Conditions and the End User Security Policies documents. Then, select the checkbox to agree to those terms. Finally, click Submit.
A message in the upper-right corner will briefly appear stating that the reservation has been created. You may also be presented with an opportunity to provide feedback on the process. Feel free to share your feedback.
Shortly after, you will receive an email from IBM Technology Zone acknowledging receipt of the request and that the reservation has started provisioning. You will receive another email from IBM Technology Zone confirming provisioning is complete. Provisioning of the environment may take about 2 hours; however, the environment is not ready to use yet. The Cloud Pak Deployer service still needs to run to install the required software, which typically takes an additional 3-4 hours. If provisioning fails, it may be due to a lack of resources in the geography specified. Try again with the same geography or specify a different one.
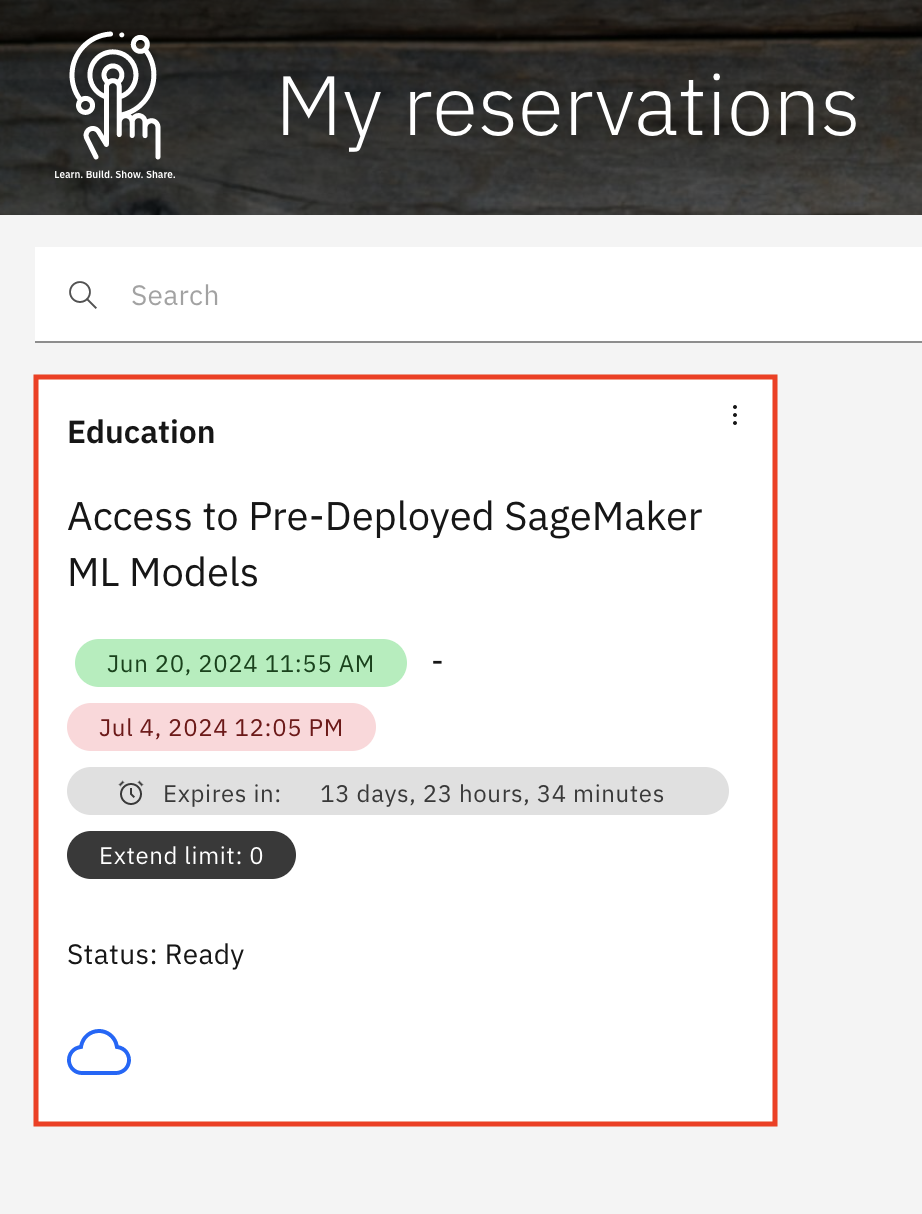
Reservation status is available at https://techzone.ibm.com/my/reservations.
You must now wait until the environment has been provisioned and the Cloud Pak Deployer service installs the required software before moving on to the next section.
Accessing the watsonx.governance Environment
-
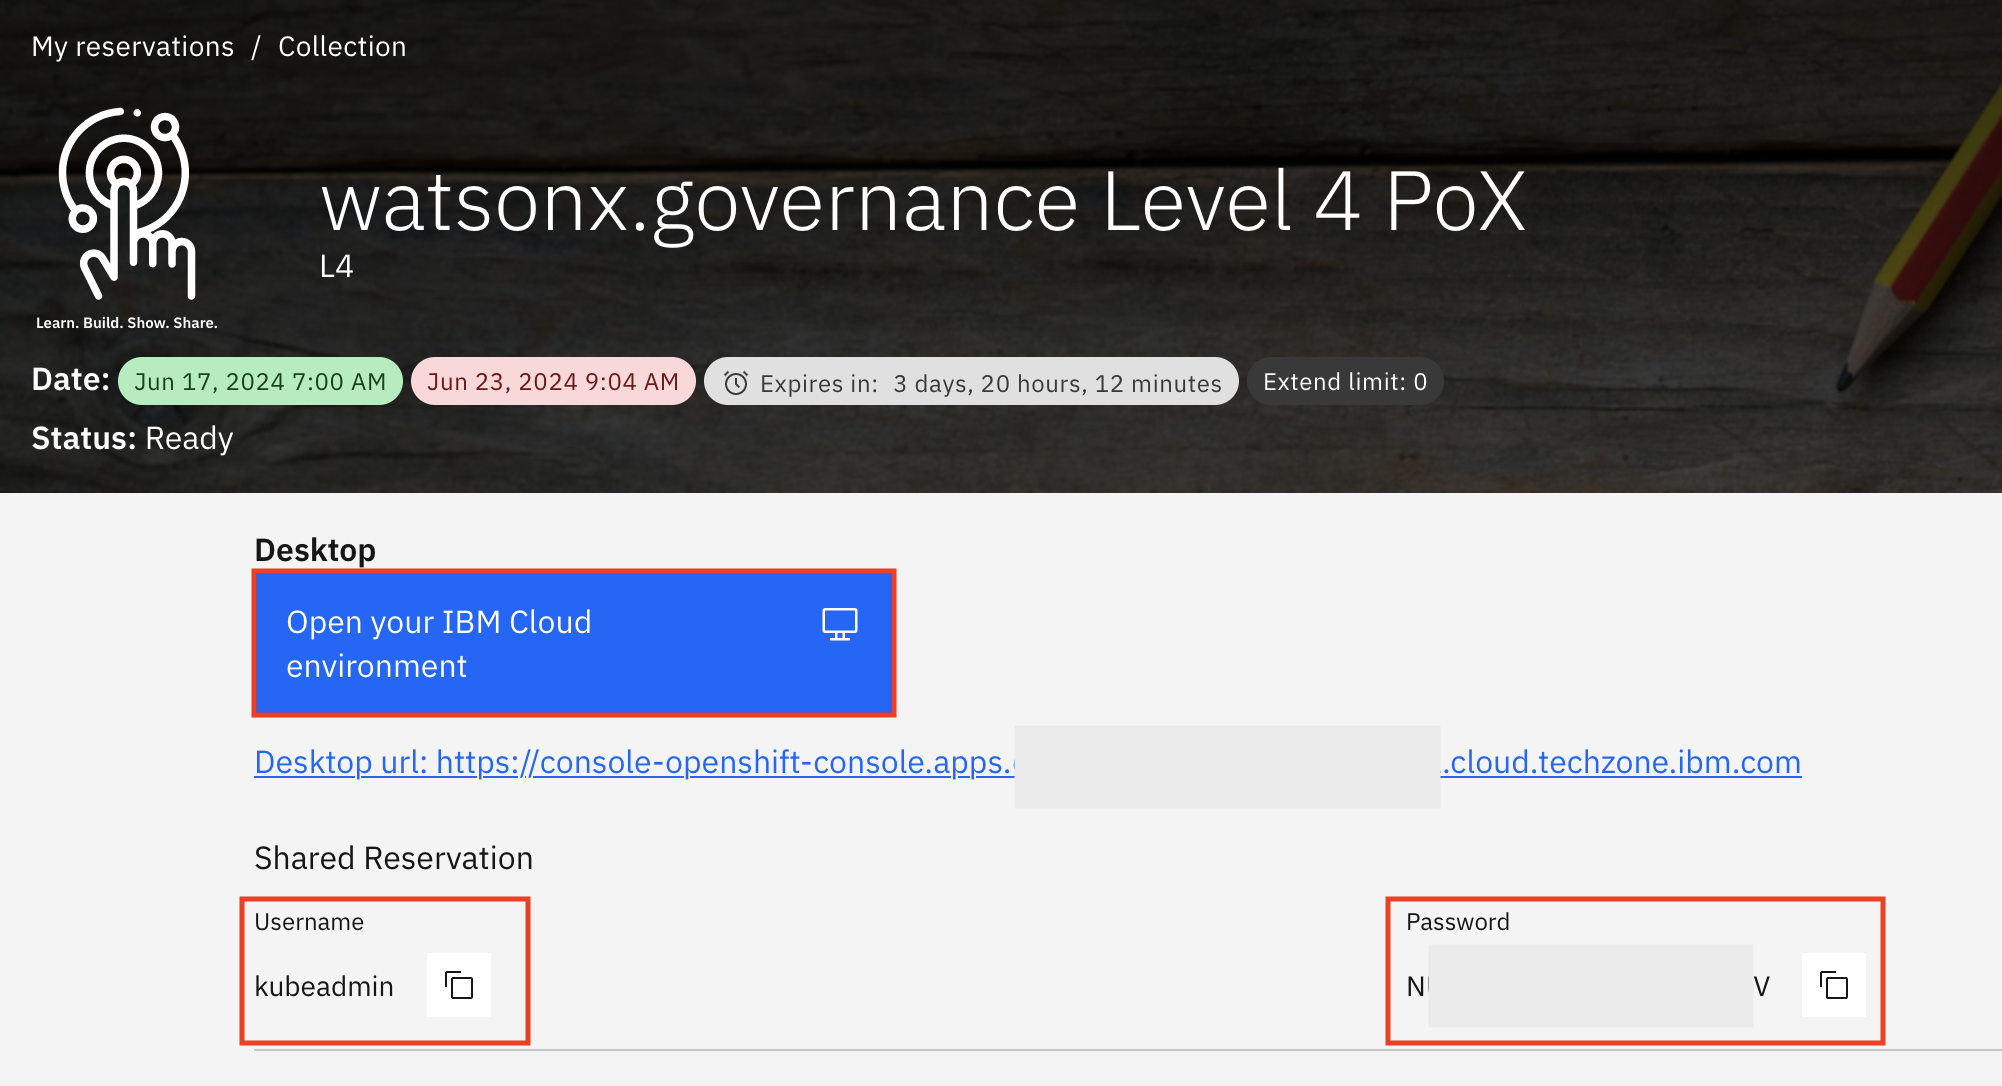
Navigate to your TechZone reservations page.
-
Locate and click on the tile for the environment you reserved in a previous step.

- Copy and paste the reservation Username and Password values from the reservation screen into a text file for later use. Then click on the Open your IBM Cloud environment button. A new tab opens with the Red Hat OpenShift log in form.
-
If given the option to log in with kube:admin credentials or IBMid credentials, click on kube:admin.
-
Using the values you copied in step 3, log in to the OpenShift cluster.
Now that you have successfully logged into your cluster, you will need the credentials to log into Cloud Pak for Data.
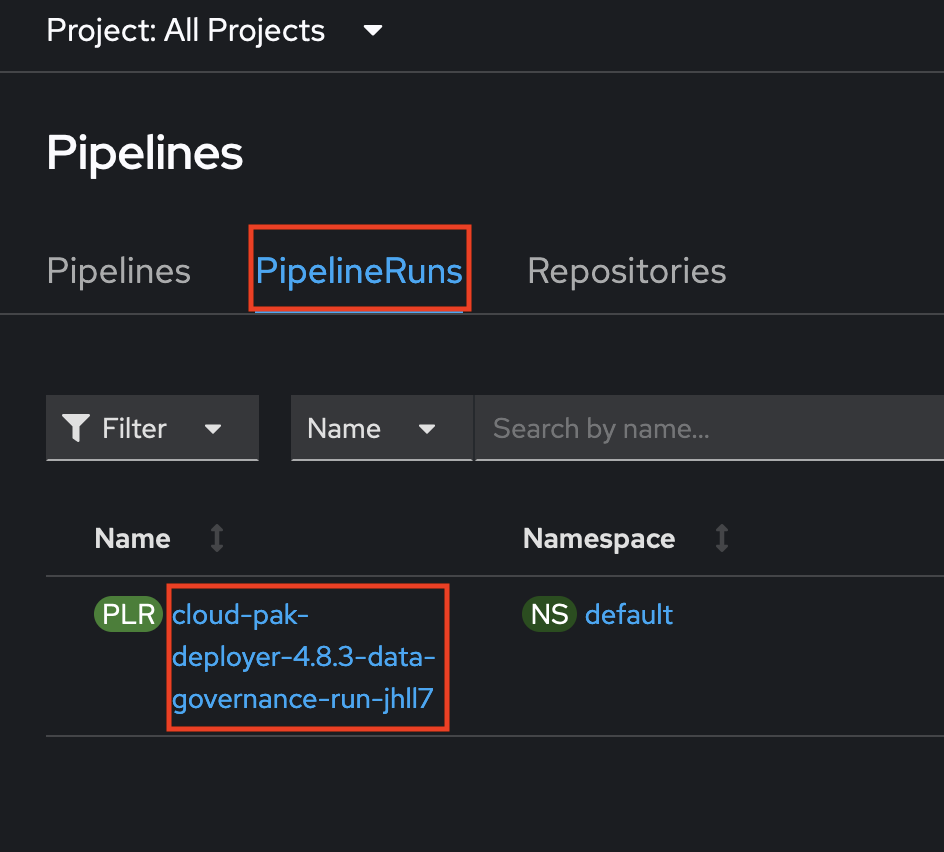
- Click the Pipelines menu on the left side of the screen to expand it and then click the Pipelines item from the list.

- Click the PipelineRuns tab to select it. From the list of pipeline runs, click the link for cloud-pak-deployer-xxx. It will likely be the only item in the list.
Note: if the run is not listed as Completed then you will need to wait for it to finish. This pipeline typically takes 4 hours or longer to run and install all the required software.
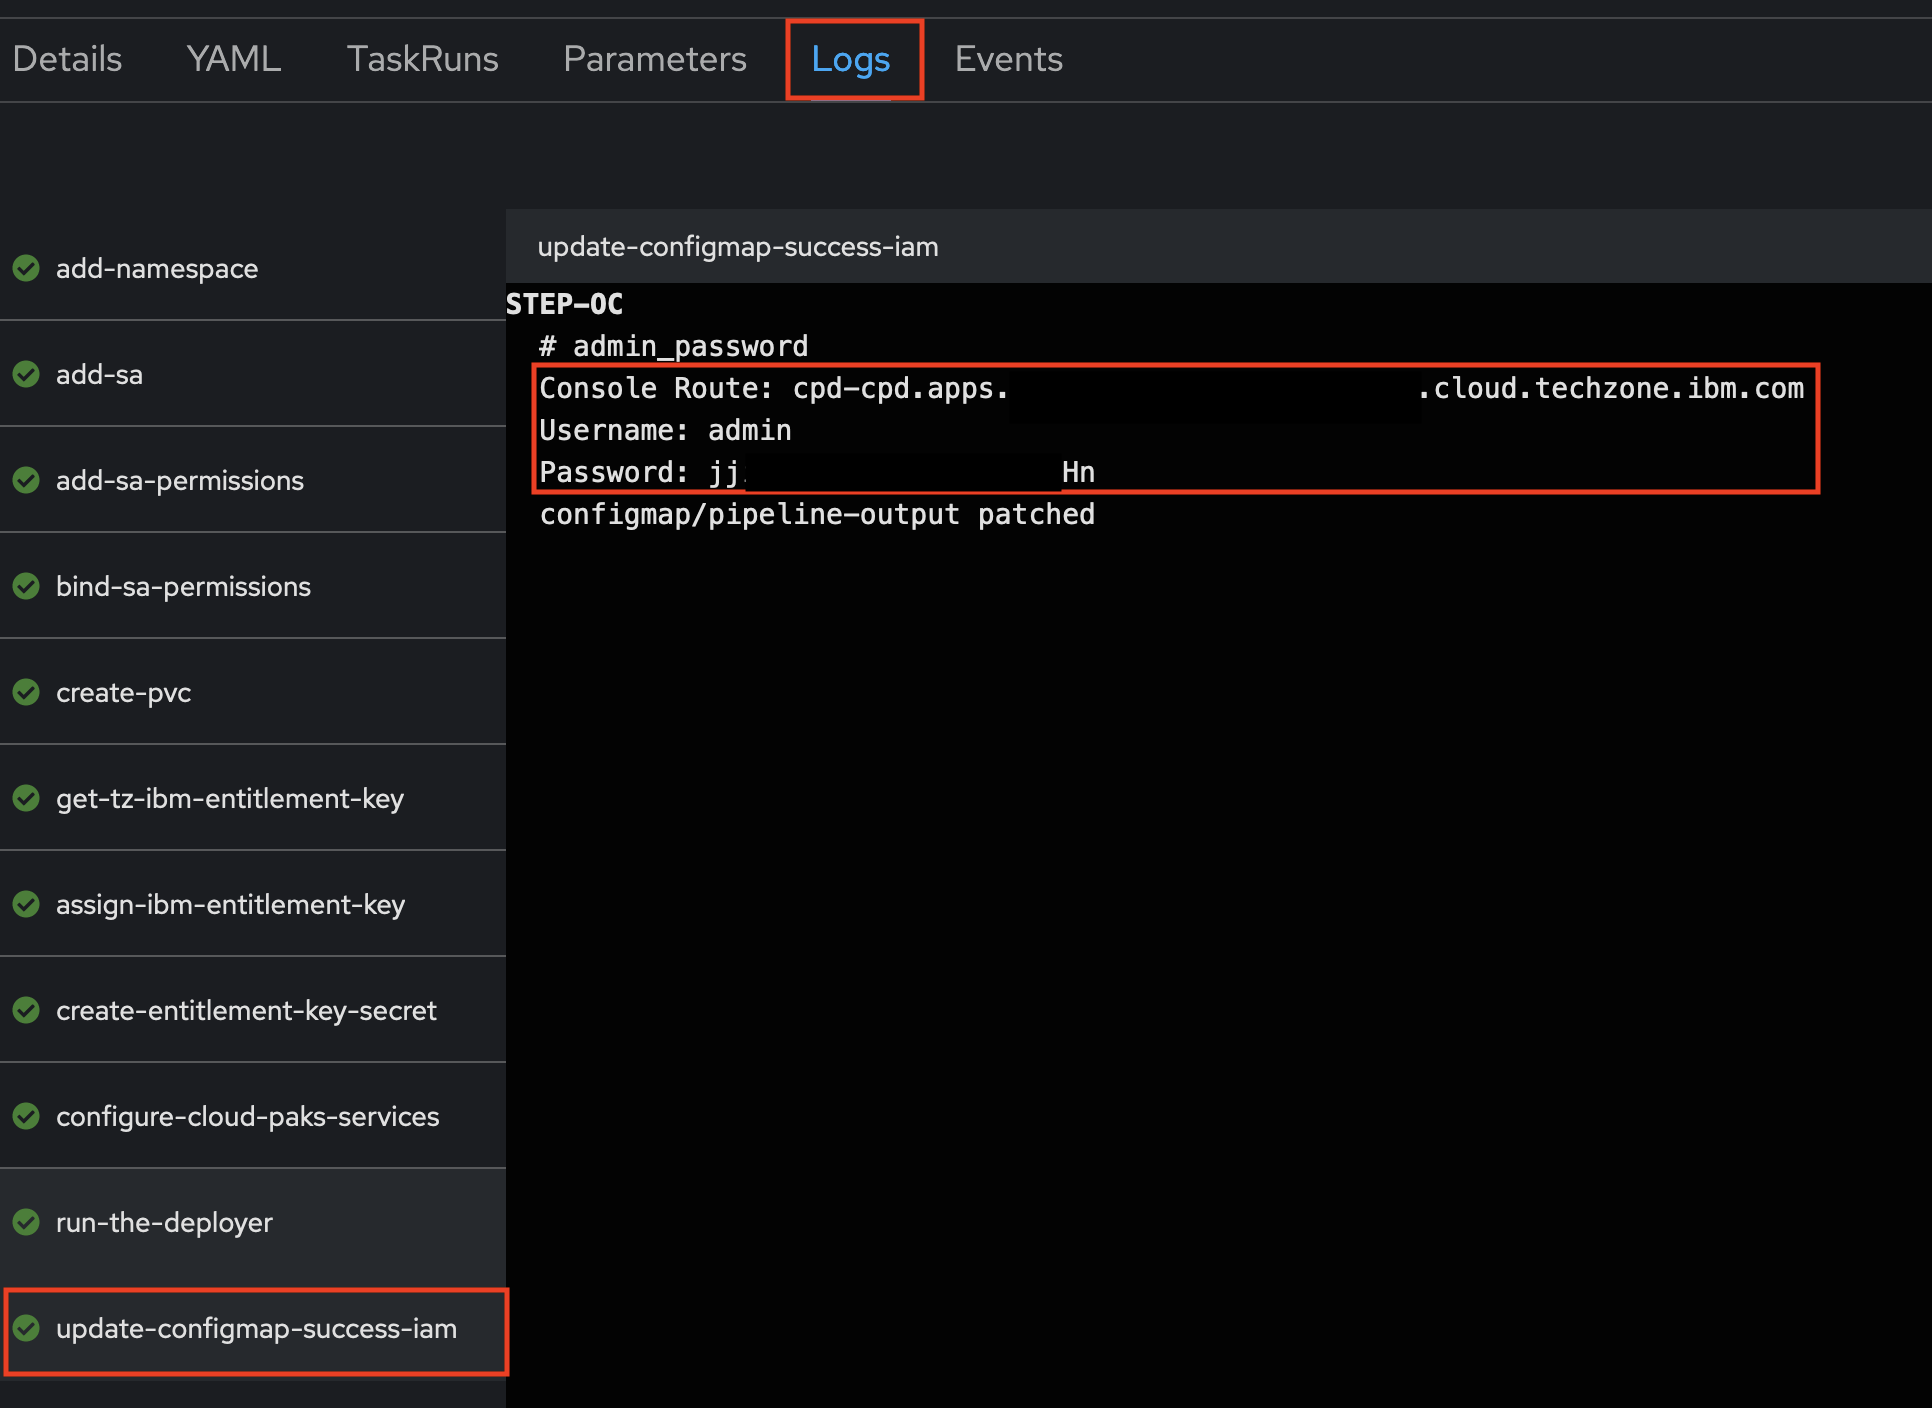
- Click on the Logs tab. Click on the last item in the list on the left, titled update-configmap-success-iam. Note that if this item does not appear in the list, then either the software installation has failed (if the pipeline run is complete) or has not fully finished. Copy and paste the Console Route, Username, and Password information from the log window into a text file. Throughout the remainder of these labs, you will use these credentials whenever you are instructed to log into Cloud Pak for Data or watsonx.
watsonx.ai Environment Setup (optional)
If you are planning on governing and evaluating the watsonx.ai generative model as part of lab 207 and if your Cloud Pak for Data software environment is not equipped with GPUs and doe not have watsonx.ai installed, go through the steps in lab 1 to provision an IBM watsonx.ai/watsonx.governance SaaS environment from TechZone. Once the environment is provisioned, continue to lab 202: Deploy up a watsonx.ai model
Getting Amazon SageMaker credentials (optional)
If you are planning on governing and evaluating the Amazon SageMaker predictive model as part of lab 208, go through the following steps.
TechZone now offers limited access to deployed models on Amazon SageMaker, including a hiring model used in these hands-on labs.
Provision an Amazon SageMaker Environment from TechZone
-
Open the Access to Pre-Deployed SageMaker ML Models in IBM Technology Zone. Sign in with your IBMid and accept any terms and conditions you are presented with.
-
For the reservation type, select the Reserve now radio button.
-
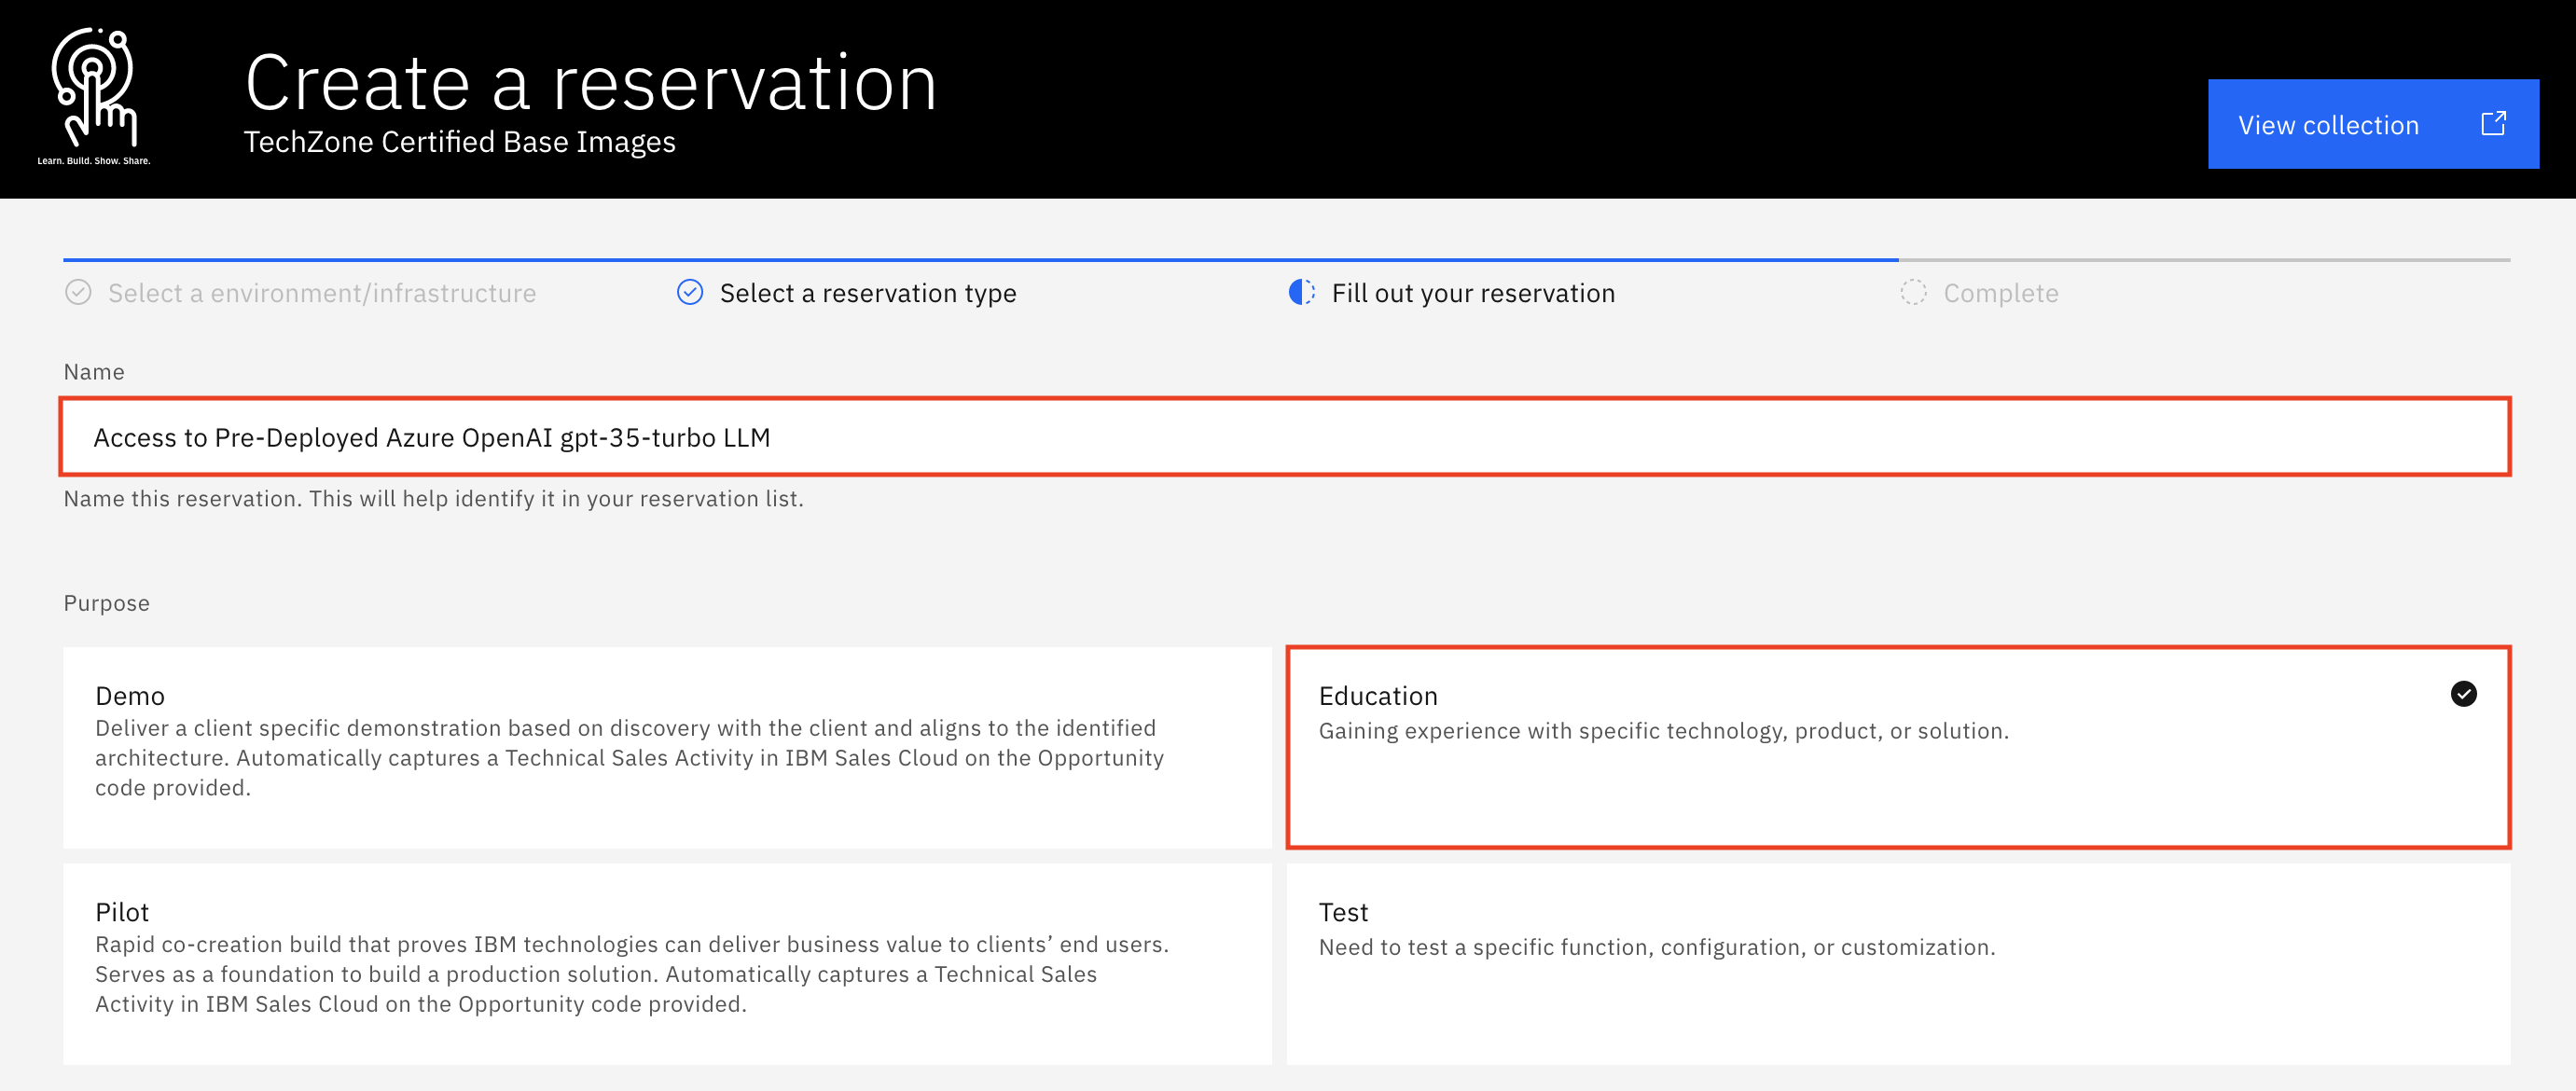
Accept the default for the reservation Name, or provide a name of your choosing. For the Purpose of the reservation, select Education.

-
Fill in the Purpose description box with the reason you are making the reservation (ex.
Workshop lab on watsonx.governance Technical Sales Advanced Badge organized by IBM Resell Lab). Then, scroll further down and select your Preferred geography based on your location (ex. US West 1). Keep the reservation's End date and time (by default it’s two weeks from now; it can’t exceed three weeks).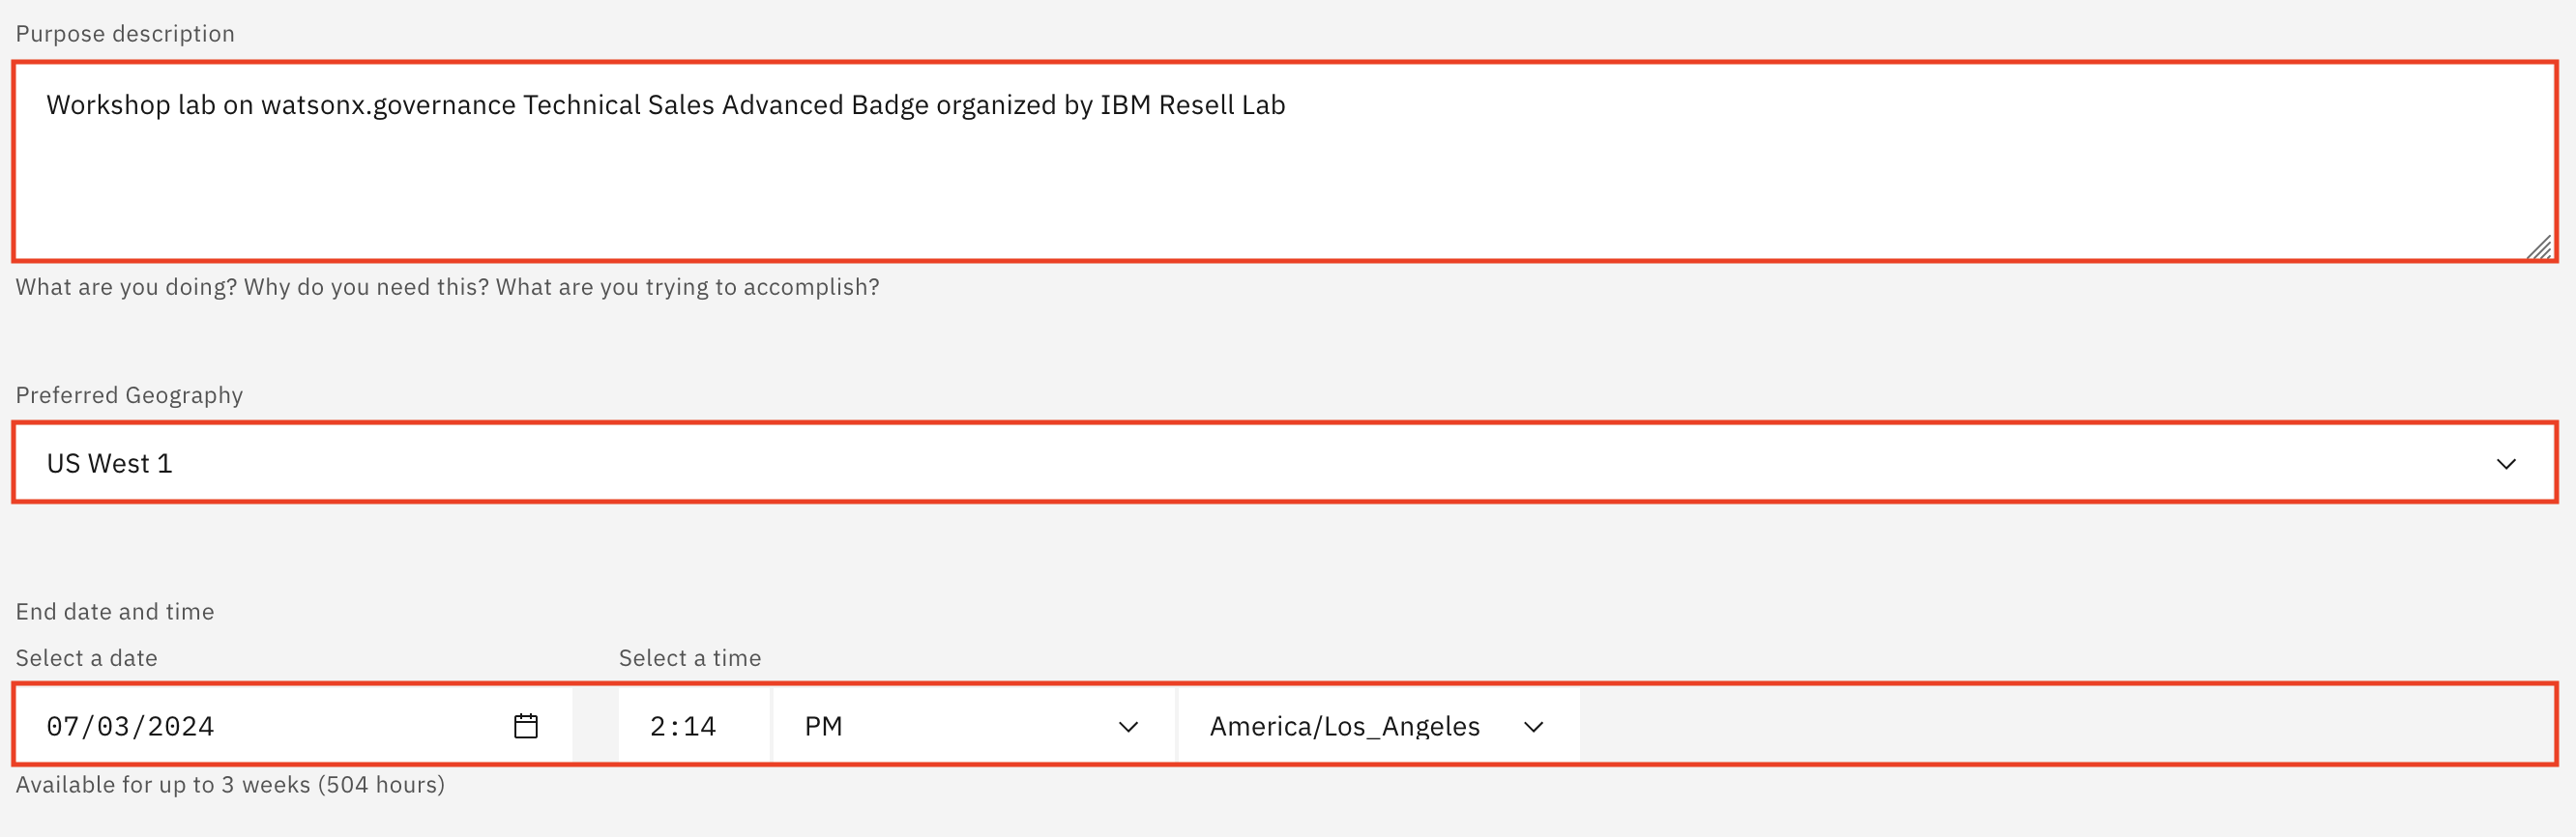
-
On the right-side panel, follow the links to read the Terms & Conditions and the End User Security Policies documents. Then, select the checkbox to agree to those terms. Finally, click Submit.
A message in the upper-right corner will briefly appear stating that the reservation has been created. You may also be presented with an opportunity to provide feedback on the process. Feel free to share your feedback.
Shortly after, you will receive an email from IBM Technology Zone acknowledging receipt of the request and that the reservation has started provisioning. You will receive another email from IBM Technology Zone confirming provisioning is complete. Provisioning of the environment may take about 10-15 minutes.
Reservation status is available at https://techzone.ibm.com/my/reservations.
Getting Amazon SageMaker credentials
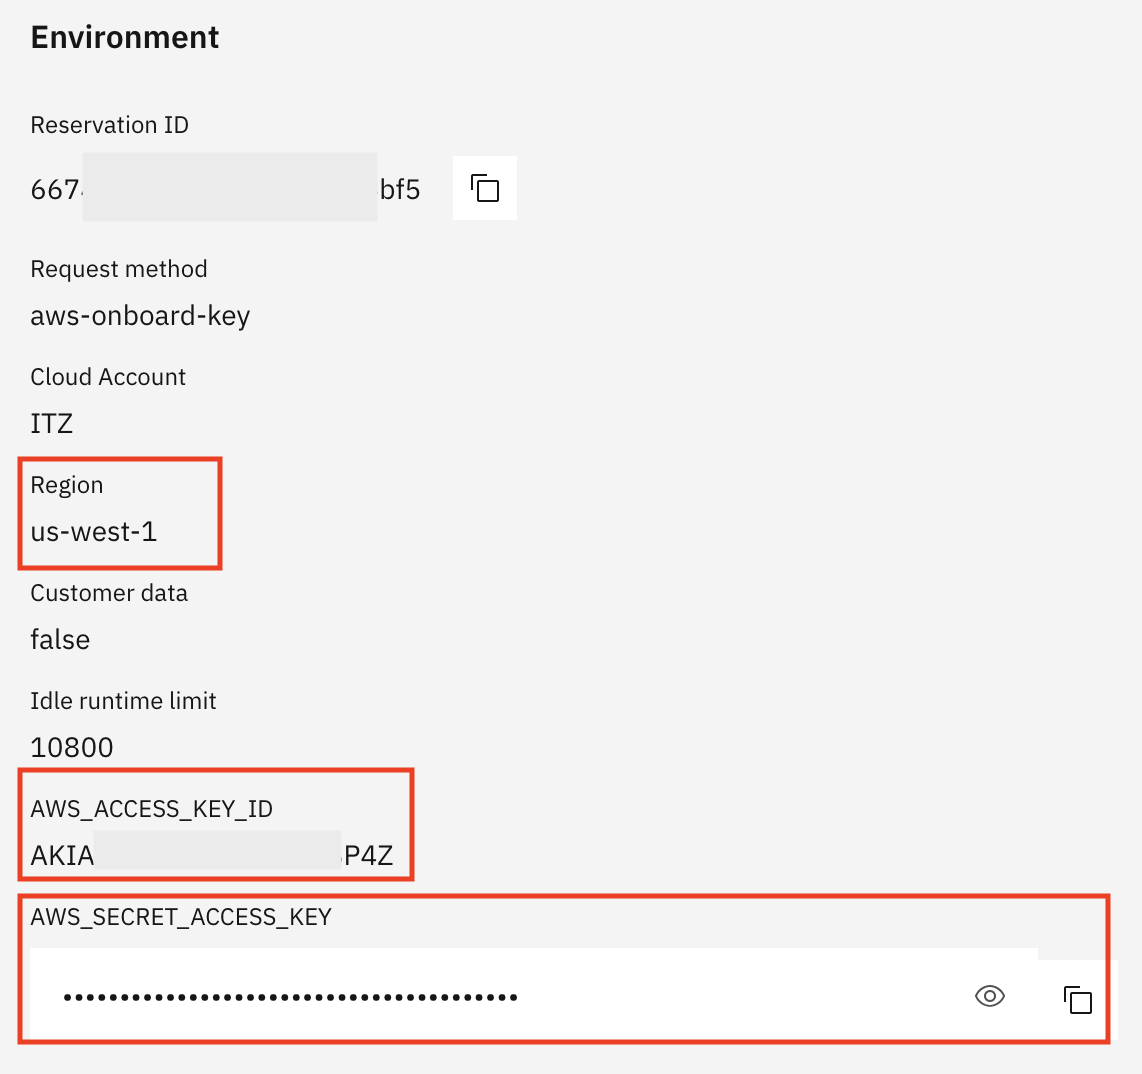
- When you receive the email from IBM Technology Zone confirming provisioning is complete, click on the tile for the reservation from your TechZone reservations page. The reservation information screen opens.
- Scroll down to the Environment section. Copy and past the values for Region, AWS_ACCESS_KEY_ID and AWS_SECRET_KEY_ID into a text file for later use in the labs.
Getting Microsoft Azure credentials (optional)
If you are planning on governing and evaluating the Microsoft Azure OpenAI generative model as part of lab 207, go through the following steps.
TechZone now offers limited access to deployed models on Microsoft Azure.
Provision a Microsoft Azure Environment from TechZone
-
Open the Access to Pre-Deployed Azure OpenAI gpt-35-turbo LLM in IBM Technology Zone. Sign in with your IBMid and accept any terms and conditions you are presented with.
-
For the reservation type, select the Reserve now radio button.
-
Accept the default for the reservation Name, or provide a name of your choosing. For the Purpose of the reservation, select Education.
-
Fill in the Purpose description box with the reason you are making the reservation (ex.
Workshop lab on watsonx.governance Technical Sales Advanced Badge organized by IBM Resell Lab). Then, scroll further down and select your Preferred geography based on your location (ex. East US 2). Keep the reservation's End date and time (by default it’s two weeks from now; it can’t exceed three weeks).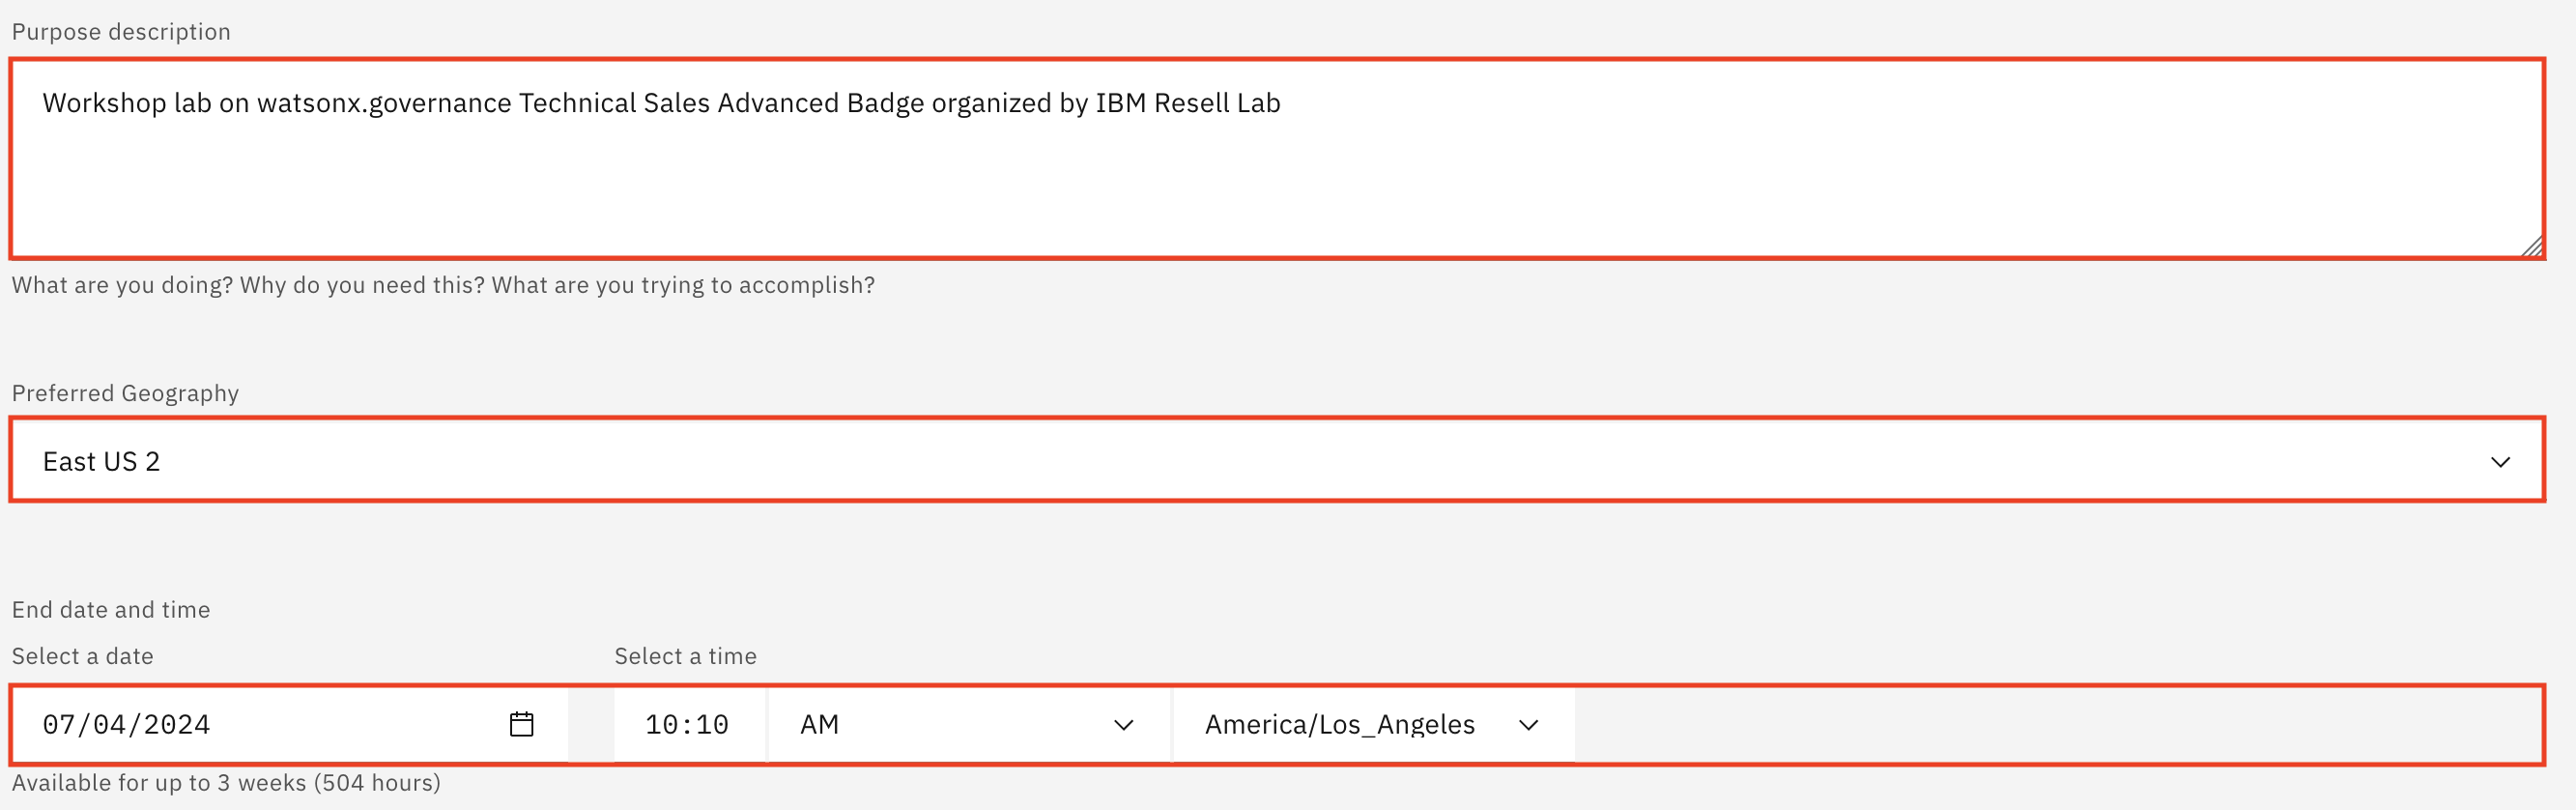
-
On the right-side panel, follow the links to read the Terms & Conditions and the End User Security Policies documents. Then, select the checkbox to agree to those terms. Finally, click Submit.
A message in the upper-right corner will briefly appear stating that the reservation has been created. You may also be presented with an opportunity to provide feedback on the process. Feel free to share your feedback.
Shortly after, you will receive an email from IBM Technology Zone acknowledging receipt of the request and that the reservation has started provisioning. You will receive two more emails when the provisioning is complete: One form IBM Technology Zone confirming provisioning is complete and another from Microsoft inviting you to join the Microsoft Azure account associated with the environment. Provisioning of the environment may take about 20 minutes.
Reservation status is available at https://techzone.ibm.com/my/reservations.
Getting Microsoft Azure credentials
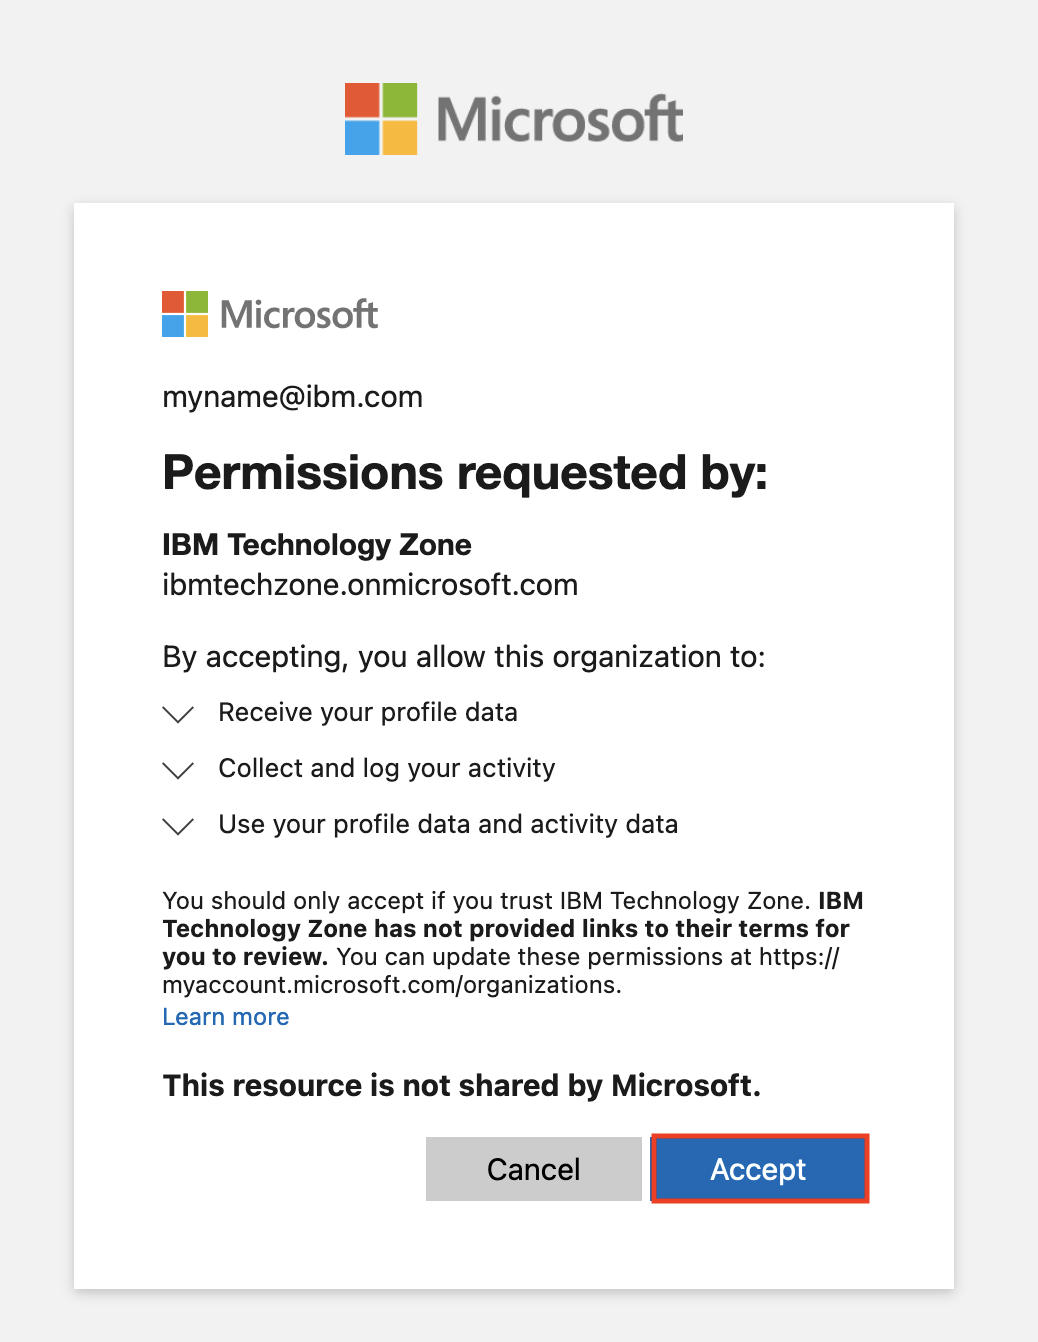
- When you receive the email from Microsoft inviting you to join a Microsoft Azure account, open the email and press Accept invitation.

- A new window will open up with a permissions request, press Accept.
You will then be brought to the Microsoft Azure portal. If a quick start guide pops up, you can press the "X" to close it in the top right corner. You now have acess to Microsoft Azure.
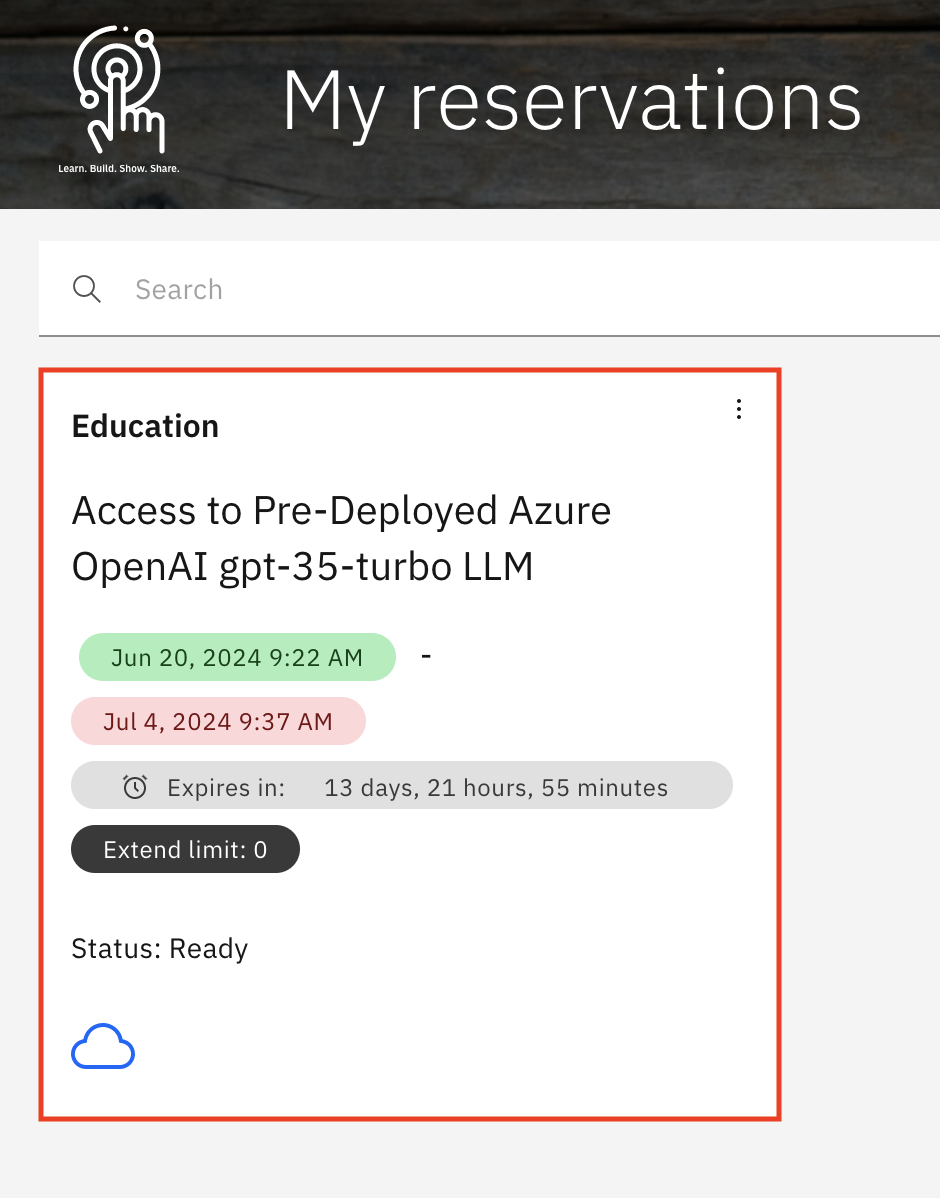
- When you receive the email from IBM Technology Zone confirming provisioning is complete, click on the tile for the reservation from your TechZone reservations page. The reservation information screen opens.
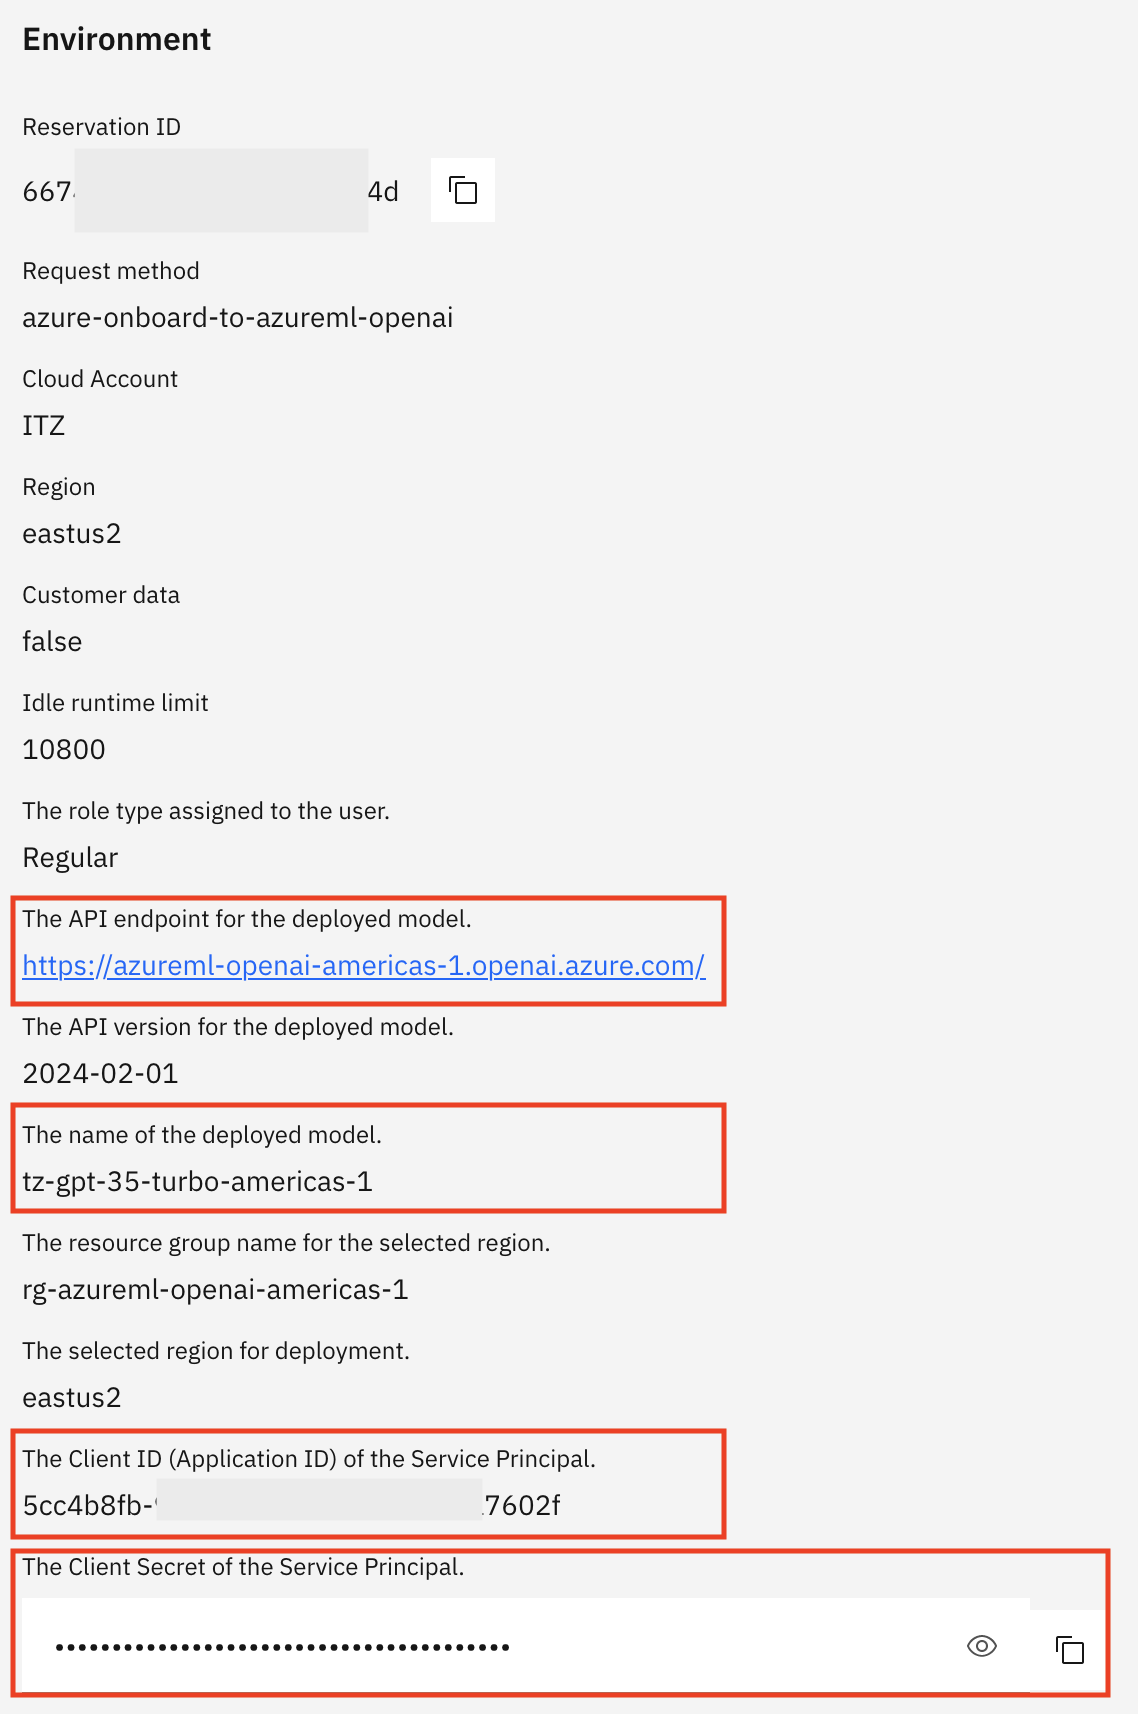
- Scroll down to the Environment section. Copy and paste the below values to a text file for later use in a Jupyter notebook in the labs:
- The API endpoint for the deployed model - It will be the AZURE_API_ENDPOINT value in the Jupyter notebook.
- The name of the deployed model - It will be the AZURE_DEPLOYMENT_NAME value in the Jupyter notebook.
- The Client ID (Application ID) of the Service Principal - It will be the AZURE_CLIENT_ID value in the Jupyter notebook.
- The Client Secret of the Service Principal - It will be the AZURE_CLIENT_SECRET value in the Jupyter notebook.
Congratulations, you've reached the end of lab 201.
If you followed the watsonx.ai Environment Setup (optional) steps, continue to lab 202
To start the L4 Labs, continue to lab 203